Automatic Document Feeder
The automatic document feeder (B813162) allows you to load and scan documents of up to 30 pages.
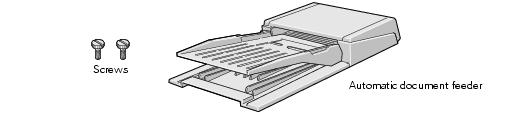
Unpacking the Automatic Document Feeder
When you unpack your automatic document feeder, make sure you have the parts shown below. If any items are missing or damaged, contact your EPSON dealer, or call EPSON at (562) 276-4382 (in the United States) or (905) 709-3839 (in Canada).
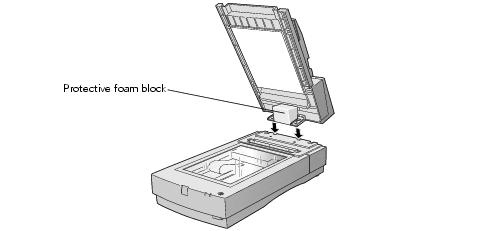
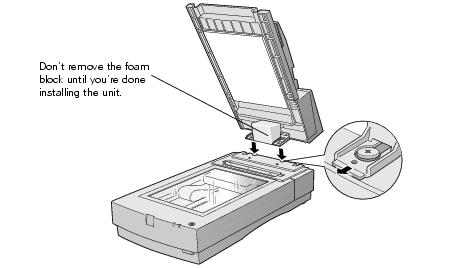
Caution: Don't remove the protective foam block from beneath the ADF until you've finished installing it.
Installing the Automatic Document Feeder
Caution: Because the automatic document feeder is heavy, you may want to have someone help you with this procedure.
- Make sure your scanner is turned off.
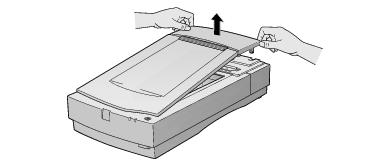
- Remove your scanner's document cover by grasping the back of the cover as shown and easing it straight up.
- Make sure the document table is clean and dust free.
- Position the automatic document feeder's mounting slots over the two mounting screws located at the back of the scanner.
- Slide the automatic document feeder forward slightly until the two holes in front of these slots are aligned with the screw holes at the back of the scanner.
- Insert the two installation screws that came with the automatic document feeder into the screw holes, then tighten the screws with a coin.
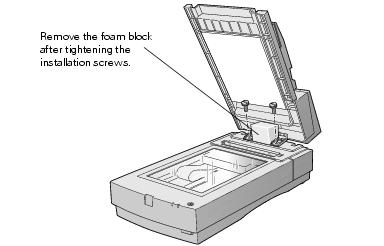
- Remove the protective foam block from the automatic document feeder's mounting hardware, and then gently close the automatic document feeder.
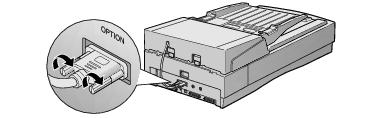
- Attach the ADF cable to the scanner's OPTION connector. Tighten the screws.
- Close the ADF.
Loading Paper in the Automatic Document Feeder
Your automatic document feeder can load up to 30 sheets of the following
paper sizes: Letter, Legal, Checks (3.3 ´ 5 inches), A4 (8.27 ´ 11.7 inches), and B5 (7.17 ´ 10.1 inches).
Follow these steps to load paper:
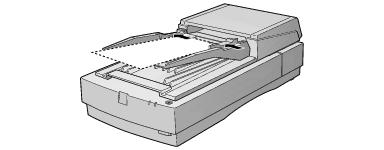
- Slide the automatic document feeder's left edge guide all the way to the left.
- Insert your document face up in the ADF.
Note: Don't push the paper into the feed path or the paper may jam.
- Move the right edge guide so it touches the right edge of your paper.
- Scan your document. If you're using EPSON Scan, follow these guidelines:
- Select either Office Mode or Professional Mode in the Mode box.
- Select ADF as the Document Source.
- If you want to scan only part of the document page, load the first page only. Click the Preview button. The first page is ejected. Adjust the marquee in the Preview area, then load your entire document. When you click Scan, the scanner scans the area defined by the marquee on each page.
Note: You can still load documents manually, if you want. Just lift the automatic document feeder and place the first sheet of your document face down on the document table. If you scan documents individually on the document table, select Document Table as the Document Source in EPSON Scan. Be sure to close the automatic document feeder before scanning. If you open it while scanning, you'll get an error.
Fixing Paper Jams
If a paper jam occurs, follow these steps to clear it:
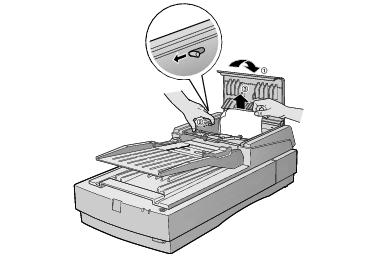
- Open the ADF cover to determine where the paper jam occurred.
- Pull forward on the jam-release lever, and slowly pull the jammed paper out of the feeder mechanism. Be careful not to tear the paper.
- After removing the jammed paper, close the document feeder cover. Make sure the ERROR light is off and the READY light isn't flashing before trying to scan.
- If the error isn't cleared, turn your scanner off and then on again. Also, close EPSON Scan. Don't restart EPSON Scan until the green READY light stops flashing.
Note: If you attempt to preview or scan before the scanner is ready, EPSON Scan may stop responding. If this happens, restart your computer.