 |
|
|||
 |
||||
Starting Scan Using the Control Panel
|
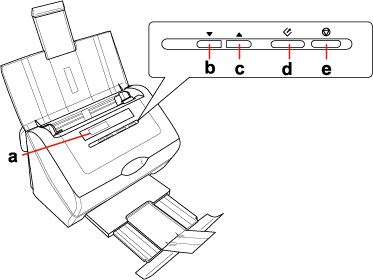
a.
|
LCD screen
|
|
b.
|
 Down arrow button Down arrow button |
|
c.
|
 Up arrow button Up arrow button |
|
d.
|
 Start button Start button |
|
e.
|
 Cancel button Cancel button |
You can start scanning by selecting one of the following functions from the LCD screen menu list. The scan starts with the scan action you assigned in advance. To assign a program to the LCD screen menu, see Assigning a Program to LCD Screen Menu List for instructions.
 Note for Mac OS X users:
|
Only the number of the action is displayed on the LCD screen. To confirm the action, check the Epson Event Manager window. See Assigning a Project Program in Epson Event Manager to a LCD Screen Menu List for instructions.
|
B&W PDF-Simplex (Mac OS X) or Scan to PDF (B&W) (Windows) lets you scan Black & White images. The scanner scans the documents and saves them as one PDF file on your computer. See Scanning to a PDF File for instructions.
Color PDF-Simplex (Mac OS X) or Scan to PDF (Color) (Windows) lets you scan Color images. The scanner scans the documents and saves them as one PDF file on your computer. See Scanning to a PDF File for instructions.
B&W PDF-Duplex (Mac OS X only) lets you scan Black & White images. The scanner scans both sides of the documents and saves them as one PDF file on your computer. See Scanning to a PDF File for instructions.
Color Jpeg to E-mail function (Mac OS X only) lets you scan a color image and attach the scanned image file to an E-mail message. See Scanning Directly to an E-mail for instructions.
Scan to PDF (Gray) (Windows) lets you scan grayscale images. The scanner scans the documents and saves them as one PDF file on your computer. See Scanning to a PDF File for instructions.
Scan to PDF (Auto) (Windows) detects the document source automatically, scans both sides of documents loaded in the ADF, and saves them as one PDF file on your computer. See Scanning to a PDF File for instructions.