Designing Labels With iLabel
Follow the instruction in these sections to create your labels.
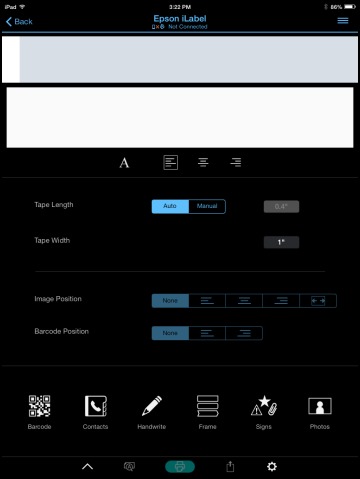
Creating a Label in iLabel
You can create a label or ribbon on your
mobile device.
-
Tap Original Label.
You see a screen like this:
-
To change the font and size, tap the
 button, then select the font, weight, and size.
-
To save your label, tap the
 button and tap Save.
-
When you are ready to print, tap the
 button.
Previewing the Label
You can preview how your label looks prior
to printing it.
-
When you're satisfied with your label design, tap the
 button.
You see a screen like this:
button.
You see a screen like this:
-
Do any of the following:
- Tap the
 button to turn on the front camera to preview the label.
 - Tap the
 button to change the text and background color of the label.
 - Tap the button to print the label.
- Tap the
 button to set the zoom to 100%.
 - Tap the
 button to return to the previous screen.
- Tap the
Selecting a Layout in iLabel
You can choose from a variety of layouts,
including text on multiple lines, text with barcodes and/or graphics, and tables.
-
Tap the button, then tap Layout Settings.
You see a screen like this:

-
Tap the button.
Using the Label Catalog in iLabel
You can choose from a variety of
ready-to-use labels.
-
Go to the Shortcut screen and tap Label Catalog.
You see a screen like this:

-
Select a label.
You see a screen like this:
-
Do one of the following:
- Tap the button to print the label
- Tap Edit to edit the label
- Tap the