PictureMate Dash can make backup copies of the photos on your camera’s memory card by saving them to a USB-connected external drive, such as a CD drive, Zip drive, or flash memory drive. See Saving Photos to an External Device.
With PictureMate Zoom, you can also save photos to its built-in CD drive. See Saving Photos to the Built-in CD Burner (PictureMate Zoom Only).
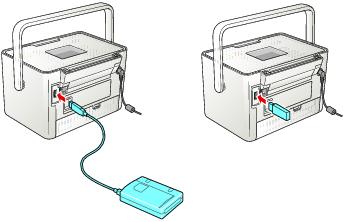
You can connect a USB external storage device directly to PictureMate and save photos on your memory card to one of these:
|
•
|
|
•
|
Except for the flash memory drive, you can save photos to several disks if you have more photos than can fit on a single one.
Note: To save your photos on your computer, see Copying Photos to and From Your Computer.
Epson cannot guarantee the compatibility of any drives.
Epson cannot guarantee the compatibility of any drives.
You can also have PictureMate automatically print an index of your saved photos. An index provides small thumbnail images—up to 56 per sheet—of all the photos you’ve copied.
|
3.
|
Connect your CD or Zip drive’s USB cable, or plug in your flash memory drive, to the
|
|
5.
|
If you want to copy all the photos on your memory card, skip to the next step. To copy individual photos, select the ones you want to copy. (Press
|
|
6.
|
|
7.
|
|
9.
|
When you see a message asking if you want to print an index of your copied photos, select Print Backup Index or Do Not Print. If necessary, make sure paper is loaded. The sheet automatically prints once the backup is complete.
|
|
10.
|
Follow the instructions on the screen to complete the backup. Each time you copy photos to the same disk or drive, PictureMate creates a new numbered folder (001, 002, etc.) where it stores your photos.
|
Caution: Avoid handling the printer during backup. Also, do not remove the memory card or external drive while photos are being saved, or you may lose photos on your card or drive. If you need to stop the backup, press  Stop/Clear.
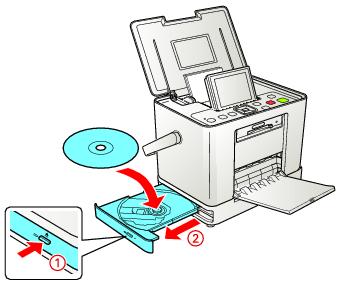
Saving Photos to the Built-in CD Burner (PictureMate Zoom Only)
You can save photos to a CD using the built-in CD drive in PictureMate Zoom. Use only 12-cm CDs and select a quality brand. The following types are compatible with this printer:
|
•
|
Note: PictureMate supports both 650MB (74 min.) and 700MB (80 min.) capacities for each type of CD.
You can also have PictureMate automatically print an index of your saved photos. An index provides small thumbnail images—up to 56 per sheet—of all the photos you’ve copied.
Note: Saving to a CD takes extra energy. If you’re using the optional battery, make sure it’s fully charged, or connect the AC power adapter.
|
4.
|
Gently push the tray back in. The light on the front of the tray flashes, indicating that the CD is being read.
|
To copy individual photos, select the ones you want to copy. (Press  or
or  to view your photos. Then press OK when you see a photo you want to copy.)
|
6.
|
|
7.
|
|
9.
|
When you see a message asking if you want to print an index of your copied photos, select Print Backup Index or Do Not Print. If necessary, make sure paper is loaded. The sheet automatically prints once the backup is complete.
|
|
10.
|
Follow the instructions on the screen to complete the backup. The CD is ejected automatically when the backup is finished.
|
Each time you copy photos to the same CD, PictureMate creates a new numbered folder (001, 002, etc.) where it stores your photos.
If another CD is required to save all the photos, you will see a message on the screen. Insert another CD and press OK.
Caution: Avoid handling the printer during backup. Also, do not remove the memory card or CD while photos are being saved, or you may lose photos on your card or CD.