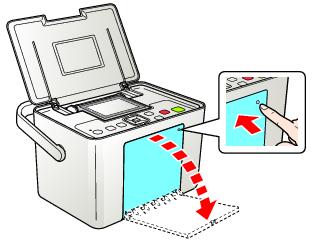
PictureMate lets you print photos quickly and easily without a computer. Just insert your digital camera’s memory card, choose settings from the menu, and press  Print.
Note: If you have a camera that supports PictBridge® or USB DIRECT-PRINT™ printing, you can connect the camera directly to PictureMate and control printing from your camera. See Printing From a Digital Camera.
|
•
|
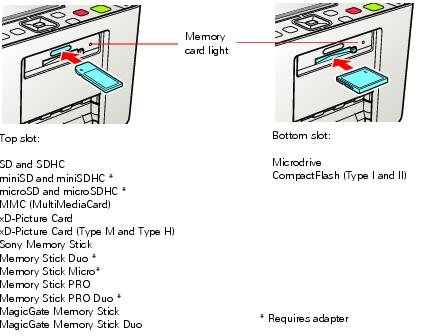
miniSD (requires adapter)
|
|
•
|
Memory Stick Duo (requires adapter)
|
Note: PictureMate supports Exif Print image enhancement features. See your camera manual to see if this feature is included on your camera.
PictureMate does not support progressive-scan JPEG or RAW images.
PictureMate does not support progressive-scan JPEG or RAW images.
|
1.
|
Press the
|
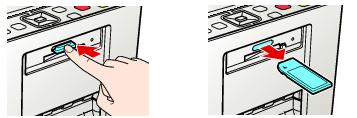
Caution: Do not remove a card while the memory card light is flashing or you may lose photos on your card.
Caution: Do not remove a card while the memory card light is flashing or you may lose photos on your card.
To remove a card from the top slot, push in the card and release it, then pull it straight out of the slot.
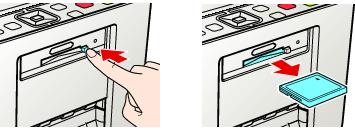
To remove a card from the bottom slot, push in and release the card release button so it pops out. Then push in the button again to eject your card and pull it straight out of the slot.
Note: If you see a Paper out message while printing, load more paper and press OK to continue printing. To cancel printing, press  Stop/Clear.
Note: You can adjust the angle of the photo viewer screen by raising or lowering the top of the screen. Be sure to lower the screen before closing the printer lid.
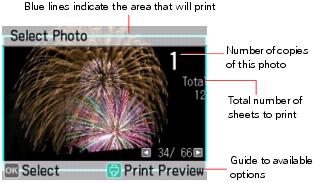
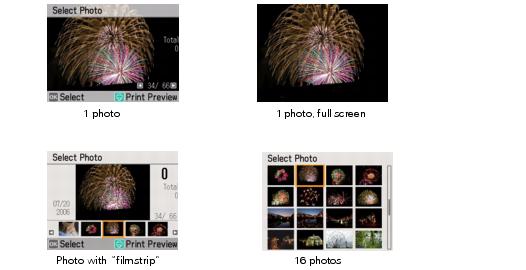
After inserting a memory card, you can change how many photos are displayed on the photo viewer screen. Press the  Display button to switch between one photo displayed with or without text, one photo with a “filmstrip” of 5 additional photos, or 16 photos, as shown:
|
2.
|
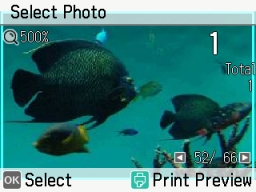
When you see a photo you want, press OK to select it for printing. You see the number 1 on the photo, indicating that one copy will be printed:
|
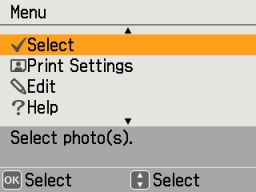
Note: If you want to change the layout or edit your photo, press  Menu. See Doing More With Your Photos for details.
|
3.
|
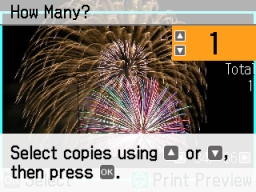
To print more than one copy, press
|
|
4.
|
To select more photos, press
|
|
5.
|
The preview screen shows the layout, cropping, and other settings you have chosen, for example:

|
7.
|
Make sure you have enough paper loaded, then press
|
You can print all the photos on your camera’s memory card, and select the number of copies to print of each photo.
|
1.
|
|
2.
|
|
3.
|
If you want more than one copy of each picture, press
|
|
4.
|
|
6.
|
If you want to change the layout or edit your photos, press
|
|
7.
|
Make sure you have enough paper loaded, then press
|
Note: If you are printing more than 20 photos, you will need to reload paper while printing. Load a maximum of 20 sheets at a time. When you see a message that paper is out, load more paper and press OK to continue printing. If you need to cancel printing, press  Stop/Clear.
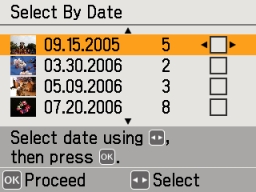
You can print photos taken on specific dates. If you have a lot of photos on your memory card, this makes it easier to find the ones you want.
|
1.
|
|
2.
|
|
3.
|
|
7.
|
Follow the steps in Printing Individual Photos to select photos, set the number of copies for each, and print.
|
If your camera supports DPOF (Digital Print Order Format), you can use it to pre-select which photos and how many copies you want to print.
See your camera’s manual to choose photos for printing with DPOF, then insert your memory card in PictureMate. PictureMate automatically reads your pre-selected photos and displays this message:
|
1.
|
Press OK.
|
|
2.
|
If you want to change any print settings, press
|
|
3.
|
Make sure you have enough paper loaded, then press
|
|
1.
|
|
2.
|
|
3.
|
|
•
|
|
•
|
If you see a photo you want to print, press OK to select it for printing.
|
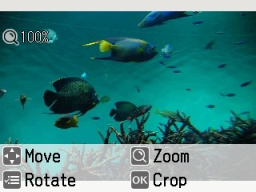
By pressing the  Zoom button, you can crop and enlarge a section of your photo (see Zooming and Cropping).
Note: These features do not change your original digital photo file; they affect only your prints.
|
1.
|
|
2.
|
|
3.
|
|
4.
|
|
5.
|
Press
|
You can print just part of a photo, cropping out the area that you don’t want. The part you keep is automatically enlarged to fit the layout.
|
2.
|
|
•
|
Press
|
|
•
|
|
4.
|
Press OK. You see a confirmation screen.
|
|
5.
|
Press OK to agree. You see your enlarged and cropped photo.
|
|
6.
|
|
7.
|
Adjust any other settings you want, then press
|
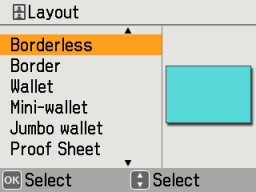
By default, your photos are printed at the full 4 × 6 size, without borders. If you want to print pictures with white borders or place several small photos on one sheet of paper, you can use the Layout menu to change the layout.
|
1.
|
|
2.
|
|
3.
|
|
4.
|
Press
|
|
|
|
|
(4 copies of each photo per sheet) |
(10 copies of each photo per sheet) |
|
|
|
Note: For the fastest printing, select Border.
When you print without borders, your images are automatically expanded and cropped around the edges. This may cause part of your image to be cut off. You can control the amount of expansion and cropping; see Adjusting Borderless Expansion for instructions.
In some layouts, your photos may be cropped to fit.
|
5.
|
At the photo selection screen, press OK to select the current photo for printing (see Printing Individual Photos).
|
For the Portrait Packages and US Passport, PictureMate prints multiple copies of each photo per sheet. For other layouts, to print two or more photos per sheet, select multiple copies or multiple photos.
For example, if you want 3 mini-wallet photos of one image and 4 of another, select 3 copies of photo A and 4 copies of photo B. Then choose Mini-wallet as the layout setting.
|
7.
|
|
8.
|
When you take photos of people, they sometimes appear to have red eyes. You can use red-eye reduction to help eliminate this problem.
Note: Red-eye reduction may not correct red eyes in all photos, and printing is slower when you use this feature.
|
2.
|
|
3.
|
|
4.
|
|
5.
|
|
6.
|
At the next screen, select whether to apply the setting to the current photo or all photos, then press OK.
|
When you press  Print, you see the red-eye icon on the preview to remind you about the setting.
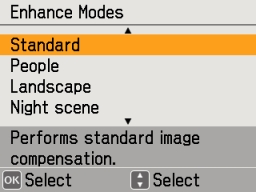
PictureMate lets you correct the color and improve the image quality of your photos without using a computer. Two types of adjustments are available:
The Enhance setting, which is applied by default, improves your photos’ colors and increases contrast and sharpness. It may correct images that are too dark, too light, or backlit.
If your camera supports PRINT Image Matching® (P.I.M.) or Exif Print, the printer’s P.I.M. setting automatically adjusts your photos for the best results.
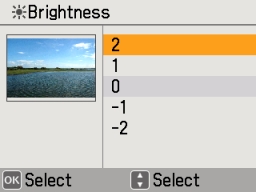
If your photos are too light or too dark, you can manually adjust their brightness or control the saturation and sharpness.
If you want, you can make manual adjustments while P.I.M. or Enhance are turned on in order to fine-tune your automatic settings.
Note: These settings affect only your printed pictures. They do not change your original image files.
|
1.
|
|
2.
|
|
3.
|
|
•
|
Enhance: This setting improves your photos’ colors and increases contrast and sharpness. It may correct images that are too dark, too bright, or backlit. (Enhance is the default setting.)
|
|
•
|
P.I.M.: This information helps ensure an accurate image reproduction for files that include P.I.M. (PRINT Image Matching) or Exif Print data.
|
|
•
|
None: Prints photos as is or bypasses P.I.M. or Exif Print data. Select this setting for the fastest printing.
|
|
5.
|
Press OK to apply the selected setting.
|
|
6.
|
Press
|
You can manually fix individual photos or fix all your photos at once. You can make different corrections for each photo on your memory card.
|
2.
|
|
3.
|
|
4.
|
Press
|
|
7.
|
At the next screen, select whether to apply the setting to the current photo or all photos, then press OK.
|
|
8.
|
Repeat steps 2 through 7 to make other adjustments to the same photo, if necessary. Or repeat steps 1 through 7 to fix more photos.
|
When you press  Print, you see the color correction icon on the preview to remind you about the setting.
Note: The date comes from your camera, not from the printer. If this information is incorrect, adjust the date setting on your camera. This setting is not available for some of the multi-photo layouts.
|
1.
|
|
2.
|
|
3.
|
|
4.
|
When you press  Print, you see the date stamp icon on the preview to remind you about the setting.
|
1.
|
|
2.
|
|
3.
|
|
4.
|
If you see white lines on the edges of your photos after printing with the MIN setting, repeat steps 1 to 3 and select MID or MAX.
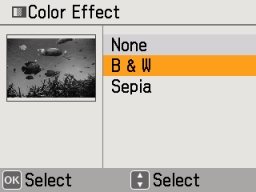
You can print pictures in black-and-white or in a sepia tone (like an old-fashioned photo) even when the originals are in color. Your original images are not changed.
|
2.
|
|
3.
|
|
4.
|
|
5.
|
|
6.
|
At the next screen, select whether to apply the color effect to the current photo or all photos, then press OK.
|
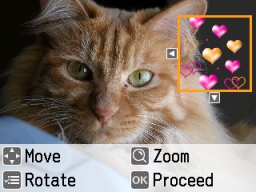
You can add fun and festive decorations to your photos from PictureMate’s built-in clip art collection. You can add up to four decorations to each photo.
|
2.
|
|
3.
|
|
4.
|
|
5.
|
|
6.
|
Press
|
|
•
|
|
•
|
|
8.
|
Press OK. You see your photo with the decoration applied, and a message asking if you want to keep it.
|
|
9.
|
Press OK. You see a screen that allows you to add another decoration.
|
|
10.
|
If you want to add another decoration, press OK and repeat steps 6 through 9.
|
You can print your decorated photo or select additional photos and print them with or without decorations.
|
2.
|
|
3.
|
|
4.
|
|
5.
|
When you press  Print, you see the camera text icon on the preview to remind you about the setting.
Note: Before you print, make sure the Borderless Layout setting is selected. See Choosing a Layout for more information.
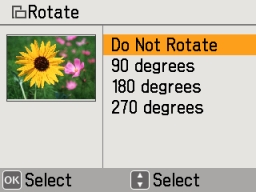
You can rotate a photo on PictureMate’s photo viewer screen. This does not affect how the photo prints, only how you see it on the screen.
|
2.
|
|
3.
|
|
4.
|
|
5.
|
Select 90 degrees, 180 degrees, or 270 degrees (or select Do Not Rotate). Your photo is rotated on the screen.
|
|
6.
|
Press OK.
|
When you press the  Print button, you see a screen that lets you confirm your selected photos and settings, for example:
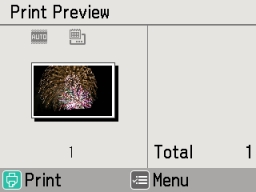
Then you press  Print again to start printing.
If you don’t want to see this screen before printing, you can turn it off. You will only need to press  Print once to start printing.
|
1.
|
|
2.
|
|
3.
|
|
4.
|
After you use the menu to change a print setting, PictureMate exits the menu. If you want to stay in the menu to adjust additional settings, you can have PictureMate display the following confirmation:
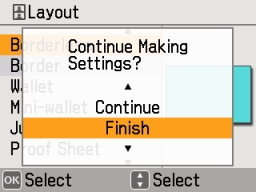
You can continue changing settings or select Finish to return to viewing photos.
|
1.
|
|
2.
|
|
3.
|
|
4.
|
|
1.
|
|
2.
|
|
3.
|
Caution: If you change the language, all the words on the screen will appear in the new language. Make sure you select the right language.
When you print directly from your camera, you can’t select settings the way you can when you print from a memory card. Instead, you can use the Direct Print Settings on the Setup Menu.
|
1.
|
|
2.
|
|
3.
|
|
1.
|
|
2.
|
|
3.
|
|
4.
|
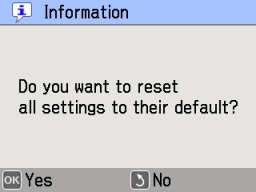
Press OK to restore the original settings, or press
|
|
5.
|
Press OK to confirm.
|
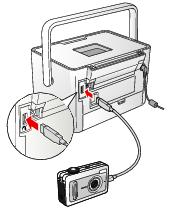
You can connect a digital camera that supports PictBridge or USB DIRECT-PRINT printing to PictureMate Dash and use the camera to control printing. (Check your camera manual to see if it supports PictBridge or USB DIRECT-PRINT. A cable may not be included with your camera.)
|
1.
|
Make sure PictureMate Dash is on but not printing.
|
Note: You must remove your memory card or the printer will read photos from the card, not from a camera.
|
4.
|
Connect your camera’s USB cable to your camera and the
|
|
5.
|
Use your camera’s controls to select and print photos on PictureMate Dash. (See your camera manual for instructions.)
|
|
6.
|
If you need to adjust any print settings, press
|
|
7.
|
You can print photos wirelessly from your Bluetooth-enabled PDA, cell phone, or computer when you use the optional Epson Bluetooth Photo Print Adapter. The adapter (part# C12C824383) is available from your local reseller or Epson. (See Purchase Supplies and Accessories for details.)
Note: While PictureMate complies with the Bluetooth specification, it is not guaranteed to work with all devices enabled with Bluetooth wireless technology. Make sure your photos meet the requirements in Photo Image File Requirements.
The communication range of the Epson Bluetooth Photo Print Adapter is approximately 33 feet (10 meters); however, this may vary depending on conditions, including obstacles between devices, signal quality, magnetic fields, static electricity and electromagnetic interference, software, operating system, reception sensitivity, and antenna performance.
Communication may also be affected when sharing wireless frequencies with equipment such as microwave ovens or cordless telephones.
The following profiles are available for the adapter: Basic Imaging Profile (BIP), Hardcopy Cable Replacement Profile (HCRP), Basic Printing Profile (BPP), and Object Push Profile (OPP).
|
1.
|
Make sure PictureMate Dash is on but not printing.
|
Caution: Do not connect or remove the Bluetooth Photo Print Adapter while it is communicating with a device or while PictureMate Dash is printing; this may cause PictureMate Dash to malfunction.
|
2.
|
|
4.
|
|
•
|
Windows: Send photos directly to PictureMate Dash with your Bluetooth file sharing program. See the documentation included with your computer’s Bluetooth adapter for details.
|
|
•
|
Macintosh: Double-click Bluetooth File Exchange in your Utilities folder. Follow the on-screen steps to choose a photo file, discover PictureMate Dash, and send photos.
|
|
•
|
Cell phones or PDAs: See your product’s documentation for instructions on setting up Bluetooth file sharing and sending files.
|
If you see a Bluetooth error message on the PictureMate Dash screen, try printing the photo from a memory card or your computer instead.
Note: To print from a device with encryption, to use pairing or a passkey, or to adjust Bluetooth settings, see Choosing Bluetooth Settings.
Caution: Do not connect or disconnect the Bluetooth Photo Print Adapter while it is communicating with your device or while PictureMate Dash is printing; this may cause PictureMate Dash to malfunction.
If necessary, use the PictureMate buttons to choose settings for Bluetooth wireless communication. You may need to enter a passkey for PictureMate or turn on encryption, depending on the Bluetooth-enabled device from which you print.
|
2.
|
|
3.
|
|
4.
|
|
5.
|
To display the device address for PictureMate (set at the factory), press
|
|
6.
|
|
7.
|
Choose options for each of the settings listed in the table below. Press
|
|
If multiple Bluetooth-enabled printers are in the same communication range, you can distinguish them by assigning each a unique number (from 0 through 9). Turn PictureMate off and then back on when you’re finished.
|
||
|
This mode allows Bluetooth-enabled devices to freely discover PictureMate and send print jobs.
|
||
|
This mode prevents unknown devices from discovering the printer. To print in this mode, first search for PictureMate in Discoverable mode. After that, you will subsequently be able to print using this mode.
|
||
|
This mode requires that a four-digit Passkey be entered into a device before it can print from PictureMate.
|
||
|
Select On to encrypt communication and require that a four-digit Passkey be entered into a device before it can print from PictureMate.
|
||
|
This setting allows you to set a four-digit Passkey that must be entered into a device before printing if Pairing is selected as the communication mode or if Encryption is On.
|
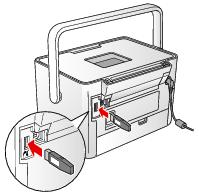
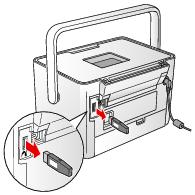
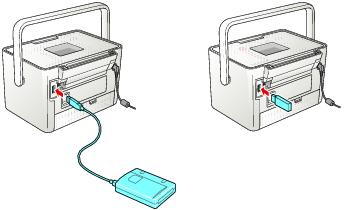
If you saved your photos to a CD, flash memory (thumb) drive, or Zip disk, you can connect the drive to the back of PictureMate and print just like you do when you insert a memory card.
You can also print photos from a CD that you get from a photo processing lab. (Images should be in JPEG or uncompressed Tiff file format. Some CDs may not work.)
|
3.
|
Connect your CD or Zip drive’s USB cable, or plug in your flash memory drive, to the
|
If you also have a memory card already inserted in PictureMate Zoom, you must either remove the card or select the external drive as the source to see any photos on the disc or drive.
To select the source, press  Menu, highlight Select, and press OK. Then choose Select Source, press OK, and select External Device.
Note: If there are folders on the CD or Zip disk, PictureMate searches those folders and displays any photos stored in them.
You can print photos from a CD or DVD using PictureMate’s built-in CD drive (PictureMate Zoom only).
Note: If you’re using PictureMate Dash and you want to print photos from a CD or DVD, you can install the PictureMate software and connect the printer to your computer. See the Basics book for instructions.
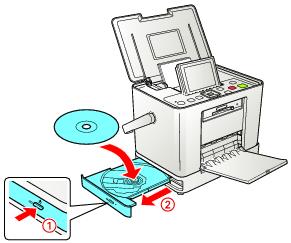
If you also have a memory card already inserted in PictureMate Zoom, you must either remove the card or select the CD drive as the source to see any photos on the CD or DVD.
To select the source, press  Menu, highlight Select, and press OK. Then choose Select Source, press OK, and select CD.
|
5.
|
If you want to print a proof sheet of the photos on your CD or DVD, press
|
Note: In addition to printing from a CD, you can also back up photos on your camera’s memory card by saving them to a CD or other device. See Saving Photos to an External Device or Saving Photos to the Built-in CD Burner (PictureMate Zoom Only) for instructions.