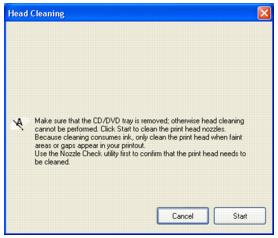
If your printouts are unexpectedly light or faint, or you notice light or dark bands across your printout, you may need to clean the print head. This unclogs the nozzles so they can deliver ink properly.
You can clean the print head using the buttons on your RX580 or using the Head Cleaning utility on your computer. You can also run a nozzle check to see if the print head needs cleaning.
Note:
Print head cleaning uses ink, so clean the print head only when print quality declines (for example, if you see lines in your printout or colors are incorrect or missing).
Before you clean the print head, check the print head nozzles first to confirm that the print head needs to be cleaned. This saves ink. For more information, see Checking the Print Head Nozzles.
If error messages indicating ink expended or ink low appear on the LCD screen, you cannot clean the print head. Replace the appropriate ink cartridge first.
Caution:
If you don’t use your RX580 often it is a good idea to print a few pages at least once a month to maintain good print quality.
If you don’t use your RX580 often it is a good idea to print a few pages at least once a month to maintain good print quality.
Before you check the print head nozzles or clean the print head, make sure the CD/DVD tray is not inserted in the RX580, and make sure the front tray is in the paper (lower) position. Follow the instructions to reposition the front tray.
|
1.
|
Make sure the RX580 is turned on but not printing, and no warnings or errors are displayed on the LCD screen.
|
|
3.
|
Windows: Right-click the
|
Macintosh OS X: Open the Applications folder and select EPSON Printer Utility2. Select SP RX580 Series in the printer list, click OK, and select Nozzle Check.
|
4.
|
|
5.
|
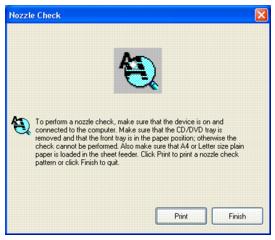
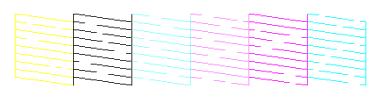
If there are gaps or lines, or the test patterns are faint, click Clean. Then read the on-screen instructions and skip to step 3 in Running the Head Cleaning Utility Using Your Computer to clean the nozzles.
|
1.
|
Make sure the RX580 is turned on but not printing, and no warnings or errors are displayed on the LCD screen.
|
|
3.
|
Press the Setup button.
|
|
4.
|
|
5.
|
|
6.
|
Press the
|

|
7.
|
If there are no gaps or lines, the print head does not need to be cleaned. Press OK to return to the Maintenance menu.
|
If there are gaps or lines, or the test patterns are faint, skip to step 5 in Running the Head Cleaning Utility Using the Buttons on the All-in-One to clean the nozzles.
|
1.
|
Make sure the RX580 is turned on but not printing, and no warnings or errors are displayed on the LCD screen. (If error messages indicating ink expended or ink low appear on the LCD screen, you need to replace a cartridge.)
|
|
2.
|
Windows: Right-click the
|
Macintosh OS X: Open the Applications folder and select EPSON Printer Utility2. Select SP RX580 Series in the printer list, click OK, and select Head Cleaning.
|
3.
|
Cleaning takes several seconds. The message “Print head cleaning in progress. Please wait.” appears on the LCD screen.
Caution:
Never turn off your RX580 while the message “Print head cleaning in progress. Please wait.” appears on the LCD screen. You may damage it.
Do not insert the CD/DVD tray until cleaning has finished.
Never turn off your RX580 while the message “Print head cleaning in progress. Please wait.” appears on the LCD screen. You may damage it.
Do not insert the CD/DVD tray until cleaning has finished.
|
4.
|
When the message “Print head cleaning complete.” appears on the LCD screen, make sure paper is loaded in the RX580, then do the following:
|
|
5.
|
If there are still gaps or lines, or the test patterns are faint, click Clean to clean the print head again.
If you don’t see any improvement after cleaning four times, turn the RX580 off and wait for at least 6 hours. This allows any dried ink to soften. Then, try cleaning the print head again.
|
1.
|
Make sure the RX580 is turned on but not printing, and no warnings or errors are displayed on the LCD screen. (If error messages indicating ink expended or ink low appear on the LCD screen, you need to replace a cartridge.)
|
|
2.
|
Press the Setup button.
|
|
3.
|
|
4.
|
|
5.
|
Press the
|
Cleaning takes several seconds. The message “Print head cleaning in progress. Please wait.” appears on the LCD screen.
Caution:
Never turn off your RX580 while the message “Print head cleaning in progress. Please wait.” appears on the LCD screen. You may damage it.
Do not insert the CD/DVD tray until cleaning has finished.
Never turn off your RX580 while the message “Print head cleaning in progress. Please wait.” appears on the LCD screen. You may damage it.
Do not insert the CD/DVD tray until cleaning has finished.
|
6.
|
When the message “Print head cleaning complete.” appears on the LCD screen, make sure paper is loaded in the RX580, then press the
|
|
7.
|
If there are no gaps or lines, press OK to return to the Maintenance menu.
|
If there are still gaps or lines, or the test patterns are faint, click the  Start button to clean the print head again.
If you don’t see any improvement after cleaning four times, turn the RX580 off and wait for at least 6 hours. This allows any dried ink to soften. Then, try cleaning the print head again.
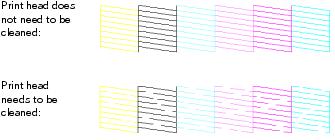
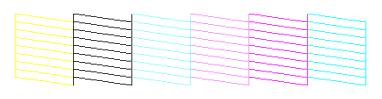
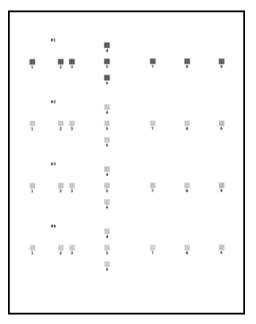
Examine the nozzle check pattern you printed. Each staggered line should be solid, with no gaps, as shown.
When you print with low or expended ink cartridges, you see a message on the LCD screen telling you which cartridges are low or expended.
You’ll also see a message on your computer screen when you print telling you which cartridge is low or expended.
When a cartridge has been installed for more than six months, you may need to replace it if printouts don’t look their best. If the quality doesn’t improve after cleaning and aligning the print head, you can replace the cartridge even if the cartridge is not expended.
Note:
Epson cannot guarantee the quality or reliability of non-genuine ink. If you install non-genuine ink cartridges, the ink cartridge status will not be displayed.
If any of the ink cartridges installed in the RX580 is broken, incompatible, or improperly installed, the ink cartridge status will not be accurately displayed.
Note:
When you use your RX580 as a shared printer on a network with the following combinations of computers, the client operating systems may not be able to communicate directly with the RX580 and some functions will not be available for the client.
When you use your RX580 as a shared printer on a network with the following combinations of computers, the client operating systems may not be able to communicate directly with the RX580 and some functions will not be available for the client.
|
Windows XP/XP Professional x64 Edition/Windows Vista
|
|
|
Windows XP/XP Professional x64 Edition/Windows Vista
|
|
•
|
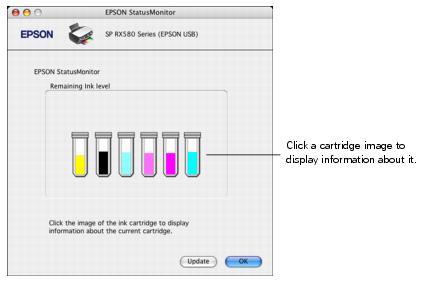
Windows: Double-click the
|

|
•
|
Macintosh OS X: Open the Applications folder and select EPSON Printer Utility2. Select SP RX580 Series in the printer list, click OK, and select EPSON StatusMonitor.
|
|
1.
|
Press Setup.
|
|
2.
|
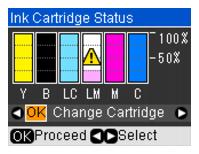
The cartridges are identified as follows: Y (yellow), B (black), LC (light cyan), LM (light magenta), M (magenta), C (cyan).
|
3.
|
Use these Epson ink cartridges within six months of installing them and before the expiration date on the package.
Note:
Try the High Capacity 77 cartridges available at www.epson.com/highcapacity (U.S. sales) or www.epson.ca (Canadian sales).
You may use any combination of cartridge sizes. (If you’ve installed a 78 black cartridge, you can still use a 77 magenta cartridge, for example.)
Try the High Capacity 77 cartridges available at www.epson.com/highcapacity (U.S. sales) or www.epson.ca (Canadian sales).
You may use any combination of cartridge sizes. (If you’ve installed a 78 black cartridge, you can still use a 77 magenta cartridge, for example.)
To ensure the best results, use genuine Epson ink cartridges and do not refill them. Other products may cause ink spills or other damage to your RX580 not covered by Epson’s warranty.
You can purchase genuine Epson ink and paper from an Epson authorized reseller. To find the nearest reseller, call 800-GO-EPSON (800-463-7766). Or you can purchase online at www.epsonstore.com (U.S. sales) or www.epson.ca (Canadian sales).
Warning:
Keep ink cartridges out of the reach of children. Do not allow children to drink from or handle the cartridges.
The ink cartridges are designed to contain any excess ink and prevent leakage. Careful handling is recommended, however. Do not touch the supply port of the ink cartridge or its surrounding area.
If ink gets on your hands, wash them thoroughly with soap and water. If ink gets in your eyes, flush them immediately with water. If discomfort or vision problems continue after a thorough flushing, see a doctor immediately.
Caution:
Don’t remove the cartridge label, or ink will leak.
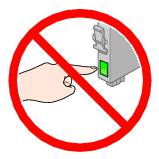
Don’t remove the green IC chip from the cartridge. Installing a cartridge without an IC chip can damage the RX580. Avoid touching the green IC chip, as this can damage the ink cartridge.
If you remove an ink cartridge temporarily, protect the ink supply port on the bottom of the cartridge from dirt and dust. Place it in a small box, or, if you have the original packaging, return it to its own box.
Store ink cartridges in the same environment as the RX580. Stand the cartridges upright; the label identifying the color should be on top.
Don’t remove the cartridge label, or ink will leak.
Don’t remove the green IC chip from the cartridge. Installing a cartridge without an IC chip can damage the RX580. Avoid touching the green IC chip, as this can damage the ink cartridge.
If you remove an ink cartridge temporarily, protect the ink supply port on the bottom of the cartridge from dirt and dust. Place it in a small box, or, if you have the original packaging, return it to its own box.
Store ink cartridges in the same environment as the RX580. Stand the cartridges upright; the label identifying the color should be on top.
Note:
You cannot continue printing or copying with one ink cartridge expended, even if the other cartridges still contain ink. Before printing, replace the expended cartridge.
This RX580 uses ink cartridges equipped with IC chips that monitor the amount of ink used by each cartridge. Cartridges are usable even if they are removed and reinserted. Some ink is consumed each time cartridges are inserted, however, because the RX580 automatically checks their reliability.
If you remove a cartridge that is low (for which you have received an “Ink low” message) and you temporarily install a new cartridge in its place, you cannot reuse the low cartridge.
Ink is consumed during the following operations: print head cleaning, self-cleaning (performed when the RX580 is turned on), and ink charging (when an ink cartridge is installed).
Be sure you have a new ink cartridge before you begin. Once you start replacing a cartridge, you must complete all the steps in one session.
Note:
Do not open ink cartridge packages until you are ready to install the ink. Cartridges are vacuum packed to maintain reliability.
Do not open ink cartridge packages until you are ready to install the ink. Cartridges are vacuum packed to maintain reliability.
Caution:
Leave the expended cartridge installed until you have obtained a replacement, or the ink remaining in the print head nozzles may dry out. To ensure the best results, use genuine Epson ink cartridges and do not refill them. Other products may cause ink spills or other damage to your RX580 not covered by Epson’s warranty.
Leave the expended cartridge installed until you have obtained a replacement, or the ink remaining in the print head nozzles may dry out. To ensure the best results, use genuine Epson ink cartridges and do not refill them. Other products may cause ink spills or other damage to your RX580 not covered by Epson’s warranty.
|
1.
|
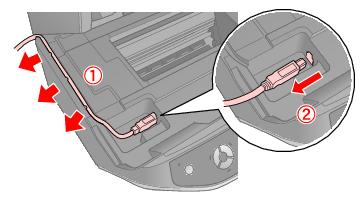
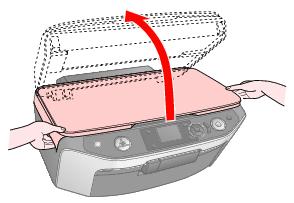
Make sure the RX580 is turned on, the CD/DVD tray is not inserted, and the front tray is in the paper (lower) position. Follow the instructions to reposition the front tray.
|
Look at the message on the LCD screen to find out which cartridge should be replaced, then press OK.
Press Setup, press  or
or  to select Maintenance, then press OK. Then press
  or
or  to select Change Ink Cartridge, and press OK.
Caution:
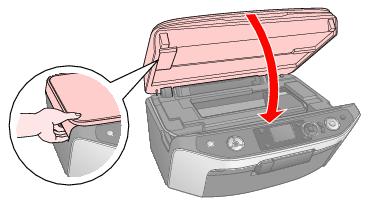
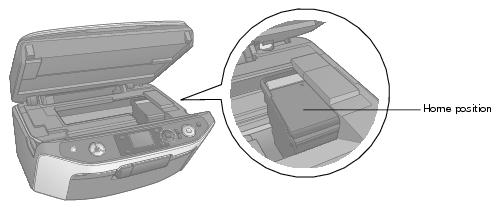
Never attempt to open the cartridge cover while the print head is moving; wait until the cartridges have moved to the replacement position.
To avoid damaging the RX580, never move the print head by hand.
Never attempt to open the cartridge cover while the print head is moving; wait until the cartridges have moved to the replacement position.
To avoid damaging the RX580, never move the print head by hand.
|
5.
|
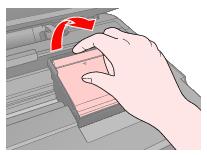
Squeeze the tab at the back of the used cartridge and lift it straight out. Dispose of it carefully. Don’t take the cartridge apart or try to refill it.
|
Warning:
If ink gets on your hands, wash them thoroughly with soap and water. If ink gets in your eyes, flush them immediately with water. If discomfort or vision problems continue after a thorough flushing, see a doctor immediately.
If ink gets on your hands, wash them thoroughly with soap and water. If ink gets in your eyes, flush them immediately with water. If discomfort or vision problems continue after a thorough flushing, see a doctor immediately.

Note:
If an ink cartridge is low, you may continue to use it until it is expended.
You can also use the Status Monitor to check ink cartridge status. See Checking the Ink Cartridge Status for more information.
If an ink cartridge is low, you may continue to use it until it is expended.
You can also use the Status Monitor to check ink cartridge status. See Checking the Ink Cartridge Status for more information.
Caution:
Be careful not to break the hooks on the side of the ink cartridge when you remove it from the package.
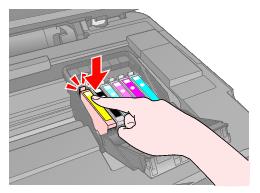
Always install an ink cartridge immediately after removing the old cartridge. If the cartridge is not installed promptly, the print head may dry out and be unable to print.
Do not touch the green IC chip on the side of the cartridge. This can damage the ink cartridge.
Be careful not to break the hooks on the side of the ink cartridge when you remove it from the package.
Always install an ink cartridge immediately after removing the old cartridge. If the cartridge is not installed promptly, the print head may dry out and be unable to print.
Do not touch the green IC chip on the side of the cartridge. This can damage the ink cartridge.
Caution:
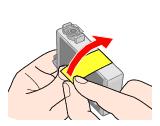
You must remove the yellow tape from the cartridge before you install it; otherwise, print quality may decline or you may not be able to print.
If you have installed an ink cartridge without removing the yellow tape, take the cartridge out of the RX580, remove the yellow tape, and then reinstall it.
Do not remove the transparent seal from the bottom of the cartridge; otherwise, the cartridge may become unusable.
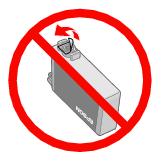
Do not remove or tear the label on the cartridge; otherwise, ink will leak.
You must remove the yellow tape from the cartridge before you install it; otherwise, print quality may decline or you may not be able to print.
If you have installed an ink cartridge without removing the yellow tape, take the cartridge out of the RX580, remove the yellow tape, and then reinstall it.
Do not remove the transparent seal from the bottom of the cartridge; otherwise, the cartridge may become unusable.
Do not remove or tear the label on the cartridge; otherwise, ink will leak.

|
8.
|
|
9.
|
If you need to replace other ink cartridges, repeat steps 5 through 8 before continuing with step 10.
|

|
12.
|
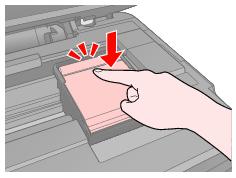
Press OK.
|
The RX580 begins charging the ink delivery system and the message “Charging Ink. Please Wait.” appears on the LCD screen.
After about one minute, the message “Ink cartridge replacement is complete.” appears on the LCD screen.
Caution:
Do not turn off the RX580 during ink charging or you’ll waste ink.
Do not insert the CD/DVD tray until ink charging is complete.
Do not turn off the RX580 during ink charging or you’ll waste ink.
Do not insert the CD/DVD tray until ink charging is complete.
Note:
If you had to replace an ink cartridge during copying, the documents or photos on the document table may have moved slightly when you opened and closed the scanner unit. To ensure copy quality, after ink charging is finished, press the Stop/Clear Settings button to cancel the job that is copying and start again.
If you had to replace an ink cartridge during copying, the documents or photos on the document table may have moved slightly when you opened and closed the scanner unit. To ensure copy quality, after ink charging is finished, press the
If your printouts look grainy or blurry, or you see light or dark lines, you may need to align the print head.
Note:
You may also see lines in your printouts if your cartridges are low on ink or you need to clean the print head.
Do not press the Stop/Clear Settings button while printing an alignment sheet.
You may also see lines in your printouts if your cartridges are low on ink or you need to clean the print head.
Do not press the
Before you align the print head, make sure the CD/DVD tray is not inserted in the RX580, and make sure the front tray is in the paper (lower) position. Follow the instructions to reposition the front tray.
|
1.
|
Make sure the RX580 is turned on but not printing, and no warnings or errors are displayed on the LCD screen.
|
|
3.
|
Windows: Right-click the
|
Macintosh OS X: Open the Applications folder and select EPSON Printer Utility2. Select SP RX580 Series in the printer list, click OK, and select Print Head Alignment.
|
4.
|
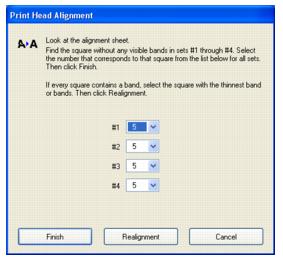
Follow the instructions on the screen to print an alignment sheet. You see a window like this one:
|

|
5.
|
For each set, look at the printed squares to determine which one is the most even, with no streaks or lines. You may have to use a magnifying glass. Enter the square’s number in the corresponding box on the screen.
|
If every square in a set contains a line or lines, select the square with the thinnest line or lines. Then click Realignment and Print to print another alignment sheet and repeat this step.
|
6.
|
Click Finish to close the Print Head Alignment utility.
|
|
1.
|
Make sure the RX580 is turned on but not printing, and no warnings or errors are displayed on the LCD screen.
|
|
3.
|
Press Setup.
|
|
4.
|
|
5.
|
|
6.
|
Press the
|
|
7.
|
Look at the printed squares in set #1 to determine which one is the most even, with no streaks or lines. You may have to use a magnifying glass.
|
|
9.
|
Press OK.
|
|
10.
|
|
2.
|
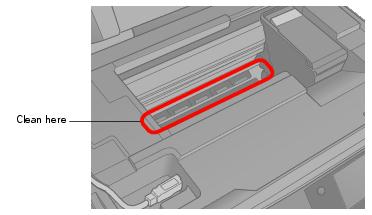
Remove all the paper, then use a soft brush to carefully clean away all dust and dirt from the sheet feeder. See Epson Stylus Photo RX580 Parts for more information on the location of the sheet feeder.
|
|
3.
|
If the outer case or inside of the sheet feeder is dirty, clean it with a soft cloth dampened with mild detergent. Keep the document cover and scanner unit closed to prevent water from getting inside. See Epson Stylus Photo RX580 Parts for more information on the location of the document cover and scanner unit.
|
|
4.
|
If the glass surface of the document table gets dirty, clean it with a non-abrasive, microfiber cloth. If the glass surface is stained with grease or some other hard-to-remove material, use a small amount of glass cleaner and a soft cloth to remove it. Spray the cleaner onto the soft cloth; don’t spray cleaner directly onto the glass. Wipe off all remaining liquid.
|
|
5.
|
Caution:
Don’t press the glass surface of the document table with any force and do not use a hard or abrasive brush to clean it; a scratched or damaged glass surface can decrease the scan quality.
Never use a hard or abrasive brush, or benzine, alcohol, or paint thinner for cleaning; they can damage the RX580 components and case.
Don’t get water on the printer components and don’t spray or apply lubricants, oils or grease inside the RX580.
Don’t use any cleaning sheets included with special paper; they may jam inside the RX580.
If you need to ship your RX580, you must prepare it for transportation by packing it in its original box or one of a similar size.
Caution:
When storing or transporting the RX580, do not tilt it, stand it up vertically, or turn it upside down. Otherwise, ink may leak from the cartridges.
Leave the ink cartridges installed. Removing the cartridges can dehydrate the print head and may prevent the RX580 from printing.
When storing or transporting the RX580, do not tilt it, stand it up vertically, or turn it upside down. Otherwise, ink may leak from the cartridges.
Leave the ink cartridges installed. Removing the cartridges can dehydrate the print head and may prevent the RX580 from printing.
After transporting the RX580, plug it in, turn it on, and test it. If you notice a decline in print quality, clean the print head; if output is grainy or blurry, align the print head.