When you print from your computer, you can edit, enhance, and organize your photos using photo software such as ArcSoft® PhotoImpression.™
Before you start, make sure your PictureMate Pal software is installed and PictureMate Pal is connected to your computer, as described in the Basics book.
Also make sure you have loaded paper as described in Loading Paper. See Supported Paper for details on the paper you should use.
Tip: It’s a good idea to check Epson’s support website periodically for free updates to your PictureMate Pal printer software. Download instructions are posted for your convenience. With Windows, you can also click Start or  , select Programs or All Programs, select EPSON, and click EPSON PictureMate PM 200 Driver Update for printer driver updates.
Tip: If your digital camera supports Exif Print technology, you can use it to ensure the most accurate reproduction of your photographs.
|
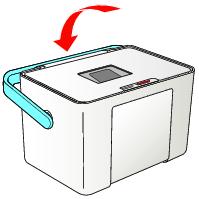
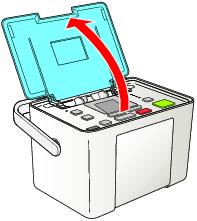
3.
|
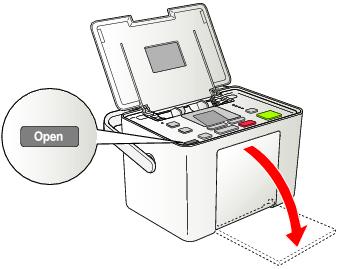
Firmly press the Open button to open the output tray.
|

|
6.
|
Place your paper into the slot between the edge guides with the glossy or whiter side up. Slide the edge guides inward slightly.
|
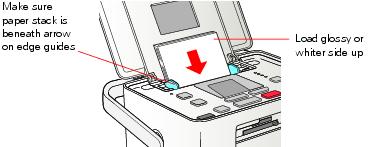
Note: Load a maximum of 20 sheets at one time. Make sure paper is glossy or whiter side up to prevent smearing.
Note: When you need more paper, order a PictureMate 200 Series Print Pack. See Supported Paper for more information.
|
Supported PictureMate models
|
||
|
Glossy photo paper (150 sheets) and photo cartridge
|
PictureMate Pal and all other PictureMate 200 Series models
|
|
|
Matte photo paper (100 sheets) and photo cartridge
|
Note: If you need more paper for any reason, you can use Epson Premium Photo Paper Glossy, borderless 4 × 6-inch size.
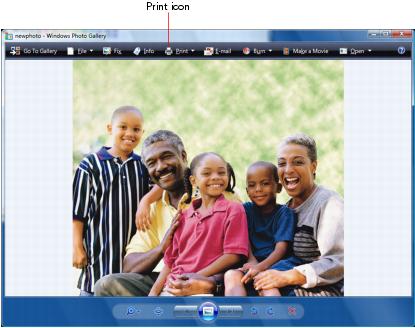
You can print your photos from an imaging application, the Picture and Fax Viewer in Windows® XP, or the Photo Gallery in Windows Vista™.
For instructions on printing with ArcSoft PhotoImpression, see Printing Photos Using ArcSoft PhotoImpression.
|
2.
|
|
3.
|
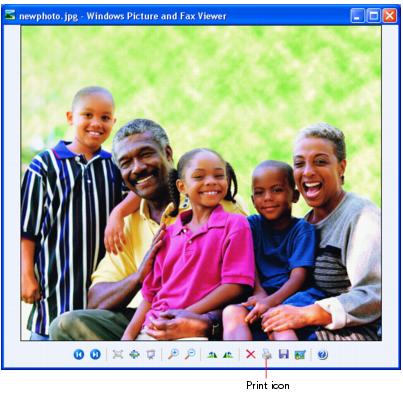
Click the Print icon at the top of the screen, then select Print from the drop-down menu that appears.
|

|
4.
|
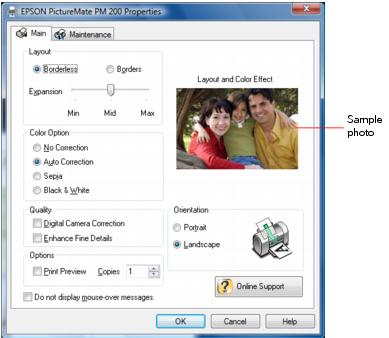
Make sure your printer is selected, then choose PictureMate Photo Paper as the Paper type setting.
|
|
5.
|
Click Options in the lower right corner of the screen and select Printer Properties. You see the printer settings window:
|
|
•
|
Select Borderless to print a photo without borders.
|
Select Borders to print with a white border all around.
|
•
|
You can change the Color Option and see the effects on the sample photo (the changes don’t affect your original).
|
Auto Correction improves the quality of photos that are too dark or have a color cast.
Sepia changes the colors to brown for an old-fashioned look.
Black & White changes color photos to black and white.
|
•
|
If your photo was taken with a digital camera, select Digital Camera Correction to minimize common digital flaws.
|
|
•
|
Select Enhance Fine Details to bring out the fine details of a particularly intricate photo (printing may be slower).
|
|
•
|
Select Print Preview to see what your photo will look like before you print.
|
|
7.
|
Click OK.
|
|
8.
|
When you return to the Windows Photo Gallery, click Print to start printing.
|
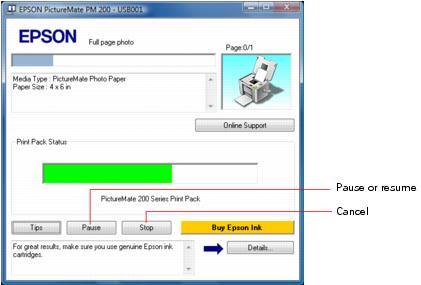
During printing, this window appears on your computer screen showing the progress of your print job. You can cancel, pause, or resume printing.
See Storing and Displaying Your PictureMate Pal Prints for tips on properly storing your printed photos.
|
2.
|
|
4.
|
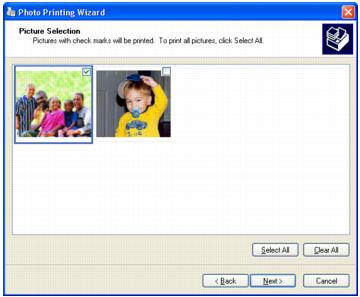
Click Next. You see a Picture Selection window:
|
|
5.
|
Select the photo(s) you want to print and click Next. You see the Printing Options window:
|
|
6.
|
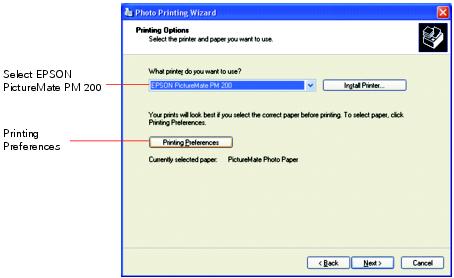
Select EPSON PictureMate PM 200 and click Printing Preferences. You see the printer settings window:
|

|
•
|
Select Borderless to print a photo without borders.
|
Select Borders to print with a white border all around.
|
•
|
You can change the Color Option and see the effects on the sample photo (the changes don’t affect your original).
|
Auto Correction improves the quality of photos that are too dark or have a color cast.
Sepia changes the colors to brown for an old-fashioned look.
Black & White changes color photos to black and white.
|
•
|
If your photo was taken with a digital camera, select Digital Camera Correction to minimize common digital flaws.
|
|
•
|
Select Enhance Fine Details to bring out the fine details of a particularly intricate photo (printing may be slower).
|
|
•
|
Select Print Preview to see what your photo will look like before you print.
|
|
8.
|
Click OK.
|
|
9.
|
At the Photo Printing Wizard screen, click Next. You see a Layout Selection window:
|

|
10.
|
During printing, this window appears on your computer screen showing the progress of your print job. You can cancel, pause, or resume printing.

See Storing and Displaying Your PictureMate Pal Prints for tips on properly storing your printed photos.
Your printer settings apply only to the program you’re currently using. If you want, you can change the Windows default printer settings for all your programs.
|
2.
|
Select Printer Settings. You see the printer settings window.
|
You can print your photos from any Macintosh® imaging application.
For instructions on printing with ArcSoft PhotoImpression, see Printing Photos Using ArcSoft PhotoImpression.
|
1.
|
From the File menu, select Page Setup.
|

|
2.
|
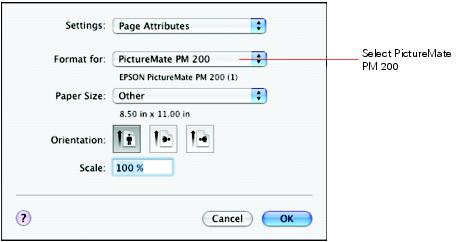
Select PictureMate PM 200 from the Format for menu.
|
|
3.
|
Open the Paper Size menu and place your cursor on the 4 × 6 in option. You see extended options:
|
Select 4 × 6 in (Borderless) to print without any borders.
|
4.
|
Select the direction you want your photo to print (
|
|
5.
|
Click OK.
|
|
6.
|
Select Print from the File menu.
|
|
7.
|
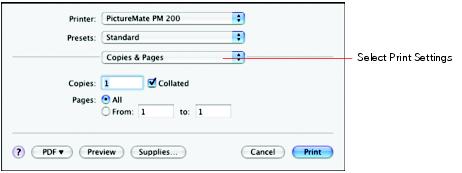
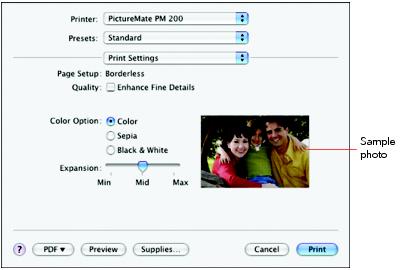
Select Print Settings from the pop-up menu. You see the printer settings window:
|

|
•
|
Select Enhance Fine Details to bring out the fine details of a particularly intricate photo (printing may be slower).
|
|
•
|
You can change the Color Option and see the effects on the sample photo (the changes don’t affect your original).
|
Sepia changes the colors to brown for an old-fashioned look.
Black & White changes color photos to black and white.
Note: iPhoto® expands two sides of an image to the maximum print area, so you may see two small borders on an iPhoto print.
|
•
|
Copies & Pages, to select the number of copies or a page range
|
|
•
|
Summary, to view a list of all your selections
|
|
10.
|
Click Print.
|
|
11.
|
To monitor the progress of your print job, click the
|

|
•
|
If multiple print jobs are listed and you want one to print before the other(s), select the job and click the Status arrow to move it up.
|
See Storing and Displaying Your PictureMate Pal Prints for tips on properly storing your printed photos.
You can use ArcSoft PhotoImpression to organize, retouch, and print your photos. Follow the steps in these sections for your operating system:
|
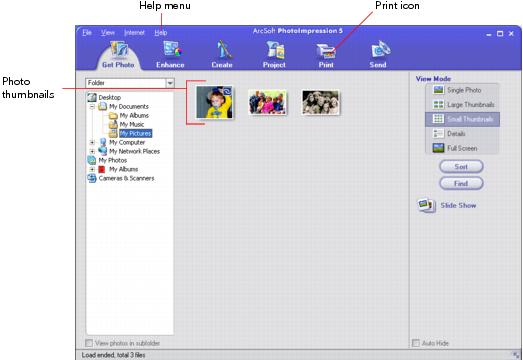
1.
|
Double-click the
|

|
2.
|
Click the Folder icon.
|
|
3.
|
Select the folder on your computer that contains your photos (PhotoImpression automatically accesses the My Pictures or Pictures folder). Thumbnails of your photos appear on the main PhotoImpression window.
|
|
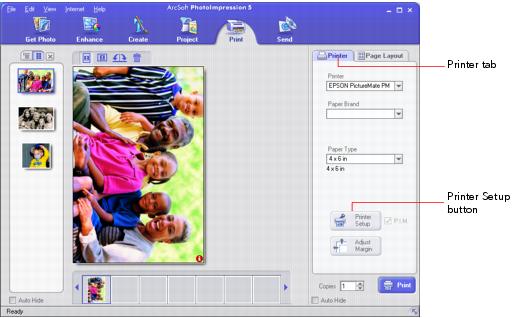
5.
|
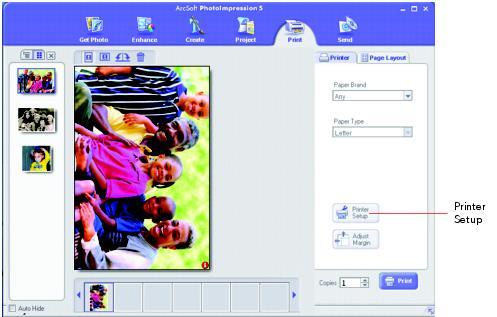
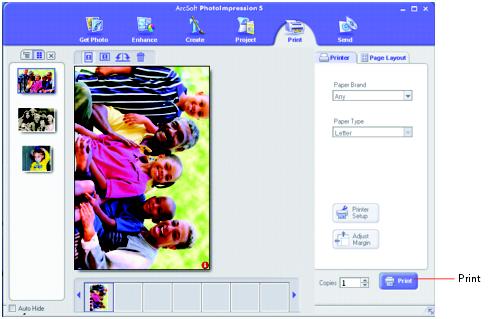
Click the Print icon at the top of the window. You see this window:
|
|
•
|
Printer: EPSON PictureMate PM 200
|
|
•
|
Paper Brand: Generic
|
|
•
|
Paper Type: 4 x 6 in
|
|
7.
|
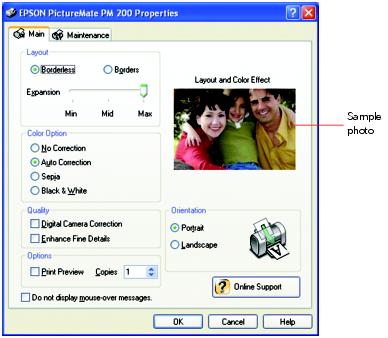
Click the Printer Setup button. You see your printer settings window:
|
|
•
|
Select Borderless to print a photo without borders.
|
Select Borders to print with a white border all around.
|
•
|
You can change the Color Option and see the effects on the sample photo (the changes don’t affect your original).
|
Auto Correction improves the quality of photos that are too dark or have a color cast.
Sepia changes the colors to brown for an old-fashioned look.
Black & White changes color photos to black and white.
|
•
|
If your photo was taken with a digital camera, select Digital Camera Correction to minimize common digital flaws.
|
|
•
|
Select Enhance Fine Details to bring out the fine details of a particularly intricate photo (printing may be slower).
|
|
•
|
Select Print Preview to see what your photo will look like before you print.
|
|
9.
|
Click OK.
|
|
10.
|
At the PhotoImpression window, click the Print button in the lower right corner to print.
|
Follow the steps in Storing and Displaying Your PictureMate Pal Prints to properly store your printed photos.
|
1.
|
Double-click the
|

|
2.
|
Click the Folder icon.
|
|
3.
|
Select the folder on your computer that contains your photos (PhotoImpression automatically accesses the Pictures folder). Thumbnails of your photos appear on the main PhotoImpression window.
|

|
5.
|
Click the Print icon at the top of the window. You see this window:
|
|
7.
|
Select PictureMate PM 200 from the Format for menu.
|
|
8.
|
Open the Paper Size menu and place your cursor on the 4 × 6 in option. You see extended options:
|
Select 4 × 6 in (Borderless) to print without any borders.
|
9.
|
Select the direction you want your photo to print (
|
|
10.
|
Click OK. You see the PhotoImpression window again:
|
|
11.
|
Click the Print button in the lower right corner. You see this window:
|

|
12.
|
Select Print Settings from the pop-up menu. You see the printer settings window:
|
|
•
|
Select Enhance Fine Details to bring out the fine details of a particularly intricate photo (printing may be slower).
|
|
•
|
You can change the Color Option and see the effects on the sample photo (the changes don’t affect your original).
|
Sepia changes the colors to brown for an old-fashioned look.
Black & White changes color photos to black and white.
Note: iPhoto expands two sides of an image to the maximum print area, so you may see two small borders on an iPhoto print.
|
•
|
Copies & Pages, to select the number of copies or a page range
|
|
•
|
Summary, to view a list of all your selections
|
|
15.
|
Click Print.
|
Follow the steps in Storing and Displaying Your PictureMate Pal Prints to properly store your printed photos.
Photos printed on PictureMate Pal photo paper are beautiful, long-lasting images. Follow these guidelines to make sure they will look great for generations.
Return unused paper to the original package. Store paper flat to prevent curling, and keep it away from extreme temperatures, high humidity, and bright light.