PictureMate Pal lets you print photos quickly and easily without a computer. Just insert your digital camera’s memory card, choose settings from the control panel, and press  Print.
Note: If you have a camera that supports PictBridge® or USB DIRECT-PRINT™ printing, you can connect the camera directly to PictureMate Pal and control printing from your camera. See Printing From a Digital Camera.
|
•
|
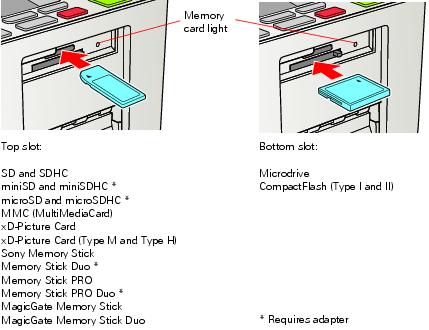
miniSD (requires adapter)
|
|
•
|
Memory Stick Duo (requires adapter)
|
Note: PictureMate Pal supports Exif Print image enhancement features. See your camera manual to see if this feature is included on your camera.
PictureMate Pal does not support progressive-scan JPEG or RAW images.
PictureMate Pal does not support progressive-scan JPEG or RAW images.
|
1.
|
Press the
|
|
2.
|
Firmly press the Open button to open the output tray.
|

Caution: Do not remove a card while the memory card light is flashing; you may lose photos on your card.
To remove a card from the top slot, push in the card and release it, then pull it straight out of the slot.
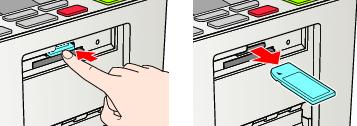
To remove a card from the bottom slot, push in and release the card release button so it pops out. Then push in the button again to eject your card and pull it straight out of the slot.


By pressing Menu or Layout, you can choose from a variety of layouts, include the date, enhance photos, and customize printing. See Doing More With Your Photos for information.
Note: If you see a Paper out message, load more paper and press OK to continue printing. To cancel printing, press Cancel.
|
1.
|
Press the
|
|
2.
|
To print more than one copy of each photo, press
|
You can also press Menu to adjust settings or print a proof sheet containing thumbnail images of all your photos. See Doing More With Your Photos for details.
|
3.
|
|
4.
|
Press
|
Note: To change the number of copies for individual photos, press Cancel, press  or
or  to select the photo, then press OK to increase or Cancel to decrease the number of copies.
|
6.
|
Press
|
|
2.
|
Press OK to select it.
|
|
3.
|
To print more than one copy of the photo, press OK to increase the number of copies (up to 999). Press Cancel to decrease the number.
|
You can also press Menu to adjust settings if necessary. See Doing More With Your Photos for details.
|
5.
|

|
6.
|
Press
|
|
8.
|
Press
|
If your camera supports DPOF™ (Digital Print Order Format), you can use it to pre-select the photos and copies you want to print.
See your camera manual to choose photos for printing with DPOF, then insert your memory card in PictureMate Pal. You see this symbol on the screen:

|
1.
|

You can also press Menu to adjust settings if necessary. See Doing More With Your Photos for details.
|
2.
|
Press
|
Note: If your camera supports PictBridge or USB DIRECT-PRINT printing, you can connect it to PictureMate Pal and use the camera to control printing. See Printing From a Digital Camera for more information.
Note: These features do not change your original digital photo file; they affect only your prints.
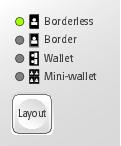
Press the Layout button to print your photos at the full 4 x 6 size—with or without borders—or print 2 wallet or 4 mini-wallet size photos per sheet.

You can also print proof sheets containing thumbnail images of all your photos using the Menu button. Each proof sheet contains 20 images and their file names.
Note: When you print without borders, your images are automatically expanded. To control the amount of expansion, see Adjusting Borderless Expansion.
|
2.
|
To print 4 × 6-inch, wallet, or mini-wallet size photos, press Layout to select the layout of your photos on the paper.
|
To print a proof sheet of all your photos, press Menu, press  or
or  to highlight Proof Sheet, and press OK.
|
3.
|
Press
|
Note: If you are printing portrait-oriented photos, they may appear to be rotated, but they will print correctly.
|
5.
|
Press
|
You can print your photo in black and white or in a sepia tone even when the original is in color. Your original image is not changed.
|
2.
|
Press Menu.
|
|
3.
|
|
4.
|

The color effect you select will be applied to all photos until you go back to the Color Effect menu and select a different setting.
|
5.
|
Press OK. You see your photo with the color effect you selected.
|
|
6.
|
Press Layout to select the layout of your photos on the paper.
|
|
7.
|
Press
|
|
9.
|
Press
|
Note: The date comes from your camera, not from the printer. If the date is incorrect, adjust the date setting on your camera. The date does not appear on photos printed using the Mini-wallet layout setting.
|
2.
|
Press Menu.
|
|
3.
|

|
4.
|
|
5.
|
Press Layout to select the layout of your photos on the paper.
|
|
6.
|
Press
|
|
8.
|
Press
|
PictureMate Pal lets you correct photos that are too dark, too light, or backlit with the PhotoEnhance™ feature. This setting improves your photos’ colors and increases contrast and sharpness.
|
2.
|
Press Menu.
|
|
3.
|
|
4.
|

Note: If you see a color cast in the gray areas of color photos, select None as the Color Effect setting. Depending on your photo, you may get different results using PhotoEnhance in your computer software.
|
5.
|
Press Layout to select the layout of your photos on the paper.
|
|
6.
|
Press
|
|
8.
|
Press
|
When you print borderless photos, your images are automatically expanded. If too much of your photos are cut off around the edges, you can adjust the amount of expansion.
|
1.
|
Press Menu.
|
|
2.
|
|
3.
|
Press
|
|
4.
|
Press OK.
|
|
5.
|
Press Cancel to exit.
|
When Print Preview is On and you press  Print, you see a screen that lets you confirm your selected photos, number of copies, layout, and other settings. Then you press
  Print again to start printing.
When Print Preview is Off, PictureMate Pal does not display a preview screen before printing. You can press  Print just once to start printing.
|
1.
|
Press Menu.
|
|
2.
|
|
3.
|
|
4.
|
Press Cancel to exit.
|
The Print Preview setting remains in effect until you change it or return to default settings (see Returning to Default Settings).
|
1.
|
Press Menu.
|
|
2.
|
|
4.
|
Press Cancel to exit.
|
|
1.
|
Press Menu.
|
|
2.
|
|
3.
|
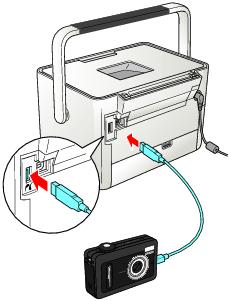
You can connect a digital camera that supports PictBridge or USB DIRECT-PRINT printing to PictureMate Pal and use the camera to control printing. (Check your camera manual to see if it supports PictBridge or USB DIRECT-PRINT. A cable may not be included with your camera.)
Note: You must remove your memory or the printer will read photos from the card, not from a camera.
|
4.
|
Connect your camera’s USB cable to your camera and the
|
|
5.
|
Use your camera’s controls to select and print photos on PictureMate Pal. (See your camera manual for instructions.)
|
|
6.
|
When you are finished, disconnect your camera from PictureMate Pal before inserting a memory card in PictureMate Pal.
|
You can print photos wirelessly from your Bluetooth-enabled PDA, cell phone, or computer when you use the optional Epson Bluetooth Photo Print Adapter. The adapter (part# C12C824383) is available from your local reseller or Epson. (See Buying a PictureMate 200 Series Print Pack for details.)
Note: While PictureMate Pal complies with the Bluetooth specification, it is not guaranteed to work with all devices enabled with Bluetooth wireless technology. Make sure your photos meet the requirements in Photo Image File Requirements.
The communication range of the Epson Bluetooth Photo Print Adapter is approximately 33 feet (10 meters); however, this may vary depending on conditions, including obstacles between devices, signal quality, magnetic fields, static electricity and electromagnetic interference, software, operating system, reception sensitivity, and antenna performance.
The following profiles are available for the adapter: Basic Imaging Profile (BIP), Hardcopy Cable Replacement Profile (HCRP), and Basic Printing Profile (BPP).
Caution: Do not connect or remove the adapter while it is communicating with a device or while PictureMate Pal is printing; this may cause PictureMate Pal to malfunction.
|
2.
|
Plug the adapter all the way into the
|

|
4.
|
Select the photo you want to print from your Bluetooth device and send it to PictureMate Pal as follows:
|
|
•
|
Windows:
Send photos directly to PictureMate Pal with your Bluetooth file sharing program. See the documentation included with your computer’s Bluetooth adapter for details. |
|
•
|
Macintosh:
Double-click Bluetooth File Exchange in your Utilities folder. Follow the on-screen steps to choose a photo file, discover PictureMate Pal, and send photos. |
|
•
|
Cell phones or PDAs:
See your product’s documentation for instructions on setting up Bluetooth file sharing and sending files. |
If you see a Bluetooth error message on the PictureMate Pal screen, try printing the image from a memory card or your computer instead.
Note: To print from a device with encryption, to use pairing or a passkey, or to adjust Bluetooth settings, see Choosing Bluetooth Settings.

Caution: Do not remove the adapter while it is communicating with a device or while PictureMate Pal is printing; this may cause PictureMate Pal to malfunction.
If necessary, use the PictureMate Pal buttons to choose settings for Bluetooth wireless communication. You may need to enter a passkey for PictureMate Pal or turn on encryption, depending on the Bluetooth-enabled device from which you print.
|
2.
|
Press Menu.
|
|
3.
|
|
4.
|
To display the device address for PictureMate Pal (set at the factory), press
|
|
5.
|
|
6.
|
Choose options for each of the BT Settings listed in the table below. Press
|
|
PictureMate Pal-(number)
(Default = 1) |
If multiple Bluetooth-enabled printers are in the same communication range, you can distinguish them by assigning each a unique number (from 0 through 9). Turn PictureMate Pal off and then back on when you’re finished.
|
|
|
This mode allows Bluetooth-enabled devices to freely discover PictureMate Pal and send print jobs.
|
||
|
Not discoverable (default)
|
This mode prevents unknown devices from discovering the printer. To print in this mode, first search for PictureMate Pal in Discoverable mode. After that, you will subsequently be able to print using this mode.
|
|
|
This mode requires that a four-digit Passkey be entered into a device before it can print from PictureMate Pal.
|
||
|
Select On to encrypt communication and require that a four-digit Passkey be entered into a device before it can print from PictureMate Pal.
|
||
|
This setting allows you to set a four-digit Passkey that must be entered into a device before printing if Pairing (Bonding) is selected as the Communication Mode or if Encryption is On.
|