 Creating Public Access Printers
Configuring a Remote Printer in NetWare Administrator
Follow the steps below to configure a Remote printer in NetWare Administrator.
NOTE:
If you have not finished the previous procedures yet, go back to "Creating Public Access Printers in NetWare Administrator".
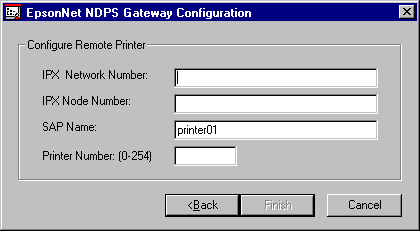
- Select Remote (rprinter on IPX) in the NDPS Gateway Configuration dialog box. The following dialog appears.

- Configure the following options:
- IPX Network Number: Enter the IPX network number of the print server. This is the number that uniquely identifies a network cable segment and is usually referred to as the IPX external network number. See the Network Address on the status sheet for the IPX Network Number.
- IPX Node Number: Enter the IPX node number of the print server. This is the number that uniquely identifies a print server. See the MAC Address or Node Number (C82357*) on the status sheet for the IPX Node Number.
- SAP Name: Enter the primary print server name that must be a unique name on the network. Do not use the following characters for the SAP name; ~!@#$%^&*()+`={} [] | \ : ; " ' < , >. ? / ` . The SAP name is the primary print server name the Printer Agent will use when emulating PSERVER.NLM. This name should match the print server name the printer is looking for.
NOTE:
Do not use any characters of the product name in the SAP name if you are using a EPL-N2000 printer or printers connected with the interface card model C82357*. If you want to use part of the product name for the SAP name, type "-PA" after part of the product name.
For example: Stylus-PA
- Printer Number: Enter the printer number using numbers from 0 to 254. Normally enter 0.
- When you have completed filling in the boxes, press Finish. Follow the on-screen instructions.
- The Select Printer Drivers dialog appears.
- Select appropriate printer driver for Windows 95/98 and Windows NT 4.0; and select [None] for Windows 3.1. Be sure to select the printer driver corresponding to your specific printer under both the Windows 95/98 and Windows NT 4.0 menus.
See "Installing Printers on Workstations" for printers supported by the EpsonNet NDPS Gateway.
- Click Continue.
The new Printer Agent will appear in the Printer Agent List window.
|
NOTE:
|
- Using the appropriate configuration utility shipped with the print server, set the SAP name and printer number for the print server. After configuring the print server, be sure to turn the printer off and back on to reset the printer.
- It takes a few minutes to start printing after configuring the printer.
- The message "The Printer Agent just created needs attention. Check Printer details or the server console for more information." might appear after creating Printer Agents. This message appears while the EpsonNet NDPS Gateway creates the Printer Agent. Click OK to close this message box and wait a while.
|
 Creating Public Access Printers
 Creating Public Access Printers