|
1.
|
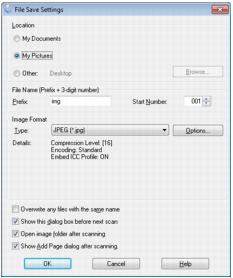
Select the folder in which you want to save your scanned image, either My Documents or My Pictures (some Windows versions), or Documents or Pictures (some Windows versions and Macintosh).
|
If you want to select another folder, click Other, then click Browse (Windows) or Choose (Macintosh) and select the folder. To save your image on the desktop, simply click Other.
|
2.
|
Specify a file name prefix. A 3-digit number is automatically added to the file name, but you can change the Start Number if you like.
|
|
3.
|
Select a file format as described in the following table. Depending on the format, the Options button may be available for making detailed settings.
|
|
Format (File Extension)
|
|
|
The JPEG format lets you highly compress image data. However, the higher the compression, the lower the image quality. The TIFF format is recommended when modification and retouching are required.
|
|
|
A TIFF format where multiple pages are saved to the same file and you can edit the images using a program that supports it.
|
|
|
A document format that can be read on both Windows and Macintosh systems using Adobe Reader or Acrobat. Multi-page documents can be saved as one PDF file.
|
|
|
PRINT Image Matching II (*.JPG or *.TIF)
|
File formats that include Epson PRINT Image Matching® II data for enhanced quality and a wider color range (does not affect the way the image displays on the screen).
|
|
A file format created for exchanging data between many programs, such as graphic and DTP software.
|
|
•
|
Overwrite any files with the same name
Select to overwrite previous files with the same names. |
|
•
|
Show this dialog box before next scan
Select to have the File Save Settings window appear automatically before you scan. |
|
•
|
Open image folder after scanning
Select to have Windows Explorer or Macintosh Finder automatically open to the folder where your scanned image is saved after scanning. |
|
•
|
Show Add Page dialog after scanning
If you are scanning a multi-page document using the PDF or Multi-Tiff format, select to display a prompt for scanning additional pages after the first page is scanned. |
|
5.
|
Click OK. Epson Scan starts scanning.
|