Copying and Restoring Photos

You can restore the colors in faded photos as you copy them.
  1. Load photo paper in the product.
  2. Press the  
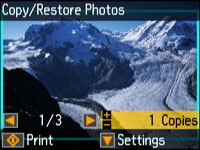
home button, then press the arrow buttons and select Copy/Restore Photos and press the OK button. You see this screen:


  3. Press the down arrow button to select On and press the OK button.
  4. Place up to two original photos on the product.
    Note: Press the up or down arrow button for instructions on placing your photos on the product.
  5. Press the  start button. You see this screen:


  6. Press the right and left arrow buttons to scroll through your photos and display one that you want to copy.
  7. Press the + or buttons to select one or more copies of the photo (up to 99).
  8. To view additional photos and select others for copying, press the arrow buttons and repeat the selections above.
  9. To select settings for the photos, press the down arrow button. You see this screen:


  10. Do one of the following:
    • To change the display setting for the LCD screen, select Display Options, press the OK button, and select the setting you want.
    • To change the print settings, select Print Settings, press the OK button, and select the necessary settings.
    • To crop or zoom into your photo, select Crop/Zoom, press the OK button, and press the + or buttons to adjust the image area.
  11. When you are ready to print, press the  start button.
    Note: To cancel printing, press the  stop button.