You can
print one or more photos displayed on the LCD screen in special
layouts on various sizes of photo paper.
Press
the Home button, if necessary.
Press
the arrow buttons to select Print
Photos and press the OK button.
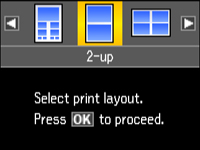
Press
the arrow buttons to select Photo Layout
Sheet and press the OK button. You see this screen:
Press
the arrow buttons to select one of the layout options and press the
OK button.
Press
the arrow buttons to select the paper size setting that matches the
paper you loaded. Then press the OK button.
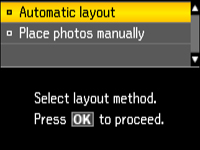
Press
the arrow buttons to select the paper type setting that matches the
paper you loaded. Then press the OK button. Depending on the layout
you selected, you may see this screen:
If you
see the screen above, do one of the following:
To allow
your product to place the photos in the layout automatically,
select Automatic layout.
To place
photos in the layout manually, select Place
photos manually and follow the instructions displayed on the
screen.
Press
the arrow buttons to select the photos you want to
print.
Press
the + or
– button to select one
or more copies of each photo (up to 99).
To
select other photos for printing, press the arrow buttons and
repeat the selections above, then press the OK button.
To print
more than one copy of the photo layout sheet, press the
+ or – buttons to select the number (up to
99), then press the OK
button.
To
change any of the print settings displayed on the LCD screen, press
the Menu button, select Print Settings, press the OK button, and select the necessary
settings.
When you
are ready to print, press the Start button.
Note: To cancel
printing, press the Stop/Clear
Settings button.