After you create a document in a software program, follow these steps to print it using the basic printer settings:
|
1.
|
|
2.
|
|
3.
|
Click the Properties or Preferences button. (If you see a Setup, Printer, or Options button, click it. Then click Properties or Preferences on the next screen.)
|
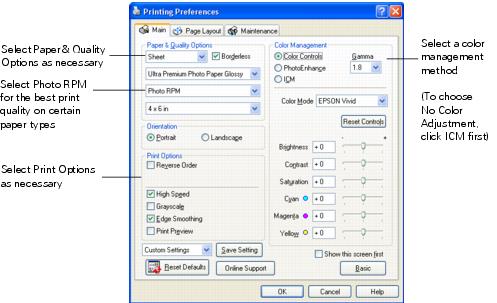
Select from these Quality Option types:
|
•
|
Draft: For rough drafts with reduced print quality
|
|
•
|
Text: For text-only documents with higher text quality
|
|
•
|
Text & Image: For documents with text and images with higher quality
|
|
•
|
Photo: For photos and graphics with good quality and speed
|
|
•
|
Best Photo: For photos or graphics with high print quality
|
Note:
For more information about print settings, click the Help button or click the ? button and then click on the area you need help with.
The Quality Option settings on this screen give you the best combination of quality and speed for most prints. For the highest quality (Photo RPM®) on selected papers, click the Advanced button on the Main tab. Then see Customizing Windows Print Settings for instructions on selecting Photo RPM.
For more information about your printer, click the Online Support button and then select your printer.
|
5.
|
Select Sheet as the source setting.
|
|
6.
|
Make sure the paper Type and size settings match the paper you’ve loaded in the printer.
|
|
7.
|
Select the direction you want your image or document to print as the Orientation setting. Select Portrait for vertical orientation or Landscape for horizontal.
|
|
8.
|
Select PhotoEnhance to automatically correct your photos.
|
|
10.
|
Click OK.
|
|
11.
|
During printing, the following window appears and shows the progress of your print job. You can use the buttons to cancel, pause, or resume printing. You can also see an estimate of your ink levels.
When you change the printer settings within a program, they apply only to that program. If you want to change the default printer settings for all your Windows programs, follow these steps:
|
1.
|
Right-click the
|
Note:
If you don’t see the icon, see You don’t see the printer icon in the lower right corner of your screen (taskbar) in Windows.
If you don’t see the icon, see You don’t see the printer icon in the lower right corner of your screen (taskbar) in Windows.
|
2.
|
You can use advanced settings for color matching, printing at a higher resolution, or selecting a variety of special effects and layouts.
|
1.
|
On the Main tab, click the Advanced button in the bottom right corner of the window.
|
|
2.
|
If you see a warning note, click Continue.
|
Note:
When you select Photo RPM for the highest print quality, printing will take longer.
For more information about advanced settings, or instructions on saving them as a group so you can reuse them later, click the Help button or click the ? button and then click on the area you need help with.
If you want to use the Advanced screen each time you access your printer settings, click Show this screen first.
|
•
|
Click OK to save your settings, return to the Print window, and print.
|
|
•
|
Click the Basic button to return to the Basic settings.
|
|
5.
|
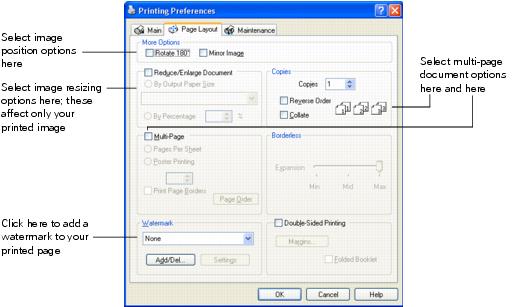
Click the Page Layout tab and select the following page layout settings as necessary:
|
Note:
For more information about page layout settings, click the Help button, or click the ? button and click on the area you need help with.
For more information about page layout settings, click the Help button, or click the ? button and click on the area you need help with.
|
6.
|
If you are using Adobe® Photoshop® Elements 6.0 with Windows, you can take advantage of the Epson EasyPrint interface when you’re ready to print. It lets you select your basic settings directly from the Print window, so you don’t need to open the Properties or Preferences window to access the printer settings.
This one-stop printing feature also prevents conflicts between software and driver settings by making them both match.
Instructions for using Adobe Photoshop Elements 6.0 are provided in the Help menu in Photoshop Elements. Follow these steps to open Elements and access the EasyPrint interface:
|
1.
|
Double-click the Adobe Photoshop Elements 6.0 icon on your desktop.
|
|
2.
|
Select ORGANIZE. You see the ORGANIZE tab in the upper right corner of the screen, indicating you are in Organizer mode.
|
|
3.
|
To open the photos you want to print, select Get Photos and Videos from the File menu and choose an option such as From Files and Folders. Then select the photos and click Get Photos.
|
|
4.
|
To edit a photo, select the photo, click the Editor button (in the upper right corner of the screen), and choose either Quick Fix or Full Edit.
|
|
5.
|
When you are ready to print, click the Organizer button (in the upper right corner of the screen) to return to Organizer mode. Do not print from Editor mode.
|
Note: If you print in Editor mode, you do not see the Epson EasyPrint interface. To access the printer driver settings, you must click Print, then click Print and select Properties or Preferences.
The Epson Web-To-Page software lets you print web pages so they fit on your paper. If you have not yet installed Web-To-Page, see the Start Here sheet for instructions on installing your software.
Note:
Epson Web-To-Page is available for Windows only. Use it in Windows XP and 2000 with Internet Explorer 5.5 through 6. If you are using Internet Explorer 7, you do not need to use Epson Web-To-Page because this functionality is already built into the browser.
Epson Web-To-Page is available for Windows only. Use it in Windows XP and 2000 with Internet Explorer 5.5 through 6. If you are using Internet Explorer 7, you do not need to use Epson Web-To-Page because this functionality is already built into the browser.
|
1.
|
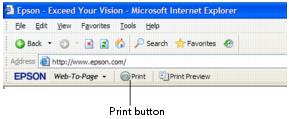
In Internet Explorer, go to the web page you want to print. The Epson Web-To-Page toolbar appears at the top of the Internet Explorer window:
|
|
2.
|
Click the Print button on the Web-To-Page toolbar. The print window appears.
|
Note:
If you want to preview the layout of your printout, click the Print Preview button on the toolbar.
If you want to preview the layout of your printout, click the Print Preview button on the toolbar.
|
•
|
Windows XP: Make sure EPSON Stylus Photo 1400 Series is selected, then click the Properties or Preferences button.
|
|
•
|
|
5.
|


