|
 Printer Printer
 Presets Presets
 Copies & Pages Copies & Pages
 Layout Layout
 Output Options Output Options
 Scheduler Scheduler
 Paper Handling Paper Handling
 ColorSync ColorSync
 Cover Page Cover Page
 Print Settings Print Settings
 Printer Color Management Printer Color Management
 Paper Configuration Paper Configuration
 Expansion Expansion
 Summary Summary
 Saving your settings in the Print window Saving your settings in the Print window
 Using your saved settings in the Print window Using your saved settings in the Print window
 Preview Preview
You can select Printer and Presets settings used for printing.
 |
Note: |
 |
|
The Print window is a standard feature of Mac OS X. See your operating system’s documentation for details.
|
|

Select Stylus Pro 3800 in the Printer pop-up menu.
 |
Note: |
 |
|
Always select the same printer in the Format for pop-up menu (in the Page Setup window) and the Printer pop-up menu (in the Print window); otherwise, your images may not be printed correctly.
|
|
Select Standard or Save As.
Prints with the current settings.
Prints with custom saved settings.
Select the Copies, Collated, and Pages settings that you want to use for printing.

Enter the number of copies that you want to print in the Copies text box.
Select Collated to print one complete document set at a time when printing multiple copies.
Select either All or From and to. If you select From and to, enter the first page of the range of pages in the From text box and the last page in the to text box.
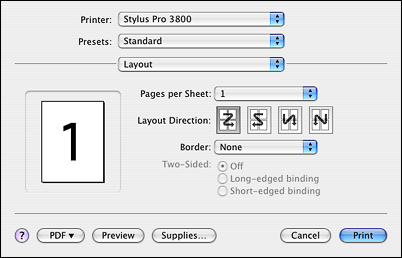
Select the Pages per Sheet, Layout Direction, and Border settings that you want to use for printing.
 |
Note: |
 |
|
Layout is a standard feature of Mac OS X. See your operating system’s documentation for details.
|
|
You can print multiple pages of your document on a single piece of paper. Select from 1, 2, 4, 6, 9, or 16.
You can specify the order in which the pages will be printed on the sheet of paper.
You can print a border around the pages printed on each sheet. You can select from None, Single hairline, Single thin line, Double hairline, or Double thin line.
You can print your image to a file if you click the Save as File checkbox, and select a format from the Format pop-up menu.

If you want to print your image on paper, uncheck the Save as File checkbox.
 |
Note: |
 |
|
Output Options is a standard feature of Mac OS X. See your operating system’s documentation for details.
|
|
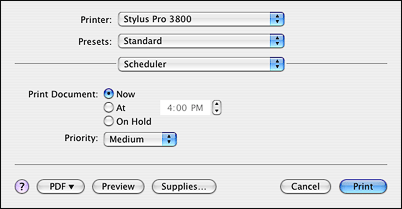
Select the Print Document (time) and Priority settings that you want to use for printing.
 |
Note: |
 |
|
Scheduler is a standard feature of Mac OS X. See your operating system’s documentation for details.
|
|
Select the Page Order, Print (pages), and Destination Paper Size settings that you want to use for printing.

 |
Note: |
 |
|
Paper Handling is a standard feature of Mac OS X. See your operating system’s documentation for details.
|
|
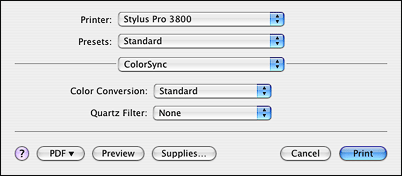
Select the Color Conversion and Quartz Filter settings that you want to use for printing.
 |
Note: |
 |
|
ColorSync is a standard feature of Mac OS X. See your operating system’s documentation for details.
|
|
Select the Print Cover Page, Cover Page Type, and Billing Info settings that you want to use for printing.

 |
Note: |
 |
|
Cover Page is a standard feature of Mac OS X. See your operating system’s documentation for details.
|
|
Select Page Setup, Media Type, Color, and Mode settings.

Shows the paper path that has been chosen from the Paper Size list in the Page Setup window. Select the print area chosen from the Paper Size list in the Page Setup window.
If you have selected custom paper, the paper source pop-up menu appears. Select Sheet Feeder if you are using the Auto Sheet Feeder. Select Manual-Front or Manual-Rear if you are using the front or rear manual feed slot.
The Media Type setting determines what other settings are available in the printer driver, so make sure you always select this setting first.
Select the Media Type setting that matches the paper you loaded in the printer. See for a list of settings. For some kinds of paper, several Media Type settings are available for selection.
 |
Note: |
|
Media Type Setting
|
Epson Media Name
|
|
Premium Luster Photo Paper
|
Ultra Premium Photo Paper Luster
Premium Luster Photo Paper
|
|
Premium Glossy Photo Paper
|
Premium Photo Paper Glossy
Premium Glossy Photo Paper
|
|
Premium Semigloss Photo Paper
|
Premium Photo Paper Semi-gloss
Premium Semi-gloss Photo Paper
|
|
Proofing Paper Semimatte
|
Proofing Paper Commercial Semimatte
|
|
Plain Paper - Photo Black
|
—
|
|
Enhanced Matte Paper
|
Ultra Premium Presentation Paper Matte
Enhanced Paper Matte
|
|
Archival Matte Paper
|
Ultra Premium Presentation Paper Matte
Enhanced Paper Matte
|
|
Velvet Fine Art Paper
|
Velvet Fine Art Paper
|
|
UltraSmooth Fine Art Paper
|
UltraSmooth Fine Art Paper
|
|
Watercolor Paper - Radiant White
|
Watercolor Paper - Radiant White
|
|
Photo Quality Ink Jet Paper
|
Presentation Paper Matte
Photo Quality Ink Jet Paper
|
|
Singleweight Matte Paper
|
Singleweight Matte Paper
|
|
Plain Paper - Matte Black
| — |
|
Singleweight Matte Paper (line drawing)
|
Singleweight Matte Paper
|
Select Color to print color or monochrome photos, or Black to print a draft or black text only. If you want to fine-tune your monochrome prints, select Advanced B&W Photo.
You can select the Automatic, Custom, or Advanced Settings.
Automatic is the quickest and easiest way to start printing. When Automatic is selected, the printer selects all of the detailed settings based on the Media Type and Color settings you choose.

Depending on the Media Type, Color, and Mode setting you selected, a Quality or Speed slider appears in the Mode box. Select Quality when print quality is more important than print speed. Select Speed when print speed is more important than print quality.
When Color is selected as the Color setting in Automatic mode, the Color Control pop-up menu appears.
You can select from the following settings.
|
EPSON Vivid
|
Select this setting to enhance blue and green tones in your printouts.
Note:
Because this setting reproduces blue and green tones that cannot be displayed by your monitor, your printouts may differ from the image on your screen when this option is selected.
|
|
Charts and Graphs
|
Enhances colors and lightens the midtones and highlights of an image. Select this setting when printing presentation graphics, such as charts and graphs.
|
|
EPSON Standard (sRGB)
|
Increases the contrast in your printouts. Select this setting when printing color photographs.
|
|
Adobe RGB
|
Matches your images’ color to the Adobe RGB color space.
|
Custom lets you select a wide range of settings with a single mouse click.
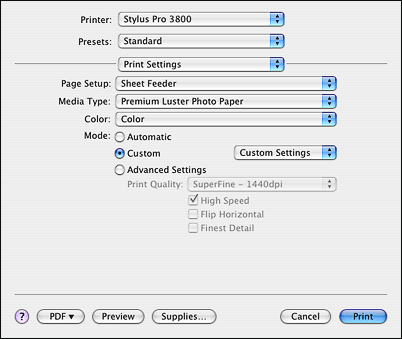
The Custom Settings pop-up menu includes the following custom preset settings.
 |
Note: |
 |
|
Custom preset settings may be dimmed, depending on the Media Type and Color settings.
|
|
|
Advanced Photo 2880
|
Good for printing scanned photos and digitally captured images in high quality. Helps prevent misprinting of ink dots that may occur due to movement of the print head and paper.
|
|
ColorSync
|
Automatically adjusts printout colors to match colors on your screen.
|
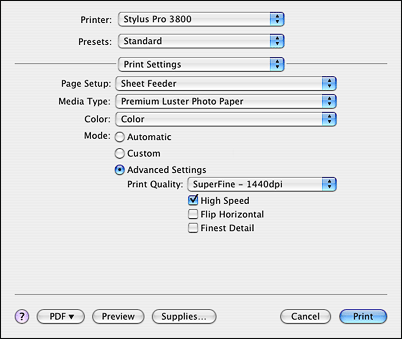
The Advanced Settings give you complete control over the printing environment. Use these settings to experiment with new printing ideas, or to fine-tune a range of print settings to meet your individual needs. Once you are satisfied with your new settings, you can give them a name and add them to the Custom Settings list.
|
Print Quality
|
Select the print quality that you want to use for printing.
|
|
High Speed
|
Activates bidirectional printing so your printer prints in both left-to-right and right-to-left directions. This setting speeds up printing, but may decrease print quality.
|
|
Flip Horizontal
|
Prints your image as it would appear in a mirror. Text and graphics appear reversed.
|
|
Finest Detail
|
Depending on the Print Quality setting you selected, you can turn on Finest Detail to print text, solid graphics, and line art with very sharp edges.
|
|
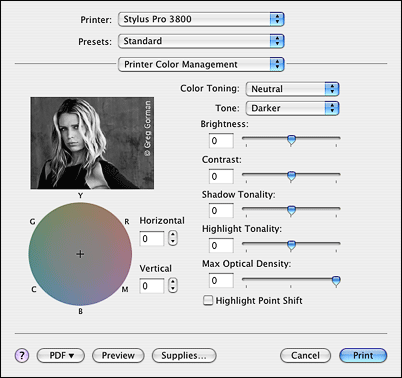
Color Toning
|
When you select Advanced B&W Photo as the Color setting, the Color Toning pop-up menu appears.
Neutral:
Provides standard image correction for most photos. Try this first.
Cool:
Gives a cool tone to your printouts.
Warm:
Gives a warm tone to your printouts.
Sepia:
Applies a sepia tone to your printouts.
Fine Adjustment:
Appears when you change the Tone, adjust the settings using the slide bars or the color circle, or select the Highlight Point Shift checkbox.
|
This option gives you control over the color matching and adjustment methods provided by the printer driver.

Use these settings to experiment with new printing ideas or to fine-tune a range of printer settings to meet your individual needs. Once you are satisfied with your new settings, you can add them to the Custom Setting list in the Print window.
Select this setting to use the color matching and adjustment methods provided with the printer. Click the triangle next to Advanced Settings. You see a window like this one.

|
EPSON Vivid
|
Select this setting to enhance blue and green tones in your printouts.
Note:
Because this setting reproduces blue and green tones that cannot be displayed by your monitor, your printouts may differ from the image on your screen when this option is selected.
|
|
Charts and Graphs
|
Enhances colors and lightens the midtones and highlights of an image. Select this setting when printing presentation graphics, such as charts and graphs.
|
|
EPSON Standard (sRGB)
|
Increases the contrast in your printouts. Select this setting when printing color photographs.
|
|
Adobe RGB
|
Matches your images’ color to the Adobe RGB color space.
|
Controls image contrast by modifying the midtones and mid-level grays.
The color enhancement sliders adjust the indicated options in a range of –25% to +25%.
Drag the slider to the right or left with your mouse to adjust the settings. You can also type a value from –25% to +25% in the boxes next to the sliders.
Color Controls (for Advanced B&W Photo)
When Advanced B&W Photo is selected as the Color setting, you see a window like this one. You can adjust the advanced monochrome settings. For more information on the settings, see the on-screen help.
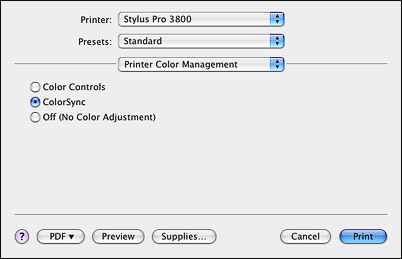
This setting automatically adjusts printout colors to match colors on your screen. Select this setting when printing scanned photographs or computer graphics. See Using Color Management for detailed information on color management.
 |
Note: |
 |
|
Ambient light and the age, quality, and settings of your monitor can affect the quality of color matching.
|
|
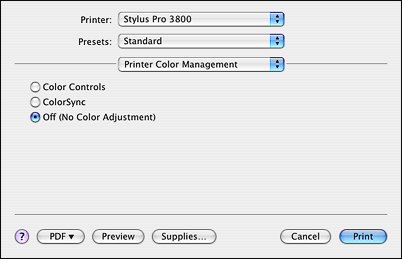
Off (No Color Adjustment)
This setting does not allow the printer driver to enhance or adjust the color in any way. Use this setting only when you create a new color profile or if the other Mode settings do not produce satisfactory results. See Using Color Management for detailed information on color management.
If you are using non-Epson paper and are experiencing problems with print quality when using Epson Media Type settings, adjust the following settings, as necessary.

|
Mode
|
Description
|
|
Color Density
|
Adjusts the saturation of Colors. Select a value between –50% and +50%. Drag the slider to the right (+) to deepen the color saturation of your printout or left (–) to lighten the color saturation. You can also type a number (–50 to +50) in the text box next to the slider.
Use this setting when you print on non-Epson papers.
Set the slider to the 0 position when you print on Epson media.
Note:
Adjusting the color saturation of a printout may not be possible, depending on the printing mode.
|
|
Drying Time per Print Head Pass
|
Pauses the print head for a specified period of time between passes.
Set this value using the slider or text box. To improve print quality by using slow ink absorption on the media, set a higher value.
The drying time per print head pass can be set from 0 to 5 seconds, in 0.1 second increments.
Note:
If you use this setting, printing will take longer.
|
|
Paper Feed Adjustment
|
Controls the paper feeding value, in 0.01% increments. If the paper feeding value is too large, white horizontal micro banding may appear. If the paper feeding value is too small, dark horizontal micro banding may appear.
|
|
Paper Thickness
|
This value is set automatically according to the Media Type setting. If you use non-Epson media, modify this value for your media. Refer to the paper specifications, or see to print a Thickness Pattern to determine the paper thickness.
|
|
Platen Gap
|
The platen gap is the distance from the media loaded in the printer to the print head. By adjusting this setting, you can increase the print quality. This is set automatically according to the Paper Thickness setting specified.
Note:
Setting Platen Gap to Narrow may produce better print quality, but make sure the media does not wrinkle or touch the print head; otherwise, the printout or the print head may be damaged. If this happens, select the Wider or Wide setting.
|
|
Default button
|
Click this button to return the settings to their factory default values.
|
You can print your images without margins. The expansion feature is available when you select a paper size with Sheet Feeder - Borderless (Auto Expand) or Manual-Rear - Borderless (Auto Expand) as the Paper Size in the Page Setup window.

Using the slider, you can control how much of the image extends beyond the edges of paper during borderless printing. For most print jobs, Max is recommended to eliminate margins on all sides of the paper. Moving the slider towards Min decreases the amount of the image enlargement; however, as this amount decreases, margins may appear on one or more sides of the print.
Use the Summary option to view the current settings.
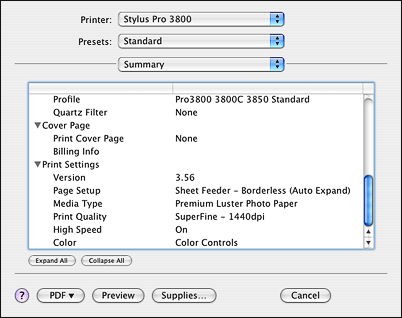
 |
Note: |
 |
|
The Summary option is a standard feature of Mac OS X. See your operating system’s documentation for details.
|
|
Saving your settings in the Print window
Follow the steps below to save your settings in the Print window.
 |
Select Save as from the Presets pop-up menu.
|
 |
Enter the name of the custom setting in the Save Preset As text box.
|

 |
Make sure that the name you entered in step 2 is saved in the Presets pop-up menu.
|
Using your saved settings in the Print window
To use your saved settings, select the name of your custom setting from the Presets pull-down menu.
If you change the Media Type or Color settings while your customized setting is selected in the Saved Settings list, your saved setting is not affected by the change. To return to your saved setting, simply reselect it in the list.
You can see how your data will look before actually printing it.
 |
Note: |
 |
Select printer driver settings.
|
 |
Click Preview in the Print window. The Preview window appears and displays a preview of your image.
|
| 


 Printer
 Top
Top

