After you create a document in a software program, follow these steps to print it using the basic printer settings:
|
1.
|
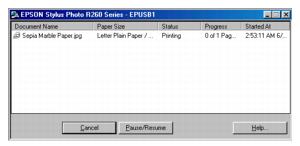
Open the File menu and select Print. You see a Print window like this one:
|

|
2.
|
Make sure EPSON Stylus Photo R260 Series is selected.
|
|
3.
|
Click the Properties or Preferences button. (If you see a Setup, Printer, or Options button, click it. Then click Properties or Preferences on the next screen.)
|
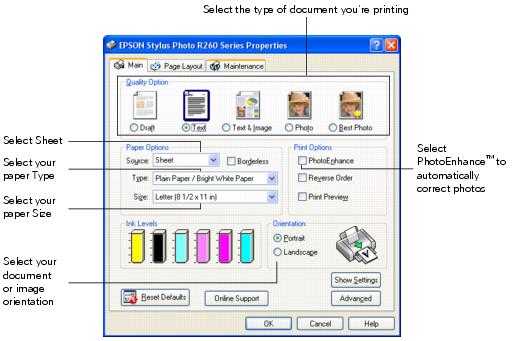
Select from these Quality Option types:
|
•
|
Draft: For rough drafts with reduced print quality
|
|
•
|
Text: For text-only documents with higher text quality
|
|
•
|
Text & Image: For documents with text and images with higher quality
|
|
•
|
Photo: For photos and graphics with good quality and speed
|
|
•
|
Best Photo: For photos or graphics with high print quality
|
Note:
For more information about printer settings, click the Help button or click the ? button and then click on the area you need help with.
The Quality Option settings on this screen give you the best combination of quality and speed for most prints. For the highest quality (Photo RPM®) on selected papers, click the Advanced button on the Main tab. Then see Customizing Windows Print Settings for instructions on selecting Photo RPM.
For more information about your printer, click the Online Support button and then select the Stylus Photo R260.
|
5.
|
Select Sheet as the source setting.
|
|
6.
|
Make sure the paper Type and size settings match the paper you’ve loaded in the printer.
|
|
8.
|
Click OK.
|
|
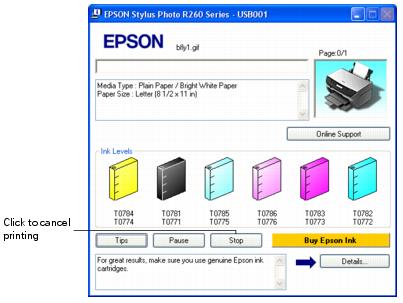
9.
|
During printing, the following window appears and shows the progress of your print job. You can use the buttons to cancel, pause, or resume printing. You can also see how much ink you have left.
When you change the printer settings within a program, they apply only to that program. If you want to change the default printer settings for all your programs, follow these steps:
Note:
If you don’t see the icon, see You don’t see the printer icon in the lower right corner of your screen (taskbar) in Windows.
If you don’t see the icon, see You don’t see the printer icon in the lower right corner of your screen (taskbar) in Windows.
|
2.
|
You can still change the printer settings in your individual programs, when necessary. For any given program, the new settings will override the Windows default settings until the next time you close and reopen the program.
You can use advanced settings for color matching, printing at a higher resolution, or selecting a variety of special effects and layouts.
|
1.
|
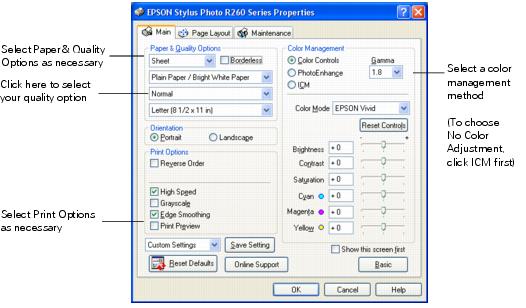
On the Main tab, click the Advanced button in the bottom right corner of the window.
|
|
2.
|
If you see a warning note, click Continue.
|
Note:
For the highest quality on selected papers, you can select Photo RPM (5760 × 1440) from the quality option pop-up menu (as shown above). When you select Photo RPM, printing will take longer.
For more information about advanced settings, or instructions on saving them as a group so you can reuse them later, click the Help button or click the ? button and then click on the area you need help with.
If you want to use the Advanced screen each time you access your printer settings, click Show this screen first.
|
•
|
Click OK to save your settings, return to the Print window, and print.
|
|
•
|
Click the Basic button to return to the Basic settings.
|
|
5.
|
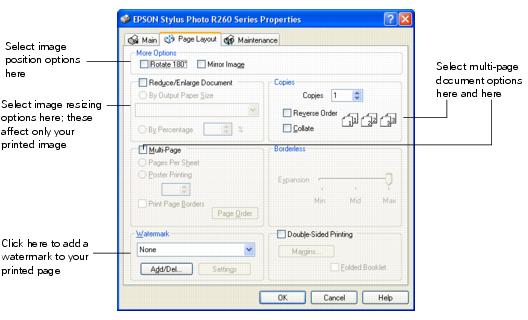
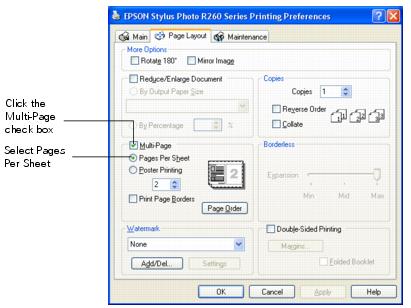
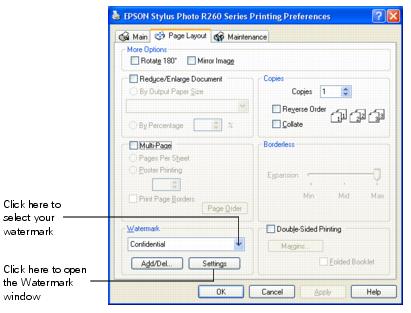
Click the Page Layout tab and select the following page layout settings as necessary:
|
Note:
For more information about page layout settings, click the Help button, click the ? button and then click on the area you need help with, or see Printing with Special Layout Options.
For more information about page layout settings, click the Help button, click the ? button and then click on the area you need help with, or see Printing with Special Layout Options.
|
6.
|
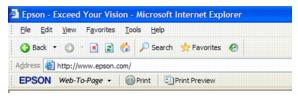
The Epson Web-To-Page software lets you print web pages so that they fit within the width of your selected paper.
If you have installed Epson Web-To-Page, the Epson Web-To-Page toolbar appears at the top of the Internet Explorer window.
|
2.
|
Click the Print button on the Epson Web-To-Page toolbar. The print window appears.
|
|
•
|
Windows XP, Me, and 98SE: Make sure EPSON Stylus Photo R260 Series is selected, then click the Properties or Preferences button. (If you see a Setup, Printer, or Options button, click it. Then click Properties or Preferences on the next screen.)
|
|
•
|
|
5.
|
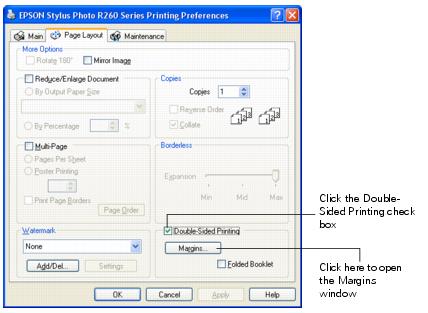
Double-sided printing allows you to print the odd-numbered pages first. Once these pages are printed, you can reload them to print the even-numbered pages onto the opposite sides of the paper.
Note:
This feature is not available when you are printing borderless, and may not be available when the printer is being accessed over a network or used as a shared printer.
Depending on the paper and the amount of ink used to print text and images, ink may bleed through to the other side of the paper. The surface of the paper may be smeared during double-sided printing.
|
1.
|
Open the File menu and select Print. You see a Print window like this one:
|

|
2.
|
|
3.
|
Click the Properties or Preferences button. (If you see a Setup, Printer, or Options button, click it. Then click Properties or Preferences on the next screen.)
|
|
4.
|
On the Main tab, select basic print settings as described in Printing from an Application, then click the Page Layout tab. You see a window like this one:
|
|
5.
|
|
6.
|
|
7.
|
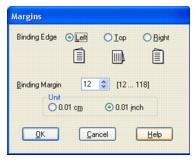
Choose cm or inch as the Unit setting. Then specify the width of the binding margin. You can enter any width from 0.12 inches (0.3 cm) to 1.18 inches (3.0 cm).
|
Note:
The actual binding margin may be different from the specified settings depending on your application. Experiment with a few sheets before printing the entire job.
The actual binding margin may be different from the specified settings depending on your application. Experiment with a few sheets before printing the entire job.
|
8.
|
|
9.
|
Note:
The paper may curl during printing due to the amount of ink used. Should this occur, slightly curl the sheets in the opposite direction before reloading them.
Align the sheet stack by tapping its edges against a hard, flat surface before reloading the stack.
Follow the instructions provided when reloading the printouts. Otherwise, paper may jam or the binding margins may be incorrect.
|
11.
|
Once you’ve reloaded the paper, click Resume to print the even-numbered pages.
|
You can use this feature to print a large photo or image on 4 × 6 paper, for example.
You can automatically resize your page to the paper size you select or choose a percentage of enlargement or reduction.
|
1.
|
Open the File menu and select Print. You see a Print window like this one:
|

|
2.
|
Make sure EPSON Stylus Photo R260 Series is selected.
|
|
3.
|
Click the Properties or Preferences button. (If you see a Setup, Printer, or Options button, click it. Then click Properties or Preferences on the next screen.)
|
|
4.
|
On the Main tab, select the basic print settings as described in Printing from an Application, then click the Page Layout tab. You see a window like this one:
|

|
5.
|
Click the Reduce/Enlarge Document check box.
|
|
•
|
If you selected By Output Paper Size, select the size of the paper you are using from the drop-down list.
|
|
•
|
If you selected By Percentage, use the arrows to choose a percentage.
|
|
7.
|
Click OK to close the printer settings window.
|
|
8.
|
Note:
It’s a good idea to print one test copy and examine the results before printing multiple copies.
It’s a good idea to print one test copy and examine the results before printing multiple copies.
|
1.
|
Open the File menu and select Print. You see a Print window like this one:
|

|
2.
|
|
3.
|
Click the Properties or Preferences button. (If you see a Setup, Printer, or Options button, click it. Then click Properties or Preferences on the next screen.)
|
|
4.
|
On the Main tab, select the basic print settings as described in Printing from an Application, then click the Page Layout tab. You see a window like this one:
|
|
5.
|
|
•
|
2, 4: Prints two or four photos or pages on a single piece of paper.
|
|
•
|
Print Page Borders: Prints frames around the pages printed on each sheet.
|
|
•
|
Page Order: Allows you to specify the order in which the pages will be printed on the sheet of paper. Some settings may be unavailable, depending on the Orientation setting (on the Main tab).
|
|
7.
|
Click OK to close the printer settings window.
|
|
8.
|
Note:
It’s a good idea to print one test page and examine the results before printing multiple pages.
It’s a good idea to print one test page and examine the results before printing multiple pages.
|
1.
|
Open the File menu and select Print. You see a Print window like this one:
|

|
2.
|
|
3.
|
Click the Properties or Preferences button. (If you see a Setup, Printer, or Options button, click it. Then click Properties or Preferences on the next screen.)
|
|
4.
|
On the Main tab, select the basic print settings as described in Printing from an Application, then click the Page Layout tab. You see a window like this one:
|

|
5.
|
|
6.
|
|
7.
|
Select Borderless if you would like each of your sheets to have no margin.
|
Note:
If you select Borderless, portions of your printout will be cropped on each sheet because this option enlarges your printout slightly beyond the paper size. You can use the Borderless Expansion slider (on the Page Layout tab) to control the amount of the image that extends beyond the edges of the paper.
The Borderless setting for poster printing is not available with Windows Me and 98SE.
If you don’t select Borderless, your sheets will have margins and they will have to be cut and overlapped to form your poster. You will be able to align your sheets more precisely, however, since your printouts won’t be cropped.
|
8.
|
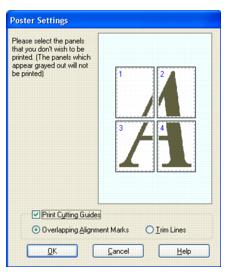
Click Settings to adjust the way your poster will be printed. The Poster Settings window opens.
|
|
9.
|
If you want to print only a few of the panels without printing the entire poster, click the panels that you do not want to print.
|
|
10.
|
If you didn’t select Borderless, make the following settings:
|
|
•
|
Print Cutting Guides: Prints guide lines for cutting.
|
|
•
|
Overlapping Alignment Marks: Slightly overlaps the panels and prints alignment markers so that the panels can be aligned more precisely.
|
|
•
|
Trim Lines: Prints border lines on the panels to guide you when trimming the pages.
|
|
11.
|
|
12.
|
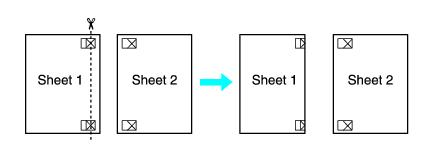
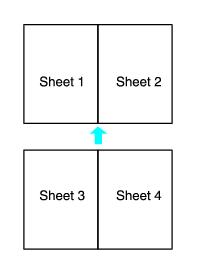
Follow these steps to create a poster from your printouts. The instructions are based on selecting 2x2 and Overlapping Alignment Marks as your cutting guide option:
|
1.
|
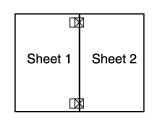
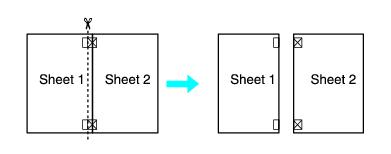
Cut off the margin of sheet 1 along a vertical line through the center of the top and bottom cross marks.
|
|
2.
|
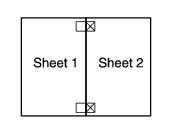
Place the edge of sheet 1 on top of sheet 2 and align the cross marks, then temporarily tape the two sheets together from the back.
|
|
3.
|
Cut the taped sheets in two along a vertical line through the alignment marks (this time, a line to the left of the cross marks).
|
|
5.
|
|
6.
|
|
1.
|
Open the File menu and select Print. You see a Print window like this one:
|

|
2.
|
Make sure EPSON Stylus Photo R260 Series is selected.
|
|
3.
|
Click the Properties or Preferences button. (If you see a Setup, Printer, or Options button, click it. Then click Properties or Preferences on the next screen.)
|
|
4.
|
On the Main tab, select the basic print settings as described in Printing from an Application, then click the Page Layout tab. You see a window like this one:
|
|
5.
|
|
6.
|
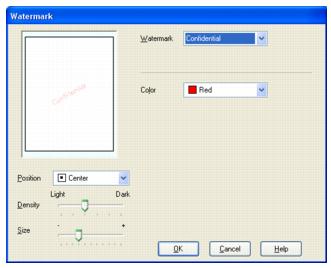
Specify settings for the watermark. You can change the position and size of the watermark by dragging the image within the preview window.
|
|
7.
|
|
8.
|
|
1.
|
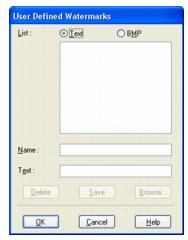
Click Add/Del under Watermark on the Page Layout screen. The following window appears.
|
|
•
|
To use an image file as a watermark, select BMP. Click Browse to locate the bitmap file you want to use, then click OK. Type a name for your watermark in the Name text box, then click Save.
|
|
•
|
To create a text-based watermark, select Text. Type the word or words in the Text box. This text will also be used as the watermark name. If you want to change the watermark name, type a new name in the Name box, then click Save.
|
|
3.
|
Click OK to return to the Page Layout screen.
|
|
4.
|
Click Settings and select the settings for your watermark.
|
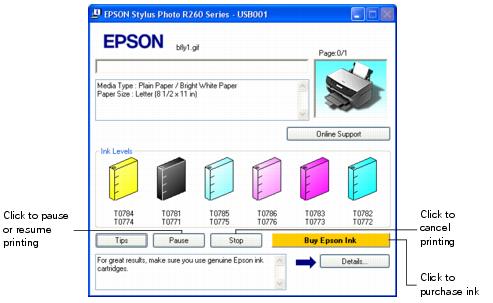
Press the  paper button to cancel your print job from the printer.
When you start printing, the following window appears. Click the Stop button to cancel printing.
Note:
If you have stalled print jobs, you can also delete those from Epson Spool Manager by selecting them and clicking Cancel. If you are having a problem with printing, deleting stalled print jobs may resolve the issue.
If you have stalled print jobs, you can also delete those from Epson Spool Manager by selecting them and clicking Cancel. If you are having a problem with printing, deleting stalled print jobs may resolve the issue.