Follow the Guidelines for Printing on CDs and DVDs, then see these sections for instructions:
|
•
|
Caution:
Use only ink jet-printable CDs and DVDs for printing. Thermal-printable and regular CDs and DVDs should not be used with this printer.
Use only ink jet-printable CDs and DVDs for printing. Thermal-printable and regular CDs and DVDs should not be used with this printer.
|
•
|
Before using or touching the printed surface of your CDs or DVDs, make sure you dry them for 24 hours.
|
|
•
|
Depending on your CD or DVD type, smearing may occur or the printed surface may be sticky even after it has dried. If smearing or stickiness occurs, see Adjusting the Print Density in Windows or Adjusting the Print Density in Mac OS X, or try a different brand of CD or DVD.
|
|
•
|
You can set the printable area for your CDs or DVDs using EPSON Print CD. Make sure the settings you choose are appropriate for the CD or DVD you are printing on; otherwise, you may stain the CD/DVD tray, CD, or DVD.
|
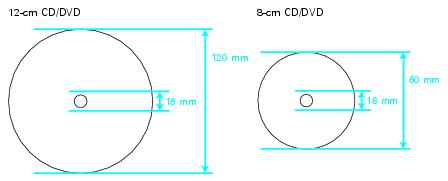
Note:
If you print in the inner hub or outer periphery areas of the disc, the disc or CD/DVD tray may get stained with ink:
If you print in the inner hub or outer periphery areas of the disc, the disc or CD/DVD tray may get stained with ink:
|
•
|
|
2.
|
Press the
|
Caution:
Make sure the data, music, or video is burned on your ink jet-printable CD or DVD before you print. Otherwise, dirt or scratches on the surface may cause errors when you burn the data.
Make sure the data, music, or video is burned on your ink jet-printable CD or DVD before you print. Otherwise, dirt or scratches on the surface may cause errors when you burn the data.
|
2.
|
Open the front cover, then set the front tray to the CD/DVD position by pulling the tray lever down.
|
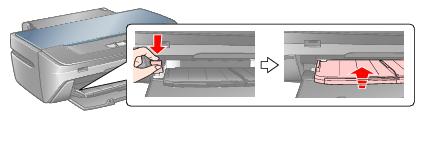
Caution:
Before you move the tray lever, make sure no paper or other objects are on the front tray and the front tray is not extended.
Do not touch the front tray when you move the tray lever.
Do not move the tray lever while the printer is printing.
Before you move the tray lever, make sure no paper or other objects are on the front tray and the front tray is not extended.
Do not touch the front tray when you move the tray lever.
Do not move the tray lever while the printer is printing.
|
3.
|
Place the CD or DVD on the CD/DVD tray with the white or printable side face-up. Make sure the disc lies flat in the tray.
|
Caution:
Before you position the CD or DVD, make sure that no foreign particles or substances are on the CD/DVD tray, as these may damage the disc’s data side.
Before you position the CD or DVD, make sure that no foreign particles or substances are on the CD/DVD tray, as these may damage the disc’s data side.
To print on a small CD or DVD (8-cm), place the small CD/DVD adapter on the tray first, then place the CD or DVD inside the adapter. Make sure the tabs on the edge of the adapter fit squarely into the molding of the tray.
Caution:
Make sure you always use the small CD/DVD adapter when you print on 8-cm CDs or DVDs and that the CD or DVD and adapter lie flat on the tray; otherwise the printer may be damaged.
Make sure you always use the small CD/DVD adapter when you print on 8-cm CDs or DVDs and that the CD or DVD and adapter lie flat on the tray; otherwise the printer may be damaged.

|
4.
|
Gently insert the CD/DVD tray along the base of the front tray until the arrow marks on the CD/DVD tray and the front tray match each other.
|

Caution:
Do not insert the CD/DVD tray while the printer is printing; otherwise, your printer may be damaged or the surface of the CD or DVD may become dirty or scratched.
Do not insert the CD/DVD tray while the printer is printing; otherwise, your printer may be damaged or the surface of the CD or DVD may become dirty or scratched.
|
1.
|
Click Start, point to Programs or All Programs, select EPSON Print CD, then select EPSON Print CD again.
|
Note:
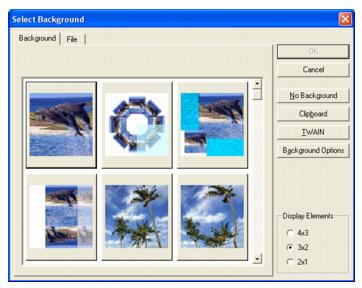
If you have already chosen a background, you see a different window. Click Select Image and the window above appears.
If you have already chosen a background, you see a different window. Click Select Image and the window above appears.
|
3.
|
To select a background image, click the File tab, click Browse to locate the folder your images are stored in, then click OK. You see thumbnail images of all the files in the folder.
|
|
4.
|
|
6.
|
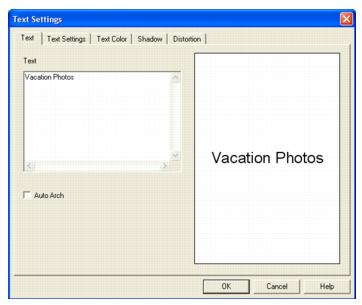
Enter your text and use the tabs to apply formatting and special effects, then click OK. (To open the window again, double-click any block of text.)
|
|
7.
|
To curve a single line of text, click the text in the main window, then drag the red “handle” up or down. Then adjust it using the other handles that appear.
|
|
8.
|
When you’re finished, choose Save As from the File menu to save your file.
|
Note:
For additional help with Epson Print CD, open the Help menu in Epson Print CD and select Help Topics.
For additional help with Epson Print CD, open the Help menu in Epson Print CD and select Help Topics.
|
1.
|
|
2.
|
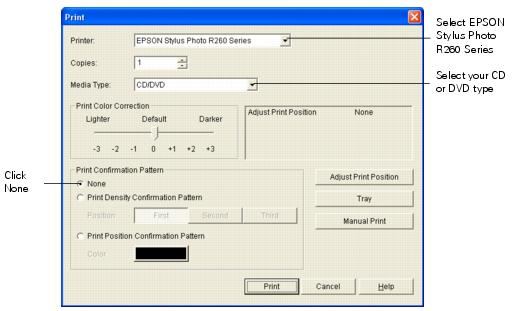
Make sure EPSON Stylus Photo R260 Series is selected.
|
|
3.
|
|
4.
|
Select None as the Print Confirmation Pattern setting.
|
|
5.
|
Click Print.
|
Note:
After you print, handle the CD or DVD carefully. To allow the ink to dry, wait at least 24 hours before playing the disc or inserting it in a drive. Keep printed discs away from moisture and direct sunlight.
After you print, handle the CD or DVD carefully. To allow the ink to dry, wait at least 24 hours before playing the disc or inserting it in a drive. Keep printed discs away from moisture and direct sunlight.
If your printed images and text are not centered or positioned the way you want on your CD or DVD, you may need to adjust the printing position. You can also use these steps to check the position before you print on a CD or DVD.
|
1.
|
Place an extra ink jet-printable CD or DVD on the CD/DVD tray and insert it into the printer, as described in Inserting a CD or DVD.
|
|
3.
|
|
4.
|
Make sure EPSON Stylus Photo R260 Series is selected.
|
|
5.
|
Select Print Position Confirmation Pattern as the Print Confirmation Pattern setting.
|
|
6.
|
Click Print. The confirmation pattern is printed on the CD or DVD.
|
|
7.
|
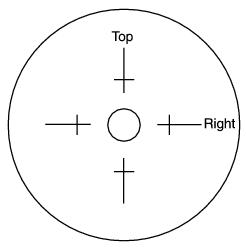
Remove the CD or DVD and measure the distance from the edge of the hole to the small cross marks labeled Top and Right. You’ll need a metric ruler with millimeters for accurate measurements.
|
|
8.
|
|
9.
|
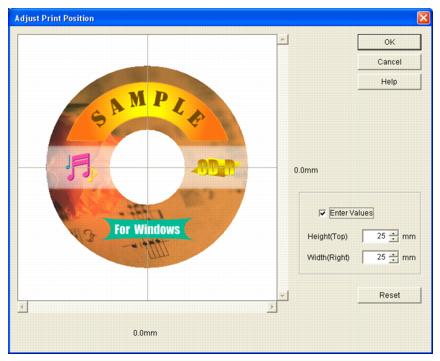
Click Enter Values, then input the Top distance (from your measurement) in the Height(Top) box. Enter the Right distance (from your measurement) in the Width(Right) box.
|
|
10.
|
Click OK to save the measurements.
|
If ink smears on your printed CDs or DVDs, you may need to adjust the color saturation or ink density. CDs and DVDs from different manufacturers may absorb ink differently, so you may need to adjust the density for each type of disc. Follow these instructions to print a color saturation check pattern, and then make adjustments as necessary.
|
2.
|
|
4.
|
Make sure EPSON Stylus Photo R260 Series is selected.
|
|
5.
|
Select Print Density Confirmation Pattern as the Print Confirmation Pattern setting.
|
|
6.
|
Click Print.
|
If you need to adjust the color, open the File menu, select Print, and make the Print Color Correction setting lighter or darker as necessary. Then, repeat steps 3 through 7 (but select either Second or Third in the Print Confirmation Pattern section, depending on whether you’re printing your second or third pattern on the disc).
Note:
You can print three density patterns on one disc. Each pattern is printed in a different location.
You can print three density patterns on one disc. Each pattern is printed in a different location.
|
8.
|
Remove the CD or DVD and let it dry for at least 24 hours. Then check the saturation levels again.
|
Note:
You can also use the Brightness and Contrast settings in Epson Print CD to adjust color saturation. For additional information, open the Help menu in Epson Print CD and select Help Topics.
You can also use the Brightness and Contrast settings in Epson Print CD to adjust color saturation. For additional information, open the Help menu in Epson Print CD and select Help Topics.
|
1.
|
|
3.
|
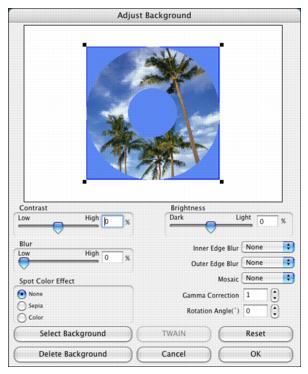
To select a background image, click Select Background.
|
|
5.
|
Click OK in the Adjust Background window.
|
|
7.
|
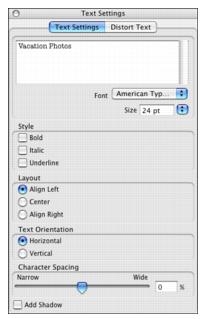
In the Text Settings window, type your text, then use any of the options in the window to format it. You can also use options in the Color Settings and Object Settings windows.
|
|
8.
|
To curve a single line of text, click the text in the main window, then drag the red “handle” up or down. Then adjust it using the other handles that appear.
|
|
9.
|
When you’re finished, choose Save As from the File menu to save your file.
|
Note:
For additional help with Epson Print CD, open the Help menu in Epson Print CD and select EPSON Print CD Help.
For additional help with Epson Print CD, open the Help menu in Epson Print CD and select EPSON Print CD Help.
|
1.
|
|
2.
|
|
3.
|
|
4.
|
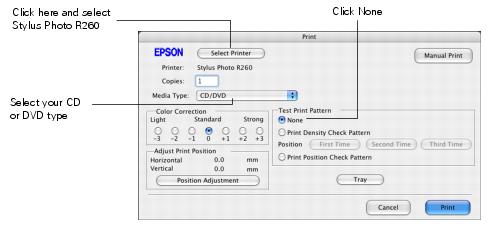
Select None as the Test Print Pattern setting
|
|
5.
|
Click Print.
|
If your printed images and text are not centered or positioned the way you want, you may need to adjust the printing position. You can also use these steps to check the position before you print on a CD or DVD.
|
1.
|
Place an extra ink jet-printable CD or DVD on the CD/DVD tray and insert it into the printer, as described in Inserting a CD or DVD.
|
|
3.
|
|
4.
|
Make sure Stylus Photo R260 is selected.
|
|
5.
|
Select Print Position Check Pattern as the Test Print Pattern setting.
|
|
6.
|
Click Print, then click OK in the Colors window. The confirmation pattern is printed on the CD or DVD.
|
|
7.
|
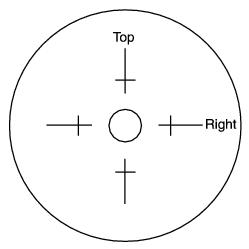
Remove the CD or DVD and measure the distance from the edge of the hole to the small cross marks labeled Top and Right. You’ll need a metric ruler with millimeters for accurate measurements.
|
|
8.
|
|
9.
|
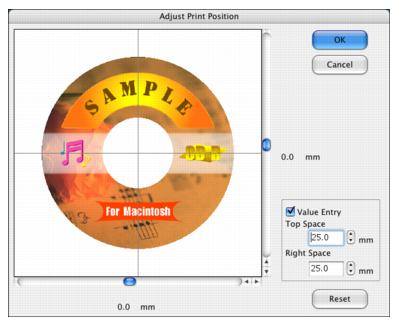
Click Value Entry, then input the Top distance (from your measurement) in the Top Space box. Enter the Right distance (from your measurement) in the Right Space box.
|
|
10.
|
Click OK to save the measurements.
|
If ink smears on your printed CDs or DVDs, you may need to adjust the color saturation or ink density. CDs and DVDs from different manufacturers may absorb ink differently, so you may need to adjust the density for each type of disc. Follow these instructions to print a color saturation check pattern, and then make adjustments as necessary.
|
1.
|
|
3.
|
Make sure Stylus Photo R260 is selected.
|
|
4.
|
Select Print Density Check Pattern as the Test Print Pattern setting.
|
|
5.
|
Click Print.
|
If you need to adjust the color, open the File menu, select Print, and make the Color Correction setting lighter or darker as necessary. Then, repeat steps 2 through 6 (but select either Second Time or Third Time in the Test Print Pattern section, depending on whether you’re printing your second or third pattern on the disc).
Note:
You can print three density patterns on one disc. Each pattern is printed in a different location.
You can print three density patterns on one disc. Each pattern is printed in a different location.
|
7.
|
Remove the CD or DVD and let it dry for at least 24 hours. Then check the saturation levels again.
|