|
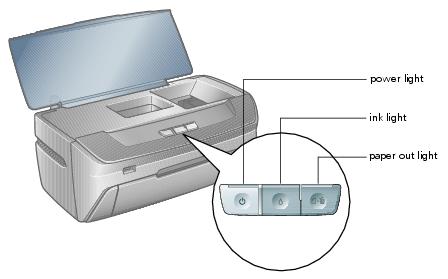
Green
|
The printer is receiving a print job, replacing an ink cartridge, charging ink, or cleaning the print head.
|
|
If you’re printing on paper, your paper ran out or multiple pages have fed at once. Make sure you push the tray lever up to set the front tray to the paper (lower) position. Then, load more paper and press the
If you’re printing on a CD or DVD, the CD/DVD tray is not inserted. Follow the instructions in Inserting a CD or DVD to insert the tray, then press the
|
|
|
If you’re printing on paper, it is jammed in the printer. Press the
If you’re printing on a CD or DVD, the CD/DVD tray has not ejected. Pull out the tray and press the
|
|
|
Red
|
One of the cartridges is nearly expended. Check the message that appears on your screen to determine which cartridge is nearly expended or follow the instructions in Checking the Ink Supply. Make sure you have a replacement cartridge.
|
|
One of the cartridges is expended or not installed. Make sure you have a replacement cartridge, then follow the steps in Replacing an Ink Cartridge to install it.
If you have just installed a new cartridge, it may be incompatible with the printer or incorrectly installed. Reinstall it or replace it with the correct cartridge, as described in Replacing an Ink Cartridge.
|
|
|
Paper may be blocking movement of the print head. Turn off the printer, then open the cover and remove any jammed paper or other foreign objects. Turn the printer back on again. If the lights are still on, contact Epson as described in Where to Get Help.
|
|
|
Before you turn on the printer or print on paper, push the tray lever up to set the front tray to the paper (lower) position.
Before you print on a CD or DVD, pull the tray lever down to set the front tray to the CD/DVD position.
|
|
|
An unsupported device is connected to the EXT. I/F USB port. Only devices compatible with PictBridge or USB DIRECT-PRINT can be connected to this port. See Direct Printing from a Digital Camera or Mobile Phone.
|
|
|
The printer may have an internal error. Turn off the printer, wait a few seconds, and turn it on again. If the lights are still flashing, contact Epson as described in Where to Get Help.
|
You can run a printer check to determine whether a problem comes from the printer itself or some other source.
Before you run a printer check, make sure the CD/DVD tray is not inserted in the printer, and make sure the front tray is in the paper (lower) position. Follow the instructions to reposition the front tray.
|
4.
|
Hold down the
|
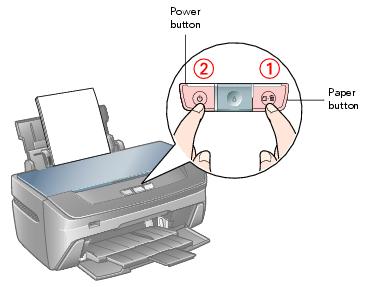
A test page prints showing the printer’s ROM version number, an ink counter code, and a nozzle check pattern. (If the pattern has gaps, you need to clean the print head.)
|
•
|
If the test page prints, the problem probably lies in your software settings, the cable, or your computer. It’s also possible that your software may not be installed correctly. Follow the instructions in Uninstalling Printer Software, then see your Start Here sheet for instructions on reinstalling the printer software.
|
|
•
|
If the test page doesn’t print, you may have a problem with your printer. Try the suggestions in Problems and Solutions. If nothing works, contact Epson as described in Where to Get Help.
|
|
5.
|
Turn off the printer after it prints the test page. Then reconnect the cable and turn on your printer and computer.
|
Tip:
It’s a good idea to check Epson’s support website periodically for free updates to your Epson Stylus Photo R260 Series printing software. Click the Driver Update button on the Maintenance tab in your Windows printer software or visit Epson’s support website. Download instructions are posted for your convenience.
It’s a good idea to check Epson’s support website periodically for free updates to your Epson Stylus Photo R260 Series printing software. Click the Driver Update button on the Maintenance tab in your Windows printer software or visit Epson’s support website. Download instructions are posted for your convenience.
|
•
|
The first time you install ink cartridges, the printer must charge its print head for a minute or so. Wait until charging finishes (the green
|
If the print head stops moving or the printer stops making noise, but the green  power light is still flashing after 5 minutes, turn off the printer. If the light is still flashing when you turn it back on, contact Epson as described in Where to Get Help.
|
•
|
Turn off the printer, then make sure the ink cartridges are inserted completely and the ink cartridge cover is closed completely. Also make sure no packing material remains in the printer. Wait a moment, then turn the printer back on to clear the error.
|
|
•
|
Make sure your printer is turned on and the cable is securely connected at both ends. Then carefully follow the installation instructions on the Start Here sheet. Also make sure your system meets the requirements listed in System Requirements.
|
|
•
|
Close your other programs, including any screen savers and virus protection software, and install the software again.
|
|
•
|
If you’re using Windows 2000 and you see an error message or your software doesn’t install correctly, you may not have software installation privileges. Contact your System Administrator.
|
|
•
|
If you’re using Windows, make sure your system was not upgraded from Windows 95. The USB Printer Device Driver may not install correctly.
|
|
•
|
If you are using a Macintosh and you do not see the printer name in the Format for menu on the Page Setup screen, you may need to set up your printer in the Printer Setup Utility or Printer Center. See the Start Here sheet for instructions.
|
|
•
|
Make sure the USB Controller is working properly in Device Manager. See your Windows help system for details. If it’s not working, contact your computer manufacturer.
|
|
•
|
If you’re printing over a network, see Setting Up Network Printing for instructions.
|
Only the green  power light is on, but nothing prints.
|
•
|
Run a printer check. If the test page prints, make sure your software is installed correctly. You may need to uninstall your printer software and then reinstall it.
|
|
•
|
If you’re trying to print a large image, your computer may not have enough memory. Try reducing the resolution of your image or printing the image at a smaller size. You may need to install more memory in your computer.
|
|
•
|
If you’re using Windows Me or 98SE, you may need to clear stalled print jobs from the Spool Manager. For instructions, see Using Epson Spool Manager in Windows 98SE or Me.
|
|
•
|
If you print continuously for an extended period, the paper may temporarily stop feeding or the print head carriage may pause for a while to prevent the printer mechanism from overheating and being damaged. If this happens, you can continue to print but Epson recommends that you stop and leave the printer on for about 30 minutes. After 30 minutes, turn the printer off and on and it should print at normal speed.
|
|
•
|
If you’re using Windows, make sure your printer is selected. For Macintosh OS X, make sure your printer is selected in the Page Setup and Print windows.
|
|
•
|
The printer won’t operate properly if it’s tilted or at an angle. Place it on a flat, stable surface that extends beyond the printer base in all directions.
|
|
•
|
You don’t see the  printer icon in the lower right corner of your screen (taskbar) in Windows.
Windows Vista: Click the  button, select Control Panel, select Hardware and Sounds, then select Printer.
Windows XP: Click Start, select Control Panel, then select Printers and Faxes (or Printers and Other Hardware and then Printers and Faxes).
|
2.
|
|
3.
|
Click the Maintenance tab.
|
|
4.
|
|
5.
|
Make sure your system meets the requirements listed in System Requirements. If you’re printing a high-resolution image, you need more than the minimum requirements listed. You may also need to:
|
•
|
Make sure the paper type selected in your printer settings is appropriate for the type of paper you’re using.
|
|
•
|
Select Grayscale in your printer settings if your document doesn’t include color.
|
|
•
|
For Windows, choose Draft as your Quality Option.
|
|
•
|
If you’re using Windows, you can also increase print speed by selecting certain settings in the Speed & Progress window:
|
|
1.
|
Right-click the
|
Note:
If you don’t see the icon, see You don’t see the printer icon in the lower right corner of your screen (taskbar) in Windows.
If you don’t see the icon, see You don’t see the printer icon in the lower right corner of your screen (taskbar) in Windows.
|
2.
|
Click the Maintenance tab.
|
|
3.
|
Click the Speed & Progress button. The following screen appears:
|

The red  ink light is flashing or on after you replace the cartridge.
|
2.
|
Press the
|
|
3.
|
Open the cartridge cover and push each ink cartridge down (you may hear a cartridge click into place if it was incorrectly installed the first time).
|

|
•
|
Select a higher Quality Option or Print Quality and turn off High Speed mode. See Printing in Windows, or Printing with Macintosh OS X.
|
|
•
|
|
•
|
Make sure you’re using genuine Epson ink cartridges and you use them within six months after you open the packages.
|
|
•
|
|
•
|
Align the print head.
|

|
•
|
Make sure your paper isn’t damp or curled, or loaded face down (the printable side should be face up).
|
|
•
|
|
•
|
When printing on special paper, check the instructions in the paper package. You may need to use an included support sheet or load your paper one sheet at a time.
|
|
•
|
The printer won’t operate properly if it’s tilted or at an angle. Place it on a flat, stable surface that extends beyond the printer base in all directions.
|
|
•
|
Align the print head.
|
|
•
|
If ink smears on the back of a printout, clean the inside of the printer.
|
|
•
|
If you are using double-sided paper and printing heavily saturated or dark images on the front side of the paper, you may notice that smudges or marks appear on the front when you print the second side. If one side of the paper will contain a lighter image or text, print that side first to eliminate marks or smudging.
|
|
•
|
Clear the High Speed check box in your printer settings.
|
|
•
|
Select Thick paper and envelopes in your printer settings:
|
|
1.
|
Right-click the
|
|
2.
|
Click the Maintenance tab.
|
|
3.
|
|
4.
|
|
2.
|
|
3.
|
|
•
|
Load a new sheet of plain paper and press the
|
|
•
|

|
•
|
|
•
|
Make sure your paper isn’t damaged, old, dirty, or loaded face down. If it is, reload a new stack of paper with the printable side up; it is usually brighter or whiter than the other side. For best results, use genuine Epson paper.
|
|
•
|
Clear the Grayscale setting in your printer settings (for Windows). Change the ink setting in your printer settings to Color (for Macintosh).
|
|
•
|
Try changing the Gamma setting; see Customizing Windows Print Settings or Customizing Mac OS X Print Settings.
|
|
•
|
After you print, the colors on your printout will take some time to set as the ink dries. During this time, the colors may look different than you expect. To reduce the drying time, avoid stacking your prints on top of each other.
|
|
•
|
Your printed colors can never exactly match your on-screen colors. However, you can use a color management system to get as close as possible. Try using the ICM (Windows) or ColorSync (Macintosh) setting.
|
|
•
|
|
•
|
Align the print head.
|
|
•
|
You may need to increase the image resolution or print it in a smaller size; see your software documentation.
|
|
•
|
|
•
|
Align the print head.
|
If you’re printing on glossy paper, prints may be scratched if not handled properly. Don’t place objects on top of your prints, and be careful not to scratch them with your fingernails. For best results, frame your prints under glass.
|
•
|
If the paper doesn’t eject fully, you may have set the wrong paper size. Press the
|
|
•
|
If paper doesn’t feed, remove it from the sheet feeder. Reload it against the right edge, behind the tabs, then slide the left edge guide against the paper.
|
|
•
|
If multiple pages feed at once, remove the paper from the sheet feeder, fan the edges to separate the sheets, then reload it.
|
|
•
|
If paper jams, press the
|
|
•
|
Heavily saturated prints may curl, causing a paper jam when printing on both sides of the paper.
|
|
•
|
Use new, smooth, high-quality paper, loaded printable side up. Make sure the paper is not curled, creased, wrinkled, too thin, or too old.
|
|
•
|
If you’re using special paper, make sure you’ve followed any loading instructions that came with the paper. Also, make sure the number of sheets in the paper stack does not exceed the limit specified for the paper. For more information, see Special Papers.
|
|
•
|
Place the paper against the right edge behind the tab. Slide the left edge guide against it, but not too tightly.
|
|
•
|
The printer won’t operate properly if it’s tilted or at an angle. Place it on a flat, stable surface that extends beyond the printer base in all directions.
|
|
•
|
If the tray is ejected when you start a print job, the printer is not ready. Wait until you see a message on your screen asking you to insert the tray. Then reinsert the tray and press the
|
Adjust the Print position. For more information, see Adjusting the Print Position (Windows) or Adjusting the Print Position (Macintosh).
|
•
|
Handle the disc carefully and allow the ink to dry for at least 24 hours before playing the disc or inserting it in a drive.
|
|
•
|
Make sure you gently insert the CD/DVD tray along the base of the front tray until the arrow marks on the CD/DVD tray and the front tray match each other. Make sure both sides of the CD/DVD tray slide underneath the brackets on the front tray. For more information, see Inserting a CD or DVD.
|
•
|
Turn off the Mirror Image setting in your printer settings:
|
|
1.
|
Right-click the
|
|
2.
|
Click the Page Layout tab.
|
|
3.
|
|
2.
|
|
3.
|
Click Advanced.
|
|
4.
|
|
•
|
|
•
|
If you’re using Windows, make sure your printer is selected. For Macintosh OS X, make sure your printer is selected in the Page Setup and Print windows.
|
|
1.
|
Right-click the
|
|
2.
|
Click the Maintenance tab.
|
|
3.
|
|
4.
|
|
•
|
The printer won’t operate properly if it’s tilted or at an angle. Place it on a flat, stable surface that extends beyond the printer base in all directions.
|
|
•
|
|
•
|
Make sure the paper you loaded matches the paper size and paper type settings you selected in your printer software. For instructions, see Printing in Windows or Printing with Macintosh OS X.
|
|
•
|
If you’re using Mac OS X, make sure you choose the same printer in the Page Setup window and the Print window.
|
|
•
|
Use the Print Preview option in your printer software to check your margins before you print.
|
|
•
|
Make sure the paper is positioned all the way to the right of the sheet feeder. Slide the left edge guide against the paper.
|
|
•
|
|
•
|
|
•
|
Make sure that the Copies option in your printer or application software is not set for multiple copies.
|
•
|
Make sure the USB cable is securely connected and meets the system requirements. Then try printing again.
|
|
•
|
If you’re using Windows, make sure your printer is selected. For Macintosh OS X, make sure your printer is selected in the Page Setup and Print windows.
|
|
•
|
If you’re using a switch box or USB hub with your printer, connect the printer directly to your computer instead.
|
|
•
|
If you’re using Windows Me or 98SE, you may need to clear stalled print jobs from the Spool Manager. For instructions, see Using Epson Spool Manager in Windows 98SE or Me.
|
|
•
|
|
•
|
|
•
|
Your images may not match the width/height proportions of the paper size or layout you’re using, and may be cropped to fit.
|
You may need to uninstall and then reinstall your printer driver and utilities. For example, this might be necessary when you upgrade your operating system. You don’t need to uninstall Epson Print CD, PhotoImpression, or your on-screen User’s Guide.
|
•
|
|
2.
|
|
3.
|
With Windows Vista, click Continue, then go to step 4.
|
4.
|
In the next window, select EPSON Stylus Photo R260 Series, and click OK. Then follow the on-screen instructions.
|
|
5.
|
Restart your computer, then see the Start Here sheet to reinstall your software.
|
|
3.
|
Open the Epson CD-ROM desktop icon.
|
|
4.
|
|
5.
|
Double-click the Installer icon.
|
|
6.
|
When the Installer window appears, select Uninstall from the pop-up menu in the upper left and click Uninstall.
|
Note:
If the name of your printer remains in the Print Center or Printer Setup Utility, select it from Printer List and click Delete.
If the name of your printer remains in the Print Center or Printer Setup Utility, select it from Printer List and click Delete.
|
8.
|
Restart your Macintosh, then see the Start Here sheet to reinstall your software.
|