After you create a document in a software program, follow these steps to print it using the basic printer settings:
|
1.
|
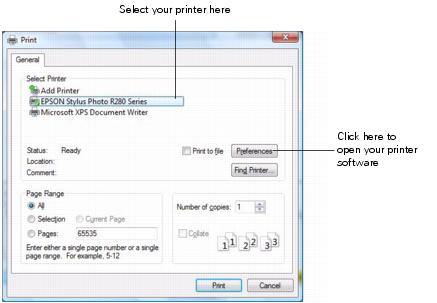
Open the File menu and select Print. You see a Print window like this one:
|
|
2.
|
Make sure EPSON Stylus Photo R280 Series is selected.
|
|
3.
|
Click the Properties or Preferences button. (If you see a Setup, Printer, or Options button, click it. Then click Properties or Preferences on the next screen.)
|
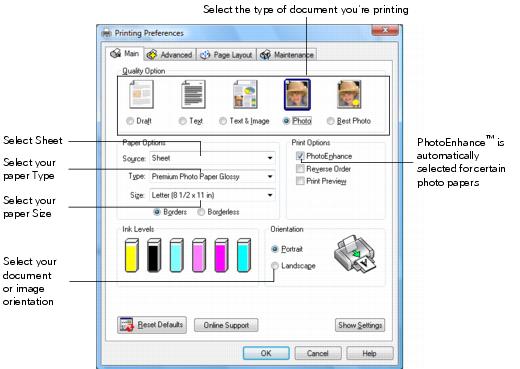
Select from these Quality Option types:
|
•
|
Draft: For rough drafts with reduced print quality
|
|
•
|
Text: For text documents with higher text quality (for example, web pages)
|
|
•
|
Text & Image: For documents with text and images with higher quality than text mode
|
|
•
|
Photo: For photos and graphics with good quality and speed
|
|
•
|
Best Photo: For photos or graphics with high print quality
|
Note:
For more information about printer settings, click the Help button or click the ? button and then click on the area you need help with.
The Quality Option settings on this screen give you the best combination of quality and speed for most prints. For the highest quality (Photo RPM®) on selected papers, click the Advanced button on the Main tab. Then see Customizing Windows Print Settings for instructions on selecting Photo RPM.
|
5.
|
Select Sheet as the source setting.
|
|
6.
|
Make sure the paper Type and size settings match the paper you’ve loaded in the printer.
|
|
8.
|
Click OK.
|
|
9.
|
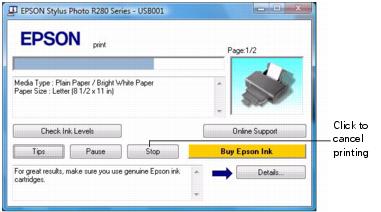
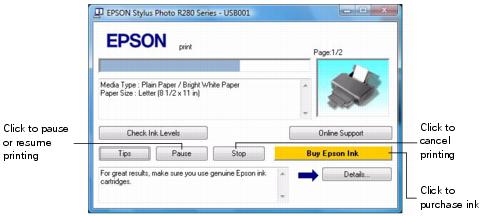
During printing, the following window appears and shows the progress of your print job. You can use the buttons to cancel, pause, or resume printing. You can also see how much ink you have left by clicking the Check Ink Levels button.
When you change the printer settings within a program, they apply only to that program. If you want to change the default printer settings for all your programs, follow these steps:
Note:
If you don’t see the icon, see You don’t see the printer icon in the lower right corner of your screen (taskbar) in Windows.
If you don’t see the icon, see You don’t see the printer icon in the lower right corner of your screen (taskbar) in Windows.
|
2.
|
You can still change the printer settings in your individual programs, when necessary. For any given program, the new settings will override the Windows default settings until the next time you close and reopen the program.
For most of your print jobs, you can use the printer defaults for the paper type you select. You can use advanced settings for color matching, printing at a higher resolution, or selecting a variety of special effects and layouts.
|
1.
|
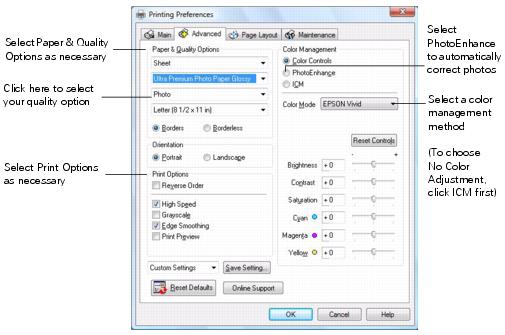
On the Main tab, click the Advanced tab.
|
|
2.
|
If you see a warning note, click Continue.
|
Note:
For the highest quality on selected papers, you can select Photo RPM (5760 × 1440) from the quality option pop-up menu (as shown above). When you select Photo RPM, printing will take longer.
For more information about advanced settings, or instructions on saving them as a group so you can reuse them later, click the Help button or click the ? button and then click on the area you need help with.
If you want to use the Advanced screen each time you access your printer settings, click Show this screen first.
|
•
|
Click OK to save your settings, return to the Print window, and print.
|
|
•
|
Click the Basic button to return to the Basic settings.
|
|
5.
|
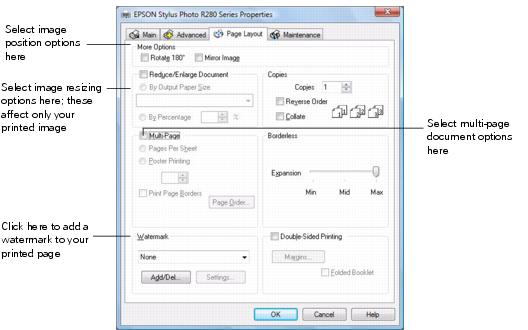
Click the Page Layout tab and select the following page layout settings as necessary:
|
Note:
For more information about page layout settings, click the Help button, click the ? button and then click on the area you need help with, or see Printing with Special Layout Options.
For more information about page layout settings, click the Help button, click the ? button and then click on the area you need help with, or see Printing with Special Layout Options.
|
6.
|
Your Epson Stylus Photo R280 Series automatically analyzes your photos and, if necessary, adjusts the brightness, contrast, and saturation. Now you can bring back to life those dark portraits and dull landscapes that you normally wouldn’t print. And you don’t need to do anything special to use this feature. The Epson Stylus Photo R280 Series automatically corrects your photos when you print.
Auto Photo Correction (called PhotoEnhance) uses a sophisticated face recognition technology to optimize photos that includes faces. For this to work, both eyes and the nose must be visible in the subject’s face. If your photo includes a face with an intentional color cast, such as a bronze statue, you may want to turn off PhotoEnhance to retain the special color effects. If you need to turn PhotoEnhance on or off, follow the links below:
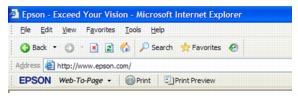
The Epson Web-To-Page software lets you print web pages so that they fit within the width of your selected paper.
If you have installed Epson Web-To-Page, the Epson Web-To-Page toolbar appears at the top of the Internet Explorer window.
|
2.
|
Click the Print button on the Epson Web-To-Page toolbar. The print window appears.
|
|
•
|
Windows XP: Make sure EPSON Stylus Photo R280 Series is selected, then click the Properties or Preferences button. (If you see a Setup, Printer, or Options button, click it. Then click Properties or Preferences on the next screen.)
|
|
•
|
|
5.
|
You can use this feature to print a large photo or image on 4 × 6 paper, for example.
You can automatically resize your page to the paper size you select or choose a percentage of enlargement or reduction.
|
1.
|
Open the File menu and select Print. You see a Print window like this one:
|

|
2.
|
Make sure EPSON Stylus Photo R280 Series is selected.
|
|
3.
|
Click the Properties or Preferences button. (If you see a Setup, Printer, or Options button, click it. Then click Properties or Preferences on the next screen.)
|
|
4.
|
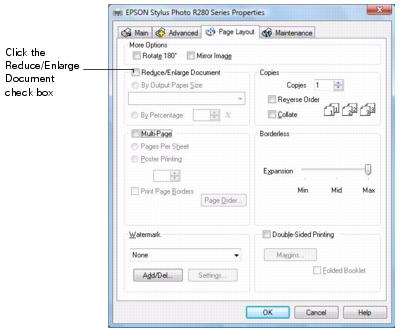
On the Main tab, select the basic print settings as described in Printing from an Application, then click the Page Layout tab. You see a window like this one:
|
|
5.
|
Click the Reduce/Enlarge Document check box.
|
|
•
|
If you selected By Output Paper Size, select the size of the paper you are using from the drop-down list.
|
|
•
|
If you selected By Percentage, use the arrows to choose a percentage.
|
|
7.
|
Click OK to close the printer settings window.
|
|
8.
|
Note:
It’s a good idea to print one test copy and examine the results before printing multiple copies.
It’s a good idea to print one test copy and examine the results before printing multiple copies.
|
1.
|
Open the File menu and select Print. You see a Print window like this one:
|

|
2.
|
|
3.
|
Click the Properties or Preferences button. (If you see a Setup, Printer, or Options button, click it. Then click Properties or Preferences on the next screen.)
|
|
4.
|
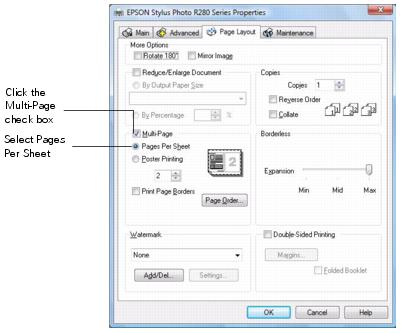
On the Main tab, select the basic print settings as described in Printing from an Application, then click the Page Layout tab. You see a window like this one:
|
|
5.
|
|
•
|
2, 4: Prints two or four photos or pages on a single piece of paper.
|
|
•
|
Print Page Borders: Prints frames around the pages printed on each sheet.
|
|
•
|
Page Order: Allows you to specify the order in which the pages will be printed on the sheet of paper. Some settings may be unavailable, depending on the Orientation setting (on the Main tab).
|
|
7.
|
Click OK to close the printer settings window.
|
|
8.
|
Note:
It’s a good idea to print one test page and examine the results before printing multiple pages.
It’s a good idea to print one test page and examine the results before printing multiple pages.
Press the  paper button to cancel your print job from the printer.
When you start printing, the following window appears. Click the Stop button to cancel printing.