- Make sure the EPSON Stylus Photo RX500 is turned on and not printing, and the Error light is off.
- Load a stack of plain, letter-size paper in the sheet feeder.
- Press the Setup button to enter setup mode. You see this message on the LCD screen:
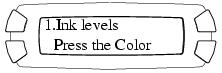
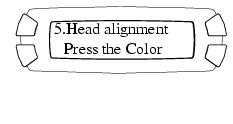
- Press the top left button (next to Ink levels in the illustration) until you see this screen:
- Press the x Color button to print the alignment page.
- On the test page, select the pattern with the two vertical lines most precisely printed on top of each other. You may need to use a magnifying glass or loupe.
- Press the button in the numeric keypad corresponding to the best pattern in row 1, then press the x Color button to enter your selection. Repeat this step for the remaining three rows.
- When you're finished, press the x Color button to print the alignment page again. Verify that pattern #8 is the best pattern in each of the rows.


Note: If you select a pattern other than 8 in any row, that pattern becomes pattern #8 the next time you align the print head.
If pattern #8 is not the best pattern in one or more of the rows, repeat step 7 for those rows.
If pattern #8 is the best pattern in every row, press the OK button to cycle through the questions about each row on the LCD screen. When you see the screen to the right, press the top left button (beside Head alignment in the illustration) to move to a different task in setup mode, or press the Copy, Memory Card, or Scan button to exit setup mode.