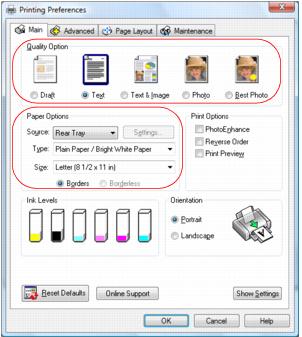
Click the Main tab on the top of the printer settings window to select your basic print options.
|
1.
|
Select a Quality Option that matches your document or photo, and the print quality you want.
|
|
•
|
Draft: for rough drafts with reduced quality
|
|
•
|
Text: for documents containing text or images with standard print quality
|
|
•
|
Text & Image: for documents with text or images with better print quality
|
|
•
|
Photo: for photos and graphics with good quality and print speed
|
|
•
|
Best Photo: for photos or graphics with high print quality
|
|
2.
|
Select the paper Type setting that matches the paper you loaded.
|
|
•
|
Front Tray: prints using the front paper cassette.
|
|
•
|
Rear Tray: prints using the rear sheet feeder.
|
|
•
|
Automatic: automatically selects the paper source based on the paper Type and Size settings selected.
|
|
•
|
Settings: selects the paper Type and Size settings for the front paper cassette when Automatic is selected as the paper Source setting.
|
You can load paper in these sizes and select the size in the printer software. (Wider papers are for use only when reducing large images with the Reduce/Enlarge Document option.) A User Defined option is also available so you can create a custom size.
Half Letter (5.5 × 8.5 inches)
Envelope #10 (4 1/8 × 9 1/2 inches)
|
5.
|
If you’re printing borderless photos, click the Borderless checkbox. For documents or photos with borders, select Borders.
|
|
6.
|
Choose Portrait or Landscape orientation for your document or photo. (Choose Landscape for envelopes.)
|
|
•
|
Select Print Options
|
|
•
|
PhotoEnhance: automatically adjusts the brightness, contrast, and saturation of photos to best effect.
|
Note:
PhotoEnhance uses a sophisticated face recognition technology to optimize photos that include faces. For this to work, both eyes and the nose must be visible in the subject’s face. If your photo includes a face with an intentional color cast, such as a bronze statue, you may want to turn off PhotoEnhance to retain the special color effects.
PhotoEnhance uses a sophisticated face recognition technology to optimize photos that include faces. For this to work, both eyes and the nose must be visible in the subject’s face. If your photo includes a face with an intentional color cast, such as a bronze statue, you may want to turn off PhotoEnhance to retain the special color effects.
|
•
|
Reverse Order: reverses the order in which your document prints to last-page-first.
|
|
•
|
Print Preview: lets you preview how your document or photo will look when printed.
|
|
•
|
See a summary of your settings (click Show Settings)
|
|
•
|
Return to the default settings (click Reset Defaults)
|
|
•
|
Access the Epson product support website (click Online Support)
|