![]()
Reference Guide
|
|
Index |
|
Search |
|
Safety | |||||
|
|
Contents |
|
Help |
|
||||||
|
|
|
|||||||||||||||||||||||||||||||||
Scanning / How to
You can place a document on the scanner of your RX700 and select Scan to PC or Scan to Email on the RX700 control panel to scan the document to your computer. Once it’s saved as a file on your computer, you can open your email application and include the scanned image in a message.
| Note: |
|
When you select Scan to PC or Scan to Email, a “scanner event” is triggered on your computer. You need to assign EPSON Scan (your RX700 scanning software) to the scanner event before scanning to your PC for the first time.
If you’re using Windows XP, continue with the next section. If you’re running Windows Me, 2000, or 98, see Setting Up in Windows Me, 2000, and 98.
Follow these steps to set up scanner events in Windows XP. Make sure you’ve installed all the software and connected the RX700 to your computer, as described on the Start Here sheet.
 |
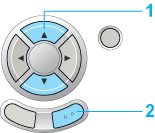
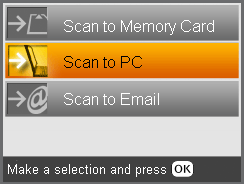
Press the Scan button on your RX700, then select Scan to Email. |
|

|
|
| 1. Select Scan to Email. |
| 2. Press the OK button. |
You see this RX700 screen:
 |
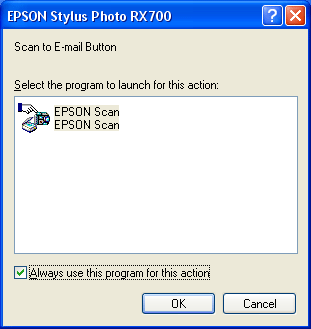
Select EPSON Scan, select Always use this program for this action, and then click OK. |
 |
When EPSON Scan opens on your computer, close the application. |
 |
Select Scan to PC on your RX700. |
 |
On the RX700 screen, select EPSON Scan, select Always use this program for this action, and then click OK. |
 |
When EPSON Scan opens on your computer, close the application. |
Setting Up in Windows Me, 2000, and 98
Follow these steps to set up scanner events. Make sure you’ve installed all the software and connected the RX700 to your computer, as described on the Start Here sheet.
| |
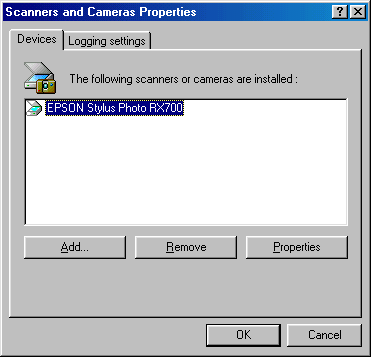
Open the Windows Control Panel, then open Scanners and Cameras. You see a screen similar to this: |
| |
Select Stylus Photo RX700 and click the Properties button. |
| |
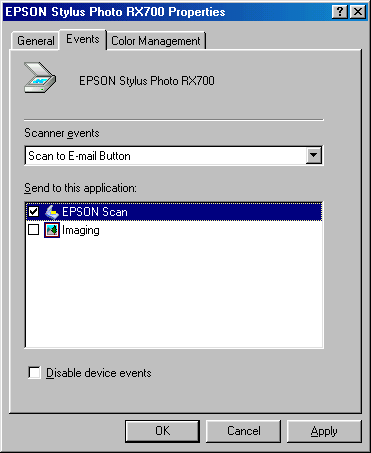
Click the Events tab. You see this screen: |
| |
Under Scanner events, select Scan to E-mail Button. Then, under Send to this application, select EPSON Scan. Make sure a check does not appear next to any other application. Click Apply. |
| |
Repeat the same steps for Scan to PC. Under Scanner events, select Scan Button. Then select EPSON Scan, making sure a check does not appear next to any other application. Click Apply. |
| |
Click OK and close any open windows. |
| Note for Windows 2000 users: |
|
Scanning and Emailing Your Document
Once you've set up scanner events on your PC, follow these steps to scan a document, save it to your computer, and email it (if desired).
| |
Place a document on the scanner glass. |
| |
Press the Scan button on your RX700, then select Scan to PC or Scan to Email. The EPSON Scan screen opens on your computer. |
| |
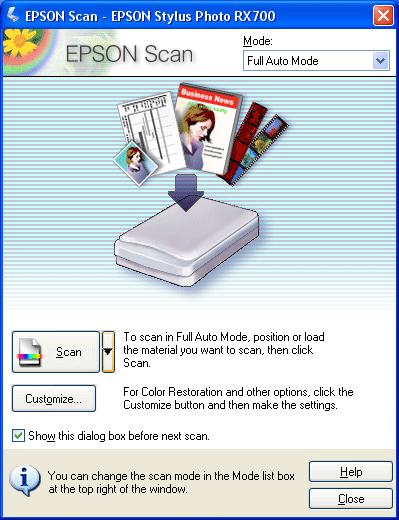
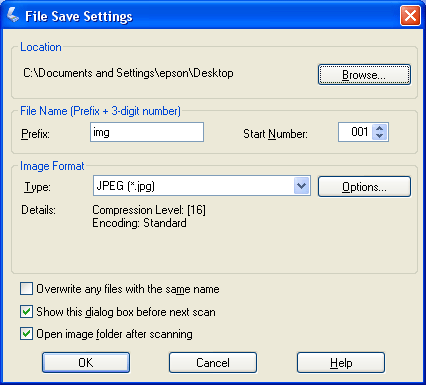
Select the desired Mode and any Customize options, if necessary. Then click Scan. The File Save Setting screen appears: |
| |
Select where you want to save the file on your computer, then click OK. Your document is scanned. |
| |
To send the image by email, use Windows Explorer to locate the saved image file on your computer. Right-click the file, select Send To, and then select Mail Recipient. |
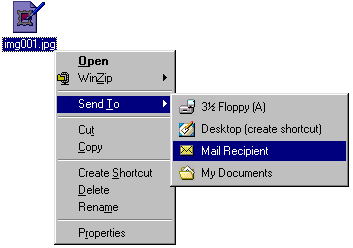
Your email application opens a message composition window, and your scanned image is included as an attachment.
Follow these steps to scan a document, save it to your computer, and email it (if desired). You do not need to make any special settings on your computer in advance, but make sure you’ve installed all the software and connected the RX700 to your computer, as described on the Start Here sheet.
| |
Place a document on the scanner glass. |
| |
Press the Scan button on your RX700, then select Scan to PC or Scan to Email. |
|
|
|
| 1. Select Scan to PC or Scan to Email. |
| 2. Press the OK button. |
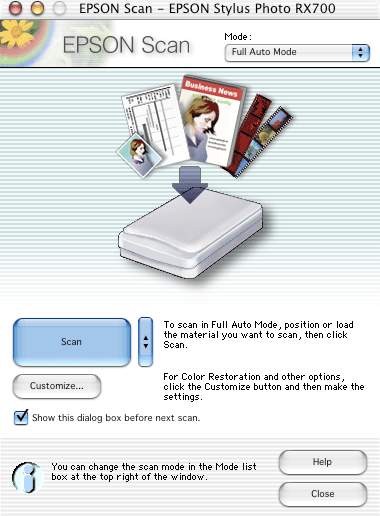
The EPSON Scan screen opens on your computer:
| |
Select the desired Mode and any Customize options, if necessary. Then click Scan. The File Save Setting screen appears: |
| |
Select where you want to save the file on your computer, then click OK. Your document is scanned. |
| |
When scanning completes, close the EPSON Scan application. |
| |
To send the image by email, open the Macintosh Mail application. |
| Note: |
|
After Mail opens, click New (OS 10.3) or Compose (OS 10.2). Create a message, then click Attach to add the scanned image file to your message.
 Previous |
| Version NPD1043-00, Copyright © 2005, SEIKO EPSON CORPORATION |
