![]()
Reference
Guide
|
|
Index |
|
Search |
|
Glossary | |||||
|
|
TOC |
|
Help |
|
||||||
|
|
|
|||||||||||||||||||||||||||||||||
How To / Replacing Ink Cartridges
Using the printer's control panel
Follow the instructions in this section to replace an ink cartridge using the printer's control panel or the Status Monitor utility.
The printer's indicator lights will inform you when it is time to obtain a replacement ink cartridge and when it is time to replace an empty cartridge.
| Note: |
|
If you need to replace an ink cartridge while the |
The following table describes the status of the lights on your printer and the actions that you need to take.
|
Light |
Action |
|
|
Obtain a replacement black ink cartridge (T019201, US; T019311, Canada). |
|
|
Replace the empty black ink cartridge. |
|
|
Obtain a replacement color ink cartridge (T020201, US; T020311, Canada). |
|
|
Replace the empty color ink cartridge. |
| Warning: |
|
|
| Caution: |
|
|
| Note: |
|
|
To replace an ink cartridge using the printer's control panel, follow the steps below.
| Note: |
|
You can also replace an ink cartridge from your computer using the Status Monitor. Click the Replace Ink Cartridge button in the Status Monitor's Printer Status window, then follow the on-screen instructions. |
|
|
Make sure that the printer is on. The |
|
|
Determine which cartridge needs to be replaced as indicated by the |
|
|
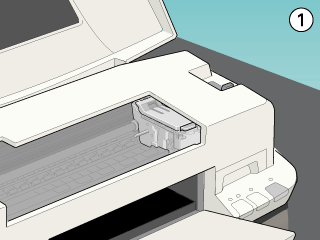
Lower the output tray at the front of the printer, then open the printer cover. |
|
|
Hold down the |
| Caution: |
|
Do not move the print head by hand as this may damage the printer. Always press the |
| Note: |
|
If you press the |
|
|
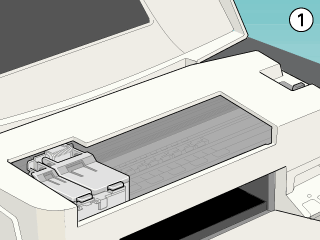
Lift the ink cartridge clamp for the cartridge that you want to replace as far as it will go. The cartridge rises partly out of the cartridge holder. Lift the cartridge out of the printer and dispose of it properly. Do not take the used cartridge apart or try to refill it. |
| Warning: |
|
If ink gets on your skin, wash it thoroughly with soap and water. If ink gets in your eyes, flush them immediately with water. If discomfort or vision problems remain after a through flushing, see a doctor immediately. |
| Caution: |
|
Do not open the ink cartridge clamp until you are ready to replace the ink cartridge. Opening the clamp will cause the installed ink cartridge to become unusable, even if ink remains. |
|
|
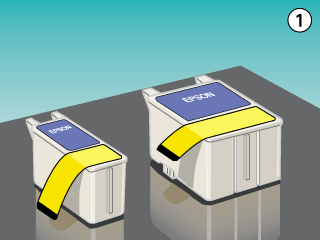
Remove the new ink cartridge from its protective bag. Next, remove only the yellow tape seal from the cartridge. |
| Caution: |
|
|
|
|
|
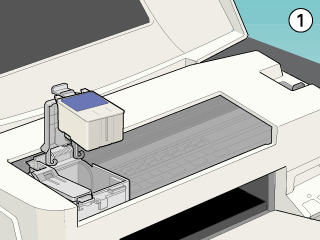
Align the tabs on the ink cartridge so that they are resting on the tabs protruding from the base of the opened ink cartridge clamp. Do not apply excessive force to the cartridge. |
| Caution: |
|
Make sure the ink cartridge tabs are not under the tabs protruding from the base of the opened ink cartridge clamp, as this could damage the clamp. |

| Caution: |
|
Once you install the ink cartridges, do not open their clamps again until you replace the cartridges. Otherwise, the cartridges may become unusable. |
|
|
Make sure that the |

| Caution: |
|
The |
|
|
Close the printer cover. |
You can monitor the remaining ink levels from your computer and view on-screen instructions for replacing a low or empty ink cartridge using the Status Monitor utility.
When an ink cartridge is low or empty, click the How to button in the EPSON Status Monitor window. The print head moves to the ink cartridge replacement position. Follow the on-screen instructions to replace the cartridge.
For more information on using EPSON Status Monitor, see Using EPSON Status Monitor 3 (Windows) or Using EPSON StatusMonitor (Macintosh).
| Copyright © SEIKO EPSON CORPORATION 2000, ALL RIGHTS RESERVED |