If print quality has declined and the nozzle check pattern indicates clogged nozzles, you can clean the print head.
Note:
You cannot clean the print head if an ink cartridge is expended, and may not be able to clean it when a cartridge is low. You must replace the cartridge first.
You cannot clean the print head if an ink cartridge is expended, and may not be able to clean it when a cartridge is low. You must replace the cartridge first.
You can clean the print head using your product’s control panel or your software. See these sections below:
|
1.
|
Load a few sheets of plain paper in cassette 1.
|
|
2.
|
|
3.
|

|
4.
|
Press OK.
|
|
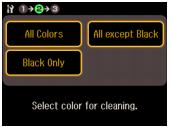
5.
|
Select the option corresponding to the nozzles that are clogged (All Colors, All except Black, or Black Only).
|
The cleaning cycle can take up to 2 1/2 minutes.
|
6.
|
|
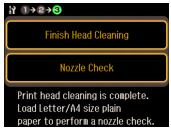
7.
|
If the printout looks good, select Finish Nozzle Check to finish; if not, select Head Cleaning and run another cleaning cycle.
|
You may need to clean the print head up to 4 times. You can also turn off your product and wait at least 6 hours. Then try printing again.
Note:
If you do not use your product often, it is a good idea to print a few pages at least once a month to maintain good print quality.
If you do not use your product often, it is a good idea to print a few pages at least once a month to maintain good print quality.
|
1.
|
Load a few sheets of plain paper in the paper cassette.
|
|
2.
|
Windows:
Right-click the |
Macintosh:
Open the Applications folder, open the Epson Software folder, and select Epson Printer Utility 4. Then select Head Cleaning.
Open the Applications folder, open the Epson Software folder, and select Epson Printer Utility 4. Then select Head Cleaning.

|
3.
|
|
4.
|
When the cleaning cycle is finished, you can check to see if the nozzles are clean. Click Print Nozzle Check Pattern and click Print.
|

|
6.
|
If there are no gaps, click Finish.
|
If there are gaps or the pattern is faint, click Clean to clean the print head again.
You may need to clean the print head up to 4 times. You can also turn off your product and wait at least 6 hours. Then try printing a nozzle check and cleaning again if necessary.