You can view
a slide show of the photos on your memory card and select
individual photos for printing.
- Press the
 home button, if
necessary.
home button, if
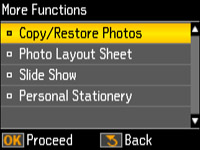
necessary. - Press the left or right arrow buttons to select More Functions and press the OK button.
- Press the up or down arrow buttons to select Slide Show and press the OK button. The first photo on your memory card is displayed:
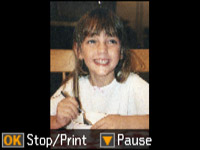
- The LCD screen scrolls through your photos and displays each photo on the memory card. Press the down arrow to pause the slide show. Press the down arrow again to resume the slide show.
- Press OK to select a photo to print.
- Press the + or – buttons to select one or more copies of the photo (up to 99).
- To view additional photos and select others for printing,
press the arrow buttons and repeat the selections above.
Note: Once you select a photo for printing, you cannot restart the slide show. You must manually browse the photos if you wish to select more than one photo for printing.
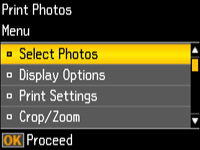
- To select print settings for the photos, press the down arrow button. You see this screen:
- Do one of the following:
- To change the selected photos and number of copies to print, select Select Photos, press the OK button, and select the necessary settings.
- To change the display setting for the LCD screen, select Display Options, press the OK button, and select the setting you want.
- To change the print settings, select Print Settings, press the OK button, and select the necessary settings.
- To crop or
zoom into your photo, select Crop/Zoom, press the OK button, and press
the + or
– buttons
to adjust the image area or the home button to rotate the crop
area.
- When you are ready to print, press the
 start button.