|

User's Guide
|
|
Installing Options
Memory Module
 Installing a memory module
Removing a memory module
 |
Caution:
|
 | |
Do not remove the memory module in the white slot. This module contains important system information. When upgrading memory, install modules only in the two gray slots.
|
|
By installing a Dual In-line Memory Module (DIMM), you can increase product memory up to 576 MB. You may need to add memory if you are having difficulty printing large documents.
 |
Note:
|
| |
This product has three memory slots. Two slots each have a 64 MB memory module already installed, for a total of 128 MB of memory.
|
|
Installing a memory module
Follow these steps to install a memory module:
 |
Warning:
|
| |
Be careful when working inside the product as some components are sharp and may cause injury.
|
|
|
Caution:
|
| |
Before you install a memory module, be sure to discharge any static electricity by touching a grounded piece of metal. Otherwise, you may damage static-sensitive components.
|
|
 |
Turn the product off and unplug the power cord and USB cable.
|
 |
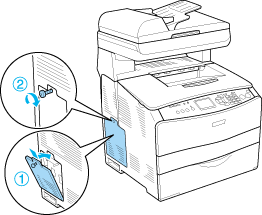
Remove the option cover on the product's left side by removing the screw from the cover.
|

 |
Identify the memory slot(s).
|
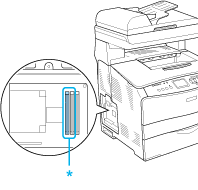
* Gray memory slots
| |
Caution:
|
| | |
Do not remove the module installed in the white slot. This module contains important system information.
|
|
| |
Note:
|
| | |
When installing one memory module, install it in the open gray slot. When installing two memory modules, you must remove the original 64 MB DIMM from the gray slot, then install the two new modules in the gray slots.
|
|
 |
Insert the memory module into a gray slot until the clip locks. Make sure that the white (front) slot has a module at all times.
|

| |
Caution:
|
| | -
Do not force the memory module into the slot.
|
|
| | -
Be sure to insert the memory module facing the correct way.
|
|
| | -
You should not remove any modules from the circuit board. Otherwise, the product will not work.
|
|
 |
Reattach the option cover with the screw as shown below.
|
 |
Reconnect the USB cable and power cord, and turn the product on.
|

| |
Note for Windows users:
|
| | |
If EPSON Status Monitor 3 is not installed, you have to specify settings in the printer driver. See Making Optional Settings.
|
|
| |
Note for Macintosh users:
|
| | |
When you have attached or removed product options, you need to delete the product using Print Setup Utility (for Mac OS X 10.3 or 10.4) or Print Center (for Mac OS X 10.2), and then re-register the product.
|
|

[Top]
Removing a memory module
|
Caution:
|
| |
Before you remove a memory module, be sure to discharge any static electricity by touching a grounded piece of metal. Otherwise, you may damage static-sensitive components.
|
|
|
Warning:
|
| |
Be careful when working inside the product as some components are sharp and may cause injury.
|
|
Perform the installation procedure in reverse.
When removing a memory module from its slot, press the clip and pull out the memory module as shown below.

[Top]
| Version 1.00E, Copyright © 2003, SEIKO EPSON CORPORATION |

