Setting Up Network Printing
These sections tell you how to set up PictureMate so that other computers on a network can print to it.
Note: These instructions are for small network users only. If you are on a large network and would like to share PictureMate, consult your network administrator.
Windows XP and 2000
First, you need to set up PictureMate as a shared printer on the computer that it is directly connected to. Then, you must install the PictureMate software on each computer that will access it through the network.
Note: To install software programs in Windows 2000, it is necessary to log on as a user with administrative privileges (a user who belongs to the Administrators group).
To install software programs in Windows XP, it is necessary to log on with a Computer Administrator account. You cannot install software programs if you log on as a Limited account user. After you install Windows XP, the user account is set as a Computer Administrator account.
The examples shown in the following instructions pertain to Windows XP, but similar screens appear in Windows 2000.
Setting Up a Shared Printer
Follow these steps to configure your computer to share PictureMate with other computers on a network.
- Click Start > Control Panel or Start > Settings > Control Panel, then click Printers and Other Hardware or Printers and Faxes.
- Right-click the icon for the PictureMate, then click Sharing.
- Select Shared as or Share this printer, then type a name for the shared printer.
Note: Do not use spaces or hyphens in the shared printer name.
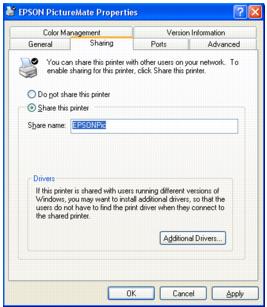
If you want Windows XP or 2000 to automatically download printer drivers to computers that are running different versions of Windows, click Additional Drivers and select the environment and the operating systems for the other computers. Click OK, then insert the PictureMate software CD into the CD-ROM drive. Select the folder for Windows Me or 98. Click OK to install the additional drivers.
- Click OK, or click Close if you installed additional drivers.
Accessing a Network Printer
Follow these steps to print to PictureMate from other computers on a network.
Note: PictureMate must be set up as a shared resource on the computer to which it is directly connected before you can access it from another computer. For instructions, see Setting Up a Shared Printer.
- Click Start > Control Panel or Start > Settings > Control Panel, then click Printers and Other Hardware or Printers and Faxes.
- Double-click the Add Printer icon. The Add Printer Wizard opens.
- Click Next.
- Select Network printer, then click Next.
- On the next screen, click Next.
- Double-click the icon of the computer that is directly connected to PictureMate. Then, click the icon for PictureMate.
- Click Next and follow the on-screen instructions.
Note: Depending on the operating system and the configuration of the computer to which PictureMate is connected, the Add Printer Wizard may prompt you to install the printer driver from the PictureMate software CD. In this case, click the Have Disk button and follow the on-screen instructions.
Windows Me and 98SE
First, you need to set up PictureMate as a shared printer on the computer that it is directly connected to. Then, you must install the PictureMate software on each computer that will access it through the network.
Setting Up a Shared Printer
Follow these steps to configure your computer to share PictureMate with other computers on a network.
- Click Start > Settings > Control Panel.
- Double-click the Network icon.
- Click the File and Print Sharing button.
- Select the I want to be able to allow others to print to my printer(s) check box and click OK.
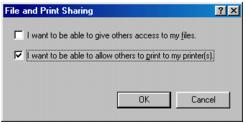
- In the Network window, click OK.
Note: If a message appears asking you to insert the Windows Me or 98 CD-ROM, insert the CD into the CD-ROM drive and follow the on-screen instructions.
If you see a message asking you to restart your computer, restart it and continue with step 6.
- In the Control Panel, double-click the Printers icon.
- Right-click the icon for PictureMate and click Sharing.
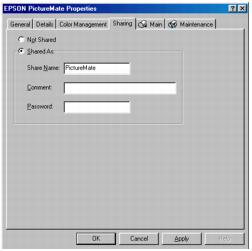
- Click the Share As button.
- Type a name for the shared printer, then click OK.
Accessing a Networked Printer
Follow these steps below to print to PictureMate from other computers on a network.
Note: PictureMate must be set up as a shared resource on the computer to which it is directly connected before you can access it from another computer. For instructions, see Setting Up a Shared Printer.
- Click Start > Settings > Printers.
- Double-click the Add Printer icon. The Add Printer Wizard opens.
- Click Next.
- Select Network printer, then click Next.
- On the next screen, click Browse.
- Double-click the icon of the computer that is directly connected to PictureMate. Then, click the icon for PictureMate.
- Click OK and follow the on-screen instructions.
Macintosh OS X
This section tells you how to set up PictureMate so that you can print to it on a network. By setting up PictureMate as a shared printer, it can be used by other computers.
First, you need to set up PictureMate as a shared printer on the Macintosh that it is directly connected to. Then, you must choose the shared PictureMate in the Page Setup and Print menus when you print your photos.
Setting Up a Shared Printer
To share PictureMate with other Mac OS X computers on a network, follow these steps to configure the computer that it is directly connected to:
- Turn on PictureMate.
- Select System Preferences from the dock at the bottom of the screen.
- Click the
 Sharing icon.
 - Click the checkbox next to Printer Sharing, then close System Preferences.
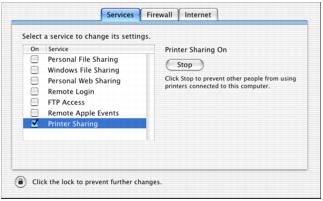
Note: To share your printer with Windows, click the Windows File Sharing checkbox. See your Mac Help and Windows documentation for more information.
Accessing a Networked Printer
Follow the steps in this section to access PictureMate from other Macintosh OS X computers on the network.
- Turn on PictureMate.
- Print as you normally would, choosing PictureMate from the Shared Printers list that appears in the Page Setup and Print menus.