|

Reference Guide
|
|
Using the Multi Photo Feeder
Installing the Multi Photo Feeder
 Removing
the Multi Photo Feeder
 |
Note:
|
 | -
Before you install the Multi Photo Feeder, make sure the scanner is placed on a stable surface.
|
|
 |
- While the Multi Photo Feeder is connected,
you cannot scan an image using the document table. To scan using
the document table, See Removing
the Multi Photo Feeder.
|
|
 |
Make sure your scanner is turned off.
|
 |
Disconnect the cover cable from the scanner.
|

 |
Open the scanner cover. |

 |
Pull the scanner cover straight up to remove it. |
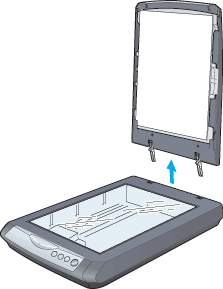
 |  |
Note:
|
 |  |
| Store the scanner cover in the stand that came
with the Multi Photo Feeder. Don't let the reflective document mat
touch the stand. |
|
 |
Place the Multi Photo Feeder on the scanner and fit the tabs on its sides
into the semicircles on the sides of the document table. |

 |
Connect the Multi Photo Feeder cable to the scanner's Option port. |
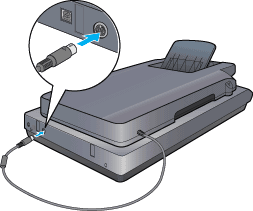
 |
Connect the power cord to the scanner to turn it on. |
Removing
the Multi Photo Feeder
While the Multi Photo Feeder is connected, you cannot scan
an image using the document table. To scan using the document table, follow
these steps to remove the Multi Photo Feeder.
 |
Close EPSON Scan if it is open.
|
 |
Unplug the scanner to turn it off. |
 |
Disconnect the Multi Photo Feeder cable from the scanner's Option port.
|
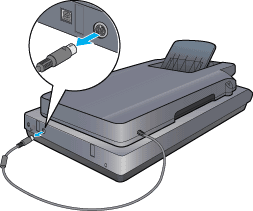
 |
Lift the Multi Photo Feeder straight up and off of the scanner. |
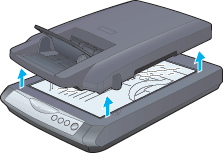
 |
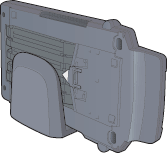
Place the Multi Photo Feeder in its stand as shown below. |
 |  |
Note:
|
 |  |
| Don't let the plastic triangle on the paper
path guide touch the stand. |
|
 |
Replace the scanner cover as shown below. |

 |
Close the scanner cover. |

[Top]
| Version 1.00E, Copyright © 2001, SEIKO EPSON CORPORATION |
![]()
Removing the Multi Photo Feeder


