|

Reference Guide
|
|
How To / Replacing Ink Cartridges
Ink Change System
 Replacing an ink cartridge
Setting the ink cartridge information
This printer uses 7 ink cartridges that are packaged with the printer. Also, you can use the Matte Black ink cartidge (Option: T0348) instead of the Photo Black ink cartridge for printing on matte paper. It also makes the printing blacker and sharper when you print on plain paper. Change the ink cartridge depending on your purpose. To replace the ink cartridge, refer to the Replacing an Empty Ink Cartridge section above.
Possible ink combination.
|
|
|
Ink Setting Position (from the left)
|
|
|
Recommended paper
|
1
|
2
|
3
|
4
|
5
|
6
|
7
|
|
1
|
All kinds of paper
|
Photo Black
|
Light black
|
Cyan
|
Light Cyan
|
Magenta
|
Light Magenta
|
Yellow
|
|
2
|
Plain Paper/ Premium/ Bright White Paper/ Enhanced Matte Paper/ Watercolor Paper-Radiant White/ Velvet Fine Art Paper/
|
Matte Black
|
 |
Note:
|
 |
The availability of special media varies by location.
|
 |
Caution:
|
| -
Do not install the ink cartridges in combination not listed above.
|
| -
Only the first ink cartridge from the left side can be changed.
|

Replacing an ink cartridge
|
Note:
|
|
Replace the ink cartridges only when it is necessary. After replacing the ink cartridge, the printer consumes some ink from all the colors to clean the print head.
|
Here is how to replace the photo black ink cartridge with the matte black ink cartridge as an example.
|
Caution:
|
|
Do not remove the cartridge from the printer until you are ready to replace it with the other one.
|
 |
Make sure that the printer is on. The  power light should be on, but not flashing. power light should be on, but not flashing.
|
 |
Lower the output tray, then open the printer cover.
|
 |
Press the  ink button. The print head will move to the ink cartridge replacement position, and the power light will begin to flash. ink button. The print head will move to the ink cartridge replacement position, and the power light will begin to flash.
|
| |
Note:
|
| |
Do not press the ink button over three seconds. Otherwise the printer starts cleaning the print head.
|

| |
Caution:
|
| |
Do not move or force the print head by hand, as this may damage the printer. Always press the ink button to move the print head.
|
 |
Open the cartridge cover. Pinch the sides of the photo black ink cartridge that is on the left side, lift the cartridge out of the printer.
|

|  |
Warning:
|
| |
If ink should come into direct contact with your skin, wash the area thoroughly with soap and water. If ink should come into direct contact with your eyes, flush them immediately with water. If you should feel discomfort or if vision is impaired, see a doctor immediately.
|
 |
Place the matte black ink cartridge vertically into the cartridge holder. Push the ink cartridge down until it clicks into place. Do not apply excessive force to the cartridge.
|

| |
Caution:
|
| | -
Be careful not to break the hooks on the side of the ink cartridge when you remove it from the package.
|
| | -
Do not remove or tear the label on the cartridge; otherwise, ink will leak.
|
| | -
Do not touch the green IC chip on the side of the cartridge. This can damage the ink cartridge.
|

| | -
Whenever an ink cartridge is removed, be sure to protect the ink supply area from dirt and dust. Store the ink cartridge in the same environment as the printer. When storing the cartridge, be sure that it stands as shown in the illustration below (the label that identifies the color of the ink cartridge should be displayed on the top of the cartridge). Although the valve of the ink supply port is designed to prevent spills and contamination, special care is recommended. Do not touch the ink supply port or its surrounding area.
|
| | -
Be sure to always install an ink cartridge into the printer immediately following the removal of the current ink cartridge. If the ink cartridge is not installed promptly, the print head may dry out rendering it unable to print.
|
 |
When you are finished replacing the cartridges, close the cartridge cover and the printer cover.
|
 |
Press the ink button. The print head will move and the ink delivery system will begin to charge. The ink lights start flashing. Ink charging takes up to one and a half minutes to complete, depending on the ink cartridge changed.
|
When the ink charging process is finished, the printer returns the print head to its home position, the power light stops flashing and remains on.

| |
Note:
|
| |
After replacing an ink cartridge using the ink change system, it takes about thirty seconds for the printer to become ready to print. During this time, the printer is performing an automatic head cleaning.
|

[Top]
Setting the ink cartridge information
After replacing an ink cartridge, make sure the driver setting for the ink cartridge is correct.
For Windows users
|
|
For Windows Me, 2000, and 98 users, click Start, point to Settings, then click Printers.
|
For Windows XP users, click Start, then click Control Panel, then click Printers and Other Hardware. Then click Printers and Faxes.
|
|
For Windows Me and 98 users, select your printer, then click Properties on the File menu. For Windows XP and 2000 users, select your printer, then click Printing Preferences on the File menu.
|
|
|
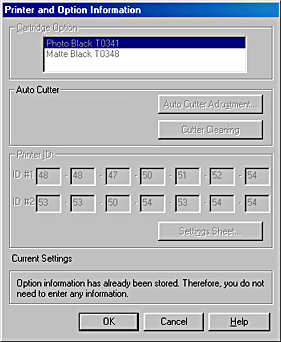
Click the Utility tab, then click the Printer and Option Information button.
|

|
|
Confirm if the appropriate ink cartridge is selected.
|
For Macintosh users
Choose Chooser from the Apple menu and click the icon for your printer. The driver setting for the ink cartridge will be updated.

[Top]
| Version 1.00E, Copyright © 2001, SEIKO EPSON CORPORATION |

