If you have
a WPS-enabled wireless router that supports PIN mode, you can use
Wi-Fi Protected Setup (WPS) PIN mode to connect your scanner to the
network.
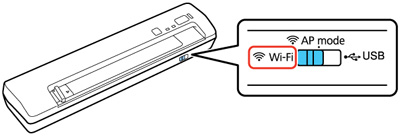
- Make sure the scanner is turned off and set the connection mode switch on the scanner to the AP mode position.
- Press and hold the Connect button as you press the
 power button to turn on the
scanner. Release the Connect button
when the ready and
power button to turn on the
scanner. Release the Connect button
when the ready and  Wi-Fi lights flash
alternately.
The scanner enters WPS discovery mode for two minutes.
Wi-Fi lights flash
alternately.
The scanner enters WPS discovery mode for two minutes. - Enter
the PIN code 01234565 into the WPS
PIN number setting in the router firmware within two
minutes.
Note: If you do not enter the code within 2 minutes, repeat steps 1 to 4.The ready and Wi-Fi lights on the scanner stay on,
indicating that the scanner is connected to the network.
- Set the connection mode switch on the scanner to the Wi-Fi position.
- Press the power button to turn on the
scanner. When the ready and Wi-Fi lights on the scanner stay on,
the scanner is connected to the network.