You can
adjust the angle of the Touch Unit to detect the position of your
fingers.
Note: These
instructions require that the Touch Unit is mounted and connected
according to the Installation Guide provided with your
projector or projector mount.
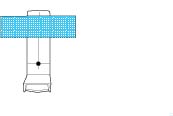
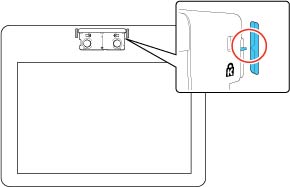
- Loosen the screw at the bottom of the Touch Unit.
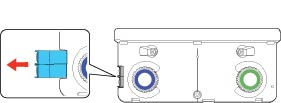
- Remove the dial cover from the Touch Unit.
- Remove the markers from inside the Touch Unit.
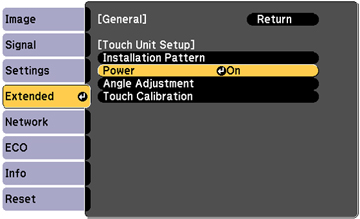
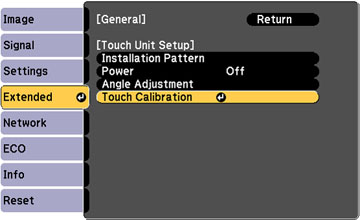
- Select Easy Interactive Function from the Extended menu.
- Select Touch Unit Setup.
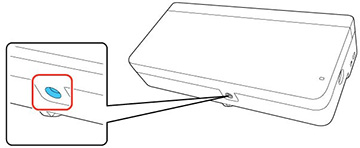
- Make sure Power is set to On.
The Touch Unit power turns on and the indicator light turns blue.
Warning: Do not look into the projector's projection window or the Touch Unit's laser diffusion ports (located on the back of the Touch Unit); this could cause injury to eyesight.
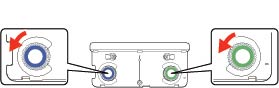
- Select Angle Adjustment. The Angle Adjustment screen is displayed.
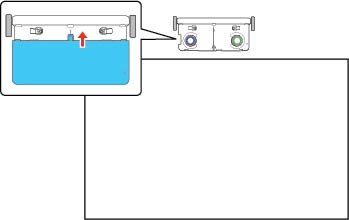
- Turn the adjustment dials on the Touch
Unit counterclockwise until you hear a click. Press the
 button on the remote control.
Note: Make sure to stop turning the dials when you hear the click.
button on the remote control.
Note: Make sure to stop turning the dials when you hear the click. - Attach
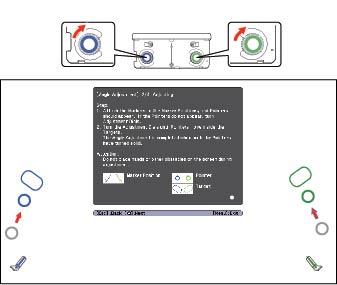
the two markers you removed from the Touch Unit to the marker
positions shown on the projected screen (
 ) (
) (  ).
). - Match the positions so that the
crosses (A) overlap with the points (B) on the marker positions (
) ( ). Move the marker over the
projected cross until the lines of the cross align with the lines
on the marker.
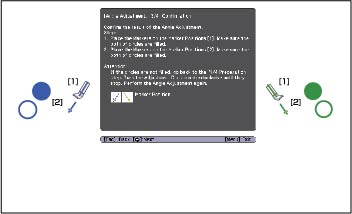
- When pointers (
 ) (
) (  ) with the same color (blue and green)
as the marker positions are displayed on the left and right of the
projection surface, attach the markers to the projection surface as
follows:
) with the same color (blue and green)
as the marker positions are displayed on the left and right of the
projection surface, attach the markers to the projection surface as
follows:
- For magnetic screens: Place the bottom of the markers on the screen.
- For non-magnetic screens: Use the supplied tape to secure the markets. Attach the tape so that each end of the marker is secure on the screen.
Incorrect position:
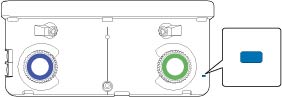
Note: Do not place anything other than the markers near the projected image during angle adjustment. If other objects are on the projected image, angle adjustment may not be performed correctly. - Turn the adjustment dials on the Touch
Unit to move the pointers so that they move inside of the target of
the same color (blue and green) on either side. Turning an
adjustment dial clockwise moves the pointer diagonally up towards
the center of the projected image.
Turning an adjustment dial counterclockwise moves the pointer diagonally down away from the center of the projected image.
When the pointers are inside the target, the colors become solid ( ) (
) (  )
Note: If a dial makes a clicking sounds, the pointer will not move any further. When turning the dials, make sure the shadows from your arm or body do not cover the markers.
)
Note: If a dial makes a clicking sounds, the pointer will not move any further. When turning the dials, make sure the shadows from your arm or body do not cover the markers. - When the pointers on the left and
right become solid colors, press the button on the remote control.
The next adjustment screen is displayed.
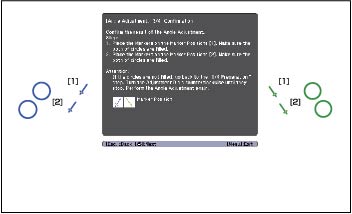
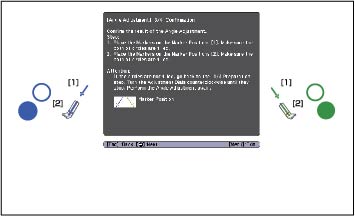
- Place the markers at the top marker
positions [1]. When angle adjustment is performed correctly, the
upper pointers become solid colors. If the upper pointers do not
become solid colors, start again from step 9.
- Place the markers at the bottom marker
positions [2]. When angle adjustment is performed correctly, the
bottom pointers become solid colors. If the bottom pointers do not
become solid colors, start again from step 9.
- When you have finished checking the
marker positions, remove the markets and press the button on the remote control.
The following confirmation screen is displayed:
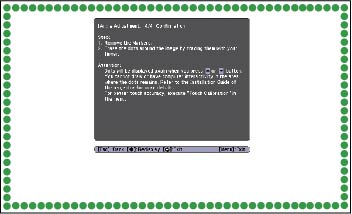
- Trace the dots with your finger as
shown. When angle adjustment is performed correctly, the traced
dots disappear.
Note: Finger touch operations may not function correctly if you are wearing bandages, artificial nails, nail polish, or anything else that may obstruct your fingers.
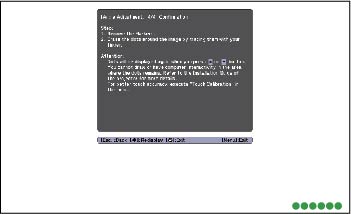
- When all of the dots have disappeared,
press the press the button on the remote control and go to
the next step. If any dots remain (as shown below), do the
following:
- Remove any obstacles from around the projected screen. When you are finished, press the up or down arrow button on the remote control and repeat step 19.
- If the dots still remain after removing obstacles, turn the adjustment dials about a quarter turn counterclockwise. Press the up or down arrow button on the remote control and repeat step 19.
- If the dots still remain or there are obstacles that cannot be removed, such as whiteboard trays or frames, go to step 21.
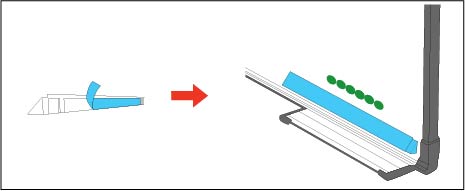
- If there is an obstacle that cannot be
removed such as a whiteboard tray or frame, remove the tape from
the back of the supplied infrared deflectors and stick them to the
screen so that the laser is not reflected by the obstacle.
Make sure to stick the deflectors between the dots and the obstacle
and adjust the number of deflectors according to the number of
dots.
Note: Do not remove an infrared deflector once is has been stuck in place. Do not stick tape or place anything on the infrared deflectors. The deflectors will not function properly if anything is placed on them.
- Perform touch calibration by pressing the Menu button on the remote control. On the Extended menu, select Easy Interactive Function, then select Touch Unit Setup. Select Touch Calibration and follow the instructions.
- After you have finished touch calibration, store the markers inside the Touch Unit.
- Attach the supplied labels to the tabs on either side of the Touch Unit. Match the center of the labels with the tabs on the Touch Unit. If the Touch Unit moves out of position, use the position of the labels to determine where to reposition the Touch Unit.
- Attach the dial cover. Make sure to tighten the screw at the bottom of the cover.