You can
clean the print head using a utility on your Windows or Mac
computer.
Load a
few sheets of plain paper in the product.
Do one
of the following:
Windows: Access the Windows Desktop and
right-click the product icon in the Windows taskbar.
OS X: In the Apple menu or the Dock, select
System Preferences. Select
Print & Fax, Print & Scan, or Printers & Scanners, select your
product, and select Options &
Supplies. Select Utility and
select Open Printer Utility.
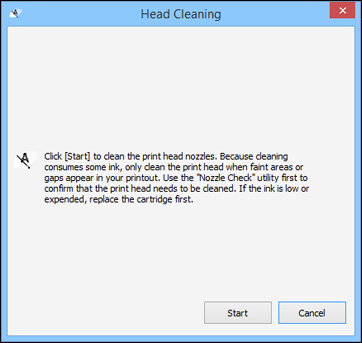
Select
Head Cleaning. You see a
window like this:
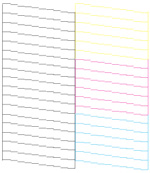
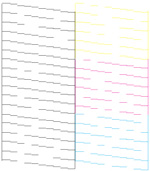
Click
Start to begin the cleaning
cycle.
Caution:
Never turn off the product or open the inner
cover during a cleaning cycle or you may not be able to
print.
When the cleaning cycle is finished, you can check to
see if the nozzles are clean; click Print
Nozzle Check Pattern and click Print.
Check
the printed pattern to see if there are gaps in the lines.
Print head is clean
Print head needs cleaning
If there are
no gaps, click Finish.
If there are
gaps or the pattern is faint, click Clean to clean the print head again.
If you
don’t see any improvement after cleaning the print head up to 2
times, turn off the product and wait at least 6 hours. Then check
the print head nozzles and try cleaning the print head again, if
necessary. If quality still does not improve, one of the ink
cartridges may be old or damaged and needs to be
replaced.