- Press
the
 home button, if
necessary.
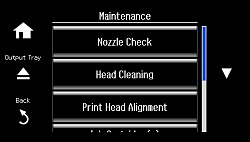
home button, if
necessary. - Select Maintenance.
- Select Head Cleaning.
- Press
the
 Start button to clean the print head. You
see a message on the LCD screen during the cleaning cycle.
Caution:Never turn off the product during a cleaning cycle or you may damage it.When the cleaning cycle is finished, you see a message on the display screen.
Start button to clean the print head. You
see a message on the LCD screen during the cleaning cycle.
Caution:Never turn off the product during a cleaning cycle or you may damage it.When the cleaning cycle is finished, you see a message on the display screen. - Select
Print Nozzle Check Pattern, then
press the Start button to run a nozzle check and
confirm that the print head is clean.