If you have
a WPS-enabled wireless router, you can use Wi-Fi Protected Setup
(WPS) to connect your scanner to the network
(ES-300W/ES-300WR). Make sure you have
installed your scanner software as described on your scanner
Start Here sheet.
Note: For best
results, re-install your scanner software and follow the on-screen
instructions to connect to a network.
- Set the connection mode switch on the
scanner to the
 Wi-Fi position.
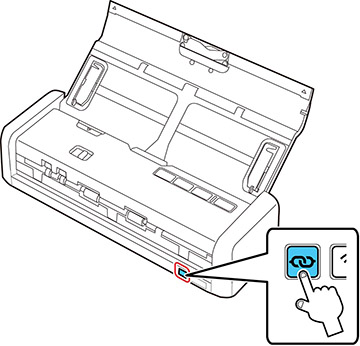
- Press and hold the
 Wi-Fi connect button on the scanner
for at least 3 seconds, then release it when the ready
and Wi-Fi lights flash
alternately.
Note: If you do not complete this step within 2 minutes, repeat steps to try again.When the ready and Wi-Fi lights on the scanner stay on,
the scanner is connected to the network.
Wi-Fi connect button on the scanner
for at least 3 seconds, then release it when the ready
and Wi-Fi lights flash
alternately.
Note: If you do not complete this step within 2 minutes, repeat steps to try again.When the ready and Wi-Fi lights on the scanner stay on,
the scanner is connected to the network.