Aligning the Print Head

If your printouts are grainy or blurry and contain vertical lines or faint text, you can realign the print head for each platen size and each ink color.
  1. If the platen is not in the forward position, press the  moveable base button to move it forward.
  2. Make sure that spacers a and b are installed.


  3. Make sure that the medium-size (standard) platen is installed.
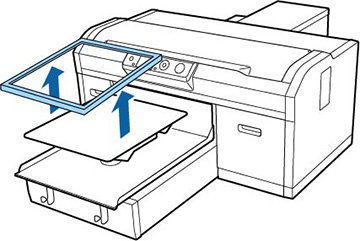
  4. Remove the platen frame.


  5. Place one sheet of A4- or letter-size plain paper on the center of the platen or grip pad. Secure the corners with tape.


  6. Set the height adjustment lever to the 1 position.


  7. Press the right arrow button on the control panel to display the menu.
  8. Press the up or down arrow button to highlight Printer Setup, and press the right arrow button to select it.
  9. Press the right arrow button to select Head Alignment.
  10. Press the up or down arrow button to highlight the medium size platen, and press the right arrow button to select it.
  11. Press the OK button.
  12. Press the OK button again. The check pattern is printed.
    Note: The check pattern is printed at the same size as the top surface of the parallel adjustment plate.
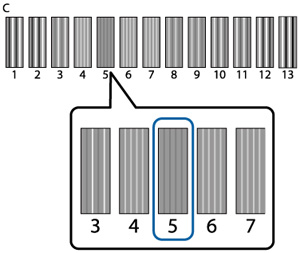
  13. Look at the printed check pattern, and choose the pattern number with the least amount of white space between the lines. For example, in the image here, 5 is the best pattern.


  14. When C is displayed on the control panel, press the up or down arrow button to select the best pattern number, and press the OK button. If there is no optimum number in the check pattern, select 1 or 13 (whichever is better), and perform Head Alignment again.
  15. Select the best pattern number for each of the ink colors and press the OK button when you are finished. You return to the Ready screen.
  16. Perform an offset head alignment to further fine-tune adjustments.
Related tasks
Adjusting the Height of the Platen
Fine-tuning Print Head Alignment
Related information
Loading a T-shirt