- Do one of the following:
- Windows: Access the Windows
Desktop and right-click the
 icon for your product in the right
side of the Windows taskbar, or click the up arrow and right-click
.
icon for your product in the right
side of the Windows taskbar, or click the up arrow and right-click
. - Mac: In the Apple menu or the Dock, select System Preferences. Select Print & Fax, Print & Scan, or Printers & Scanners, select your product, and select Options & Supplies. Select Utility and select Open Printer Utility.
- Windows: Access the Windows
Desktop and right-click the
- Select Print Head Cleaning. You see a window like this:
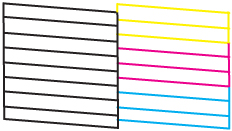
- Check the printed pattern to see if
there are gaps in the lines.
Print head is clean
Print head needs cleaning
Print head needs Power Cleaning
- If there are no gaps, click Finish.
- If there are gaps or the pattern is faint, click Clean to clean the print head again.
- If almost the entire pattern is missing, click Finish and perform a Power Cleaning.


If you don’t see any improvement after cleaning the print head up to 3 times, turn off the product and wait at least 12 hours. Then check the print head nozzles and try cleaning the print head again. If quality still does not improve, run a Power Cleaning. If there is still no improvement, contact Epson support.