You can
access Web Config from your browser using HTTP or HTTPS.
By default, you access Web Config for the first time using HTTP.
If you continue to use HTTP, Web Config will not display all
available menus.
- Determine the product's IP address. On
the product control panel, select Settings > Network
Settings > Network Status.
Then select the active connection method (Wired LAN/Wi-Fi Status or Wi-Fi Direct Status).
- Start
your web browser and make sure JavaScript is enabled.
- Type the product IP address into the
browser as follows, depending on the protocol you are using:
- IPv4: http://product IP address
- IPv6: http://[product IP address]/
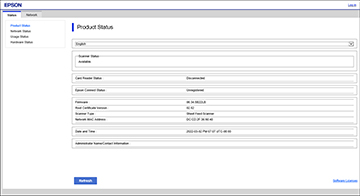
The Status page appears:
- If you see a warning about the
self-signed certificate, ignore the warning and continue to the
product IP address. See your browser help for details.
Note: You can
disable the HTTPS requirement, update the self-signed certificate,
or import a CA (Certificate Authority) certificate to remove the
warning message. See the links below for more information.
- To change scanner settings, you need
to log in as a Web Config administrator. Click Log in at the top-right of the screen. Enter the
User Name and Current password, then click OK.
The default values for the Web Config administrator
information are as follows:
- User name: none (blank)
- Password: If there is a
"PASSWORD" label attached to the back of the product, enter the
8-digit number shown on the label. If there is no "PASSWORD" label
attached, enter the serial number on the label attached to the back
of the product.
Note:
If
Log out is displayed at the
top-right of the screen, you are already logged in as an
administrator. You will be logged out automatically after
approximately 20 minutes of inactivity.
To access Web Config after
configuring HTTPS, enter https:// before the product IP address,
shown in step 3.
Note: If the
product name is registered with the DNS server, you can use the
product name instead of the product IP address to access Web
Config.