You
can select input sources and other frequently used options from the
Home screen.
To display the Home screen, do one of the
following:
Press
the Home button on the
control panel or remote control.
Turn
on the projector with the Home Screen
Auto Disp setting enabled.
Turn
on the projector when no signal is received from the selected input
source.
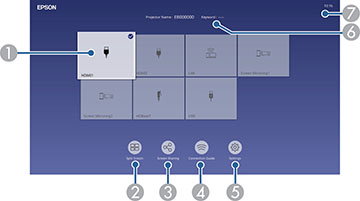
Press the arrow buttons on the remote control
or control panel to navigate the screen, and press Enter to select an option.
1
Selects the source you
want to project
A checkmark appears in the upper right corner of the
current input source. For most sources, a preview of the input
image appears as a thumbnail.
2
Projects images from two or four
input sources simultaneously in a grid format
3
Shares your
projected image with other projectors connected to the same
network
4
Displays the Connection Guide
You can view steps for different wireless connection
methods depending on the devices you are using, such as smartphones
or computers.
5
Lets you select the following
common projector settings (these settings may vary depending on
other selected settings):
Color Mode
Brightness Level
Volume
Geometry
Correction (Quick Corner
is available)
Aspect
Install Again
6
Displays the projector name and
the projector keyword
7
Displays the current time
Note: The
Home screen closes after 10 minutes of inactivity.
Note: The
Geometry Correction setting is
only displayed when Fixed
Installation is set to Off
and Geometry Correction is set to
Quick Corner in the projector's
Installation menu.