Aligning the Print Head

If your printouts are grainy or blurry and contain vertical lines or faint text, you can realign the print head for each platen size and each ink color.
Note: Before making any adjustments, select the registered media setting number you wish to save the settings to. Redo the adjustments if you change the Platen Gap setting to Manual.
  1. If the platen is not in the forward position, press the  moveable base button to move it forward.
  2. Make sure the platen and media you want to make adjustments for are loaded.
  3. Confirm the currently selected media settings on the printer's LCD screen.
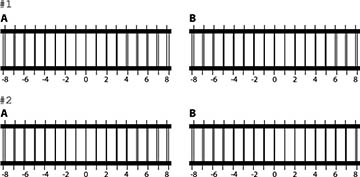
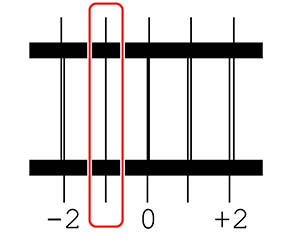
    Note: If you want to save the adjustments to a different media setting, select Media on the screen, and then select Current Settings > Media. Select the media setting you wish to save the adjustments to and then select the  home icon.
  4. Select Media on the screen and then select Print Adjustments > Print Head Alignment.
  5. Select either Standard or Micro Adjust and then do one of the following:
    • If you selected Standard, go to the next step.
    • If you selected Micro Adjust, go to step 8.
  6. Select the items to adjust according to the color of the media being used and then select Start. The check pattern is printed.
  7. Look at each printed check pattern, and choose the number that corresponds to the thinnest line.
    Note: You may see more than one row of patterns.


    For example, in the image here, -1 is the best line.


  8. Do one of the following:
    • If you selected Standard, input the adjustment values for all of the lines you selected and then select OK. A confirmation screen appears.
    • If you are selected Micro Adjust, input values from +10 to -10. We recommend first setting both adjustment values to +1 and -1 and then printing. Make further adjustments based on the value that improved image quality.
  9. If you selected Standard, check the results and select OK to save the adjustments to the media setting.
If image quality has not improved after making adjustments, do one of the following:

Otherwise, you can try printing the with Uni-Directional (Low Speed) setting enabled in Garment Creator 2. You can also repeat printing or print a job from a USB memory stick and select Uni-Directional as the Head Move Direction setting from the printer's preview screen.

Related tasks
Changing the Platen Height
Registering and Using Media Settings
Related information
Loading a T-shirt