You see a
message on the LCD screen when it is time to clean the encoder
strip (carriage scale).
Note: If you
continue to use the printer without cleaning the encoder strip, the
printer may not read the print area accurately and print quality
may decline.
- Press the
 moveable base button to move the
platen into the printer to the maintenance position.
Caution:Do not manually move the platen; otherwise, a malfunction may occur.
moveable base button to move the
platen into the printer to the maintenance position.
Caution:Do not manually move the platen; otherwise, a malfunction may occur. - Pour about 0.15 ounce (5 ml) of ink cleaner into the cup supplied with the maintenance kit, and then let it soak into a wipe. Squeeze the wipe gently.
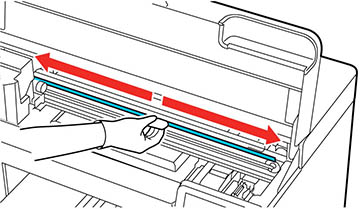
- Wipe off
any ink stains on the front and back, as shown. Gently squeeze the
center of the encoder strip between the wipe and wipe in each
direction about two to three times. Wipe to the left edge just
before the print head carriage. Wipe to the right edge up to just
before where the encoder strip becomes transparent.
Note: You do not need to clean the sections covered by the print head.Caution:
- Make sure that ink cleaning solution does not drip into the printer. If any cleaning solution does drip, wipe it with a dry cleaning wipe.
- Do not touch the carriage shaft. Doing so may cause a malfunction or failure to occur. Do not use anything other than a clean wipe.
a Carriage shaft (do not touch) Caution: