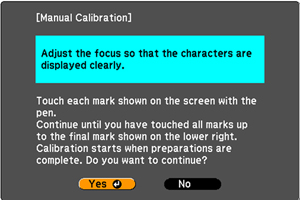
Calibrating Manually

If the cursor location and pen position do not match after auto calibration, you can calibrate manually.
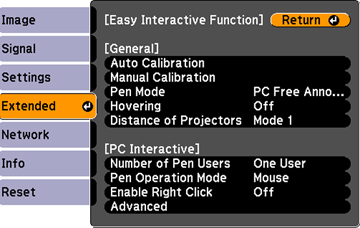
  1. Press the Menu button, select the Extended menu, and press Enter.


  2. Select the Easy Interactive Function setting and press Enter.


  3. Select Manual Calibration and press Enter.


  4. Adjust the focus if necessary, by turning the focus ring.
  5. Press Enter to select Yes. A flashing green circle appears in the upper left corner of your projected image.
  6. Touch the center of the circle with the tip of the pen. The circle disappears, and you see another circle below the first one.


    Note: For the most accurate calibration, make sure you touch the center of the circle.


  7. Touch the center of the next circle, then repeat. When you get to the bottom of the column, the next circle appears at the top of a new column.
    Note: Make sure you are not blocking the signal between the pen and the interactive receiver.

    If you make a mistake, press the Esc button on the remote control to go back to the previous circle. To restart the calibration process, press and hold the Esc button for 2 seconds.

  8. Continue until all of the circles disappear.