|

User's Guide
|
|
Faxing (Fax Model Only)
Registering Recipients
 Using the EPSON Speed Dial Utility (for Windows only)
Using the Setup menu on the control panel
When sending faxes using the speed dial or one-touch dial function, you need to register the recipient information in advance. You can register recipients either from EPSON Speed Dial Utility or the Setup menu on the control panel.
 |
Caution:
|
 | |
While using a fax function such as sending/receiving fax or making fax settings in Setup mode, do not use EPSON Speed Dial Utility to change a recipient.
|
|
 |
Note:
|
| -
When registering multiple recipient fax numbers on the product as a group, only EPSON Speed Dial Utility is available. For details, see online help.
|
|
| -
Registering a recipient name is only available using EPSON Speed Dial Utility. For details, see online help.
|
|
Using the EPSON Speed Dial Utility (for Windows only)
Installing EPSON Speed Dial Utility
|
Note:
|
| |
For Windows 2000 and XP, you need the administrative privileges to install the software.
|
|
Follow the steps below to install EPSON Speed Dial Utility.
 |
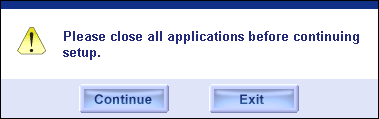
Make sure that the product is off and Windows is running on your computer.
|
 |
Insert the software CD in the CD-ROM drive.
|
 |
Click Continue. Then follow the on-screen instructions.
|
 |
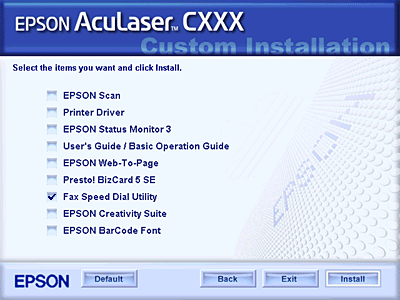
When the following screen appears, click Custom.
|

 |
Select the Fax Speed Dial utility check box, then click Install.
|
 |
Then follow the on-screen instructions.
|
 |
When the installation is complete, click Exit.
|

Accessing EPSON Speed Dial Utility
|
Caution:
|
| -
When accessing EPSON Speed Dial Utility, the product must be in Print mode. If the product is in other than Print mode, such as in Copy mode, communication with EPSON Speed Dial Utility is not available.
|
|
| -
While uploading or downloading speed dial data between your computer and the product, jobs cannot be printed and faxes cannot be transmitted or received.
|
|
Follow the steps below to access EPSON Speed Dial Utility.
|
|
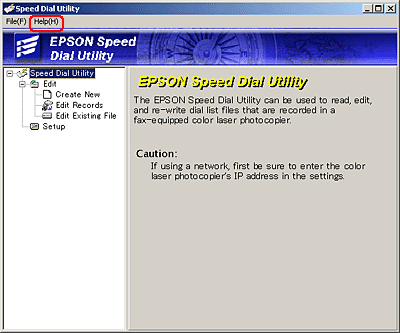
Click Start, point to All Programs (Windows XP) or Programs (Windows Me, 98, or 2000), EPSON Speed Dial Utility, and then click Speed Dial Utility.
|
EPSON Speed Dial Utility window appears.
For using EPSON Speed Dial Utility, see the software online help.

[Top]
Using the Setup menu on the control panel
You can register, change, or delete a recipient number for one-touch dial or speed dial on the control panel.
|
Note:
|
| |
When registering multiple recipient fax numbers on the product as a group, only EPSON Speed Dial Utility is available. For details, see online help.
|
|
For Speed dial
Registering recipients
You can register up to 60 recipients in the speed dial list.
|
|
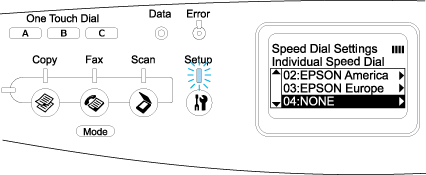
Make sure the product is turned on, and then press the  Setup button. Setup button.
|
The Setup light is lit and the Setup menu appears in the LCD panel.
|
|
Press the  Down button twice to select Fax Settings, then press the Down button twice to select Fax Settings, then press the  Right button. Right button.
|
The Fax Settings menu appears.
|
|
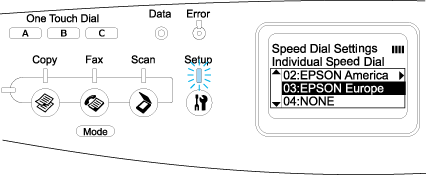
Press the  Up or Down button several times until Speed Dial Settings appears, then press the Right button. Up or Down button several times until Speed Dial Settings appears, then press the Right button.
|
|
|
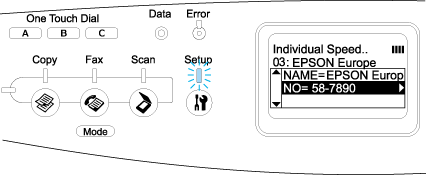
Make sure that Individual Speed Dial is selected, and then press the Right button.
|
The Speed dial list appears.
|
|
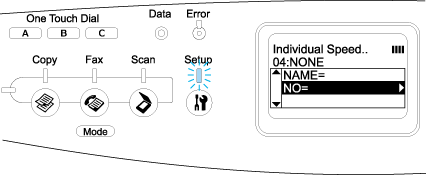
Press the Up or Down button several times to select the number displayed as NONE, and then press the Right button.
|
|
|
Press the Down button to select NO=, and then press the Right button.
|
| |
Note:
|
| | |
To register a recipient name to the speed dial, use EPSON Speed Dial Utility. For details, see online help.
|
|
|
|
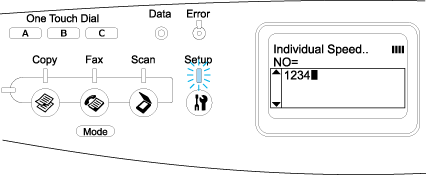
Enter the phone number you want to register, and then press the Right button.
|
| |
Note:
|
| |
To correct a number while entering it, use the  Left button to back one character or the Left button to back one character or the  Reset button to delete. Reset button to delete.
|
|
The registered speed dial is added to the speed dial list.
To change or delete a registered recipient in the speed-dial list, see Changing recipients or Deleting recipients.
Changing recipients
You can change recipient registered to another one in the speed dial list.
|
|
Make sure the product is turned on, and then press the Setup button.
|
The Setup light is lit and the Setup menu appears in the LCD panel.
|
|
Press the Down button twice to select Fax Settings, then press the Right button.
|
The Fax Settings menu appears.
|
|
Press the Up or Down button several times until Speed Dial Settings appears, then press the Right button.
|
|
|
Make sure that Individual Speed Dial is selected, and then press the Right button.
|
The Speed dial list appears.
|
|
Press the Up or Down button several times to select the recipient you want to change, and then press the Right button.
|

|
|
Make sure that Change is selected, and then press the Right button.
|
|
|
Press the Down button to select NO=, and then press the Right button.
|
| |
Note:
|
| | |
When registering a recipient name to the speed dial, use EPSON Speed Dial Utility. For details, see online help.
|
|
 |
Enter the phone number you want to register, and then press the Right button.
|

| |
Note:
|
| | |
To correct a number while entering it, use the Left button or the Reset button.
|
|
The registered speed dial is changed to the new one on the speed dial list.
Deleting recipients
You can delete registered recipients in the speed dial list.
|
|
Make sure the product is turned on, and then press the Setup button.
|
The Setup light is lit and the Setup menu appears in the LCD panel.
|
|
Press the Down button twice to select Fax Settings, then press the Right button.
|
The Fax Settings menu appears.
|
|
Press the Up or Down button several times until Speed Dial Settings appears, then press the Right button.
|
|
|
Make sure that Individual Speed Dial is selected, and then press the Right button.
|
The speed dial list appears.
| |
Note:
|
| | |
To clear all recipients that are registered in the speed-dial list, select Clear Speed Dial and press the Right button.
|
|
|
|
Press the Up or Down button several times to select the recipient you want to delete, and then press the Right button.
|
|
|
Press the Down button to select Delete, and then press the Right button.
|
|
|
Press the Down button to select Yes for confirmation, and then press the Right button.
|
The registered recipient in the speed-dial list is deleted.
For One-touch dial
Assigning recipients
You can assign recipients from the registered speed dial list for the One Touch Dial button A, B, or C.
|
|
Make sure the product is turned on, and then press the Setup button.
|
The Setup light is lit and the Setup menu appears in the LCD panel.
|
|
Press the Down button twice to select Fax Settings, then press the Right button.
|
The Fax Settings menu appears.
|
|
Press the Up or Down button several times until Speed Dial Settings appears, then press the Right button.
|
|
|
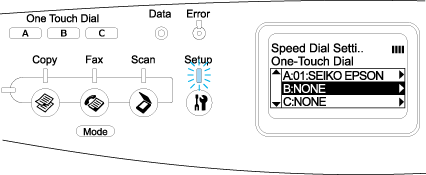
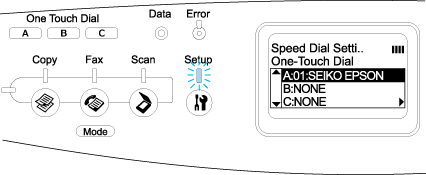
Press the Down button to select One-Touch Dial, and then press the Right button.
|
The One-Touch Dial list appears.
|
|
Press the Down button to select one-touch dial A, B, or C displayed as NONE, and then press the Right button.
|
|
|
Press the Down button to select a recipient you want to assign for the One Touch Dial, and then press the Right button.
|
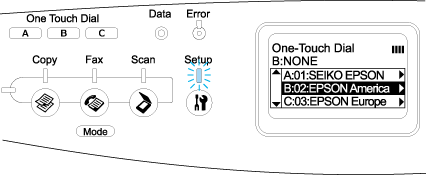
The selected recipient is assigned for the One Touch Dial A, B, or C.
To change or delete a recipient assigned for the one-touch dial, see Reassigning recipients or Deleting recipients.
Reassigning recipients
You can reassign recipients from the registered speed dial list for the One Touch Dial button A, B, or C.
|
|
Make sure the product is turned on, and then press the Setup button.
|
The Setup light is lit and the Setup menu appears in the LCD panel.
|
|
Press the Down button twice to select Fax Settings, then press the Right button.
|
The Fax Settings menu appears.
|
|
Press the Up or Down button several times until Speed Dial Settings is selected, then press the Right button.
|
|
|
Press the Down button to select One-Touch Dial, and then press the Right button.
|
The One-Touch Dial list appears.
|
|
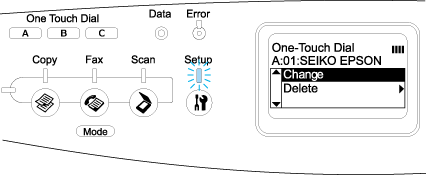
Press the Down button to select one-touch dial A, B, or C you want to change a recipient, and then press the Right button.
|

|
|
Make sure that Change is selected, and then press the Right button.
|
|
|
Press the Down button to select the number you want to reassign for the One Touch Dial button, and then press the Right button.
|
The selected recipient is assigned to the corresponding One Touch Dial button, then it is displayed in the one-touch dial list.
Deleting recipients
You can delete recipients from the assigned One Touch Dial button A, B, or C.
|
|
Make sure the product is turned on, and then press the Setup button.
|
The Setup light is lit and the Setup menu appears in the LCD panel.
|
|
Press the Down button twice to select Fax Settings, then press the Right button.
|
The Fax Settings menu appears.
|
|
Press the Up or Down button several times until Speed Dial Settings appears, then press the Right button.
|
|
|
Press the Down button to select One-Touch Dial, and then press the Right button.
|
The One-Touch Dial menu appears.
|
|
Press the Down button to select the One Touch Dial button A, B, or C, and then press the Right button.
|
|
|
Press the Down button to select Delete, and then press the Right button.
|
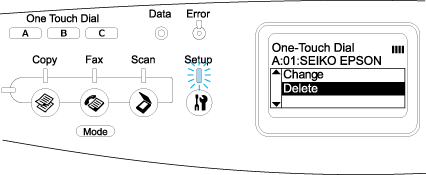
|
|
Press the Down button to select Yes for confirmation, and then press the Right button.
|
The recipient assigned for the one-touch dial is deleted.
[Top]
| Version 1.00E, Copyright © 2003, SEIKO EPSON CORPORATION |
