![]()
User's Guide
| Index | Help | Safety | ||||||||
| Contents | Glossary |
|
||||||||
|
|
|
|||||||||||||||||||||||||||||||||
Maintenance / Replacing Consumable Products
Handling precautions
Changing a low toner cartridge
Removing and replacing an empty toner cartridge
Always observe the following handling precautions when replacing the consumable products:
| Warning: |
|
|
|
|
 |
Make sure the CX11N is turned on, then press the  Setup button. Setup button.
|
The Setup light is lit and the LCD screen displays Setup Mode for a few seconds, then changes to the Setup menu screen.
 |
Use the  Up or Up or  Down button to select Printer settings, then press the Down button to select Printer settings, then press the  Right button. Right button.
|
 |
Use the  Up or Up or  Down button to select Reset Menu, then press the Down button to select Reset Menu, then press the  Right button. Right button.
|
 |
Use the  Up or Up or  Down button to select Change Toner C/M/Y/K for the color of the toner cartridge you want to change, then press the Down button to select Change Toner C/M/Y/K for the color of the toner cartridge you want to change, then press the  Right button. Right button.
|
 | Continue with the steps in the next section to remove and replace the toner cartridge. |
 | Make sure the CX11N is turned on. |
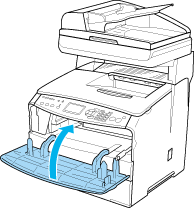
 | Check the color of the toner cartridge to be replaced in the LCD panel, and then open cover A. |
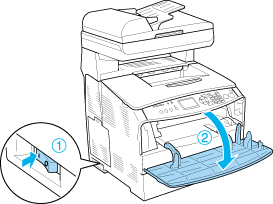
 | Push up the right lever to unlock the toner cartridge. |

 | Remove the toner cartridge from the product. |
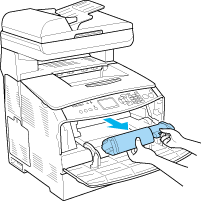
 | Take the new toner cartridge out of its package and gently shake the toner cartridge as shown below. |

 | Hold the tag and gently pull the toner seal upward and remove it. |

 | Insert the cartridge all the way until it stops securely with the arrow mark on the top of the toner cartridge facing toward cover A. |
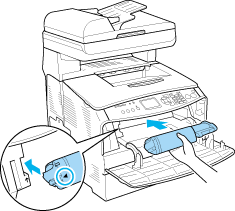
 | Push down the right lever to lock the toner cartridge. |
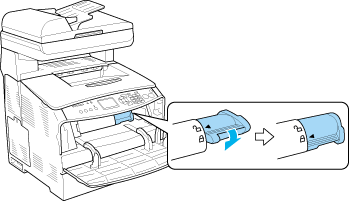
| Note: |
|
 | Close cover A. |
 | Confirm the error message in the LCD panel. When another toner cartridge needs to be replaced, an error message is displayed. Repeat steps 2 to 9 to replace the cartridge. |
 Previous |
 Next |
| Version 1.00E, Copyright © 2003, SEIKO EPSON CORPORATION |