Stand-Alone Copying
Basic Copying
- Open the scanner lid.
- Place your document face-down on the glass, in the corner shown below. Move your document about 0.1 inch from the top and side edge so your entire document is scanned.

- Close the scanner lid.
- The default copy settings are displayed on the control panel. Change any necessary copy settings, as described in Changing Copy Settings.
- Press the Color Copy button (for color copies) or B&W Copy button (for black and white copies). Your document is scanned and then printed. If you're using the 2-up Copy Mode setting (see Type of Copies), repeat these steps for your second page.
Note: Your copied image size may not be the exact same size as your original.
Changing Copy Settings
The current copy settings are shown on the LCD screen. You can change copy settings using the control panel, as described below.
When you finish changing a setting, press the Stop button.
Note: To clear a setting, press the Reset button. To clear all the setting changes you've made, press and hold the Reset button for at least 3 seconds.
If you'll be changing the Copy mode setting (as described in Type of Copies), select your Copy mode before selecting any other copy settings.
Number of Copies
Press the + or - Copies buttons. (If you're using the 2-up Copy Mode setting (see Type of Copies), you can't select the number of copies.)
Paper Size
Press a Menu button until you see Paper size on the LCD screen. Then press the + or - Value buttons to select the size of the paper you loaded, either Letter, 4 × 6, 5 × 7, or A4 (8.3 × 11.7 inches).
Lighten or Darken
Press a Menu button until you see Lighter/Darker on the LCD screen. Then press the + or - Value buttons to lighten or darken your copies.
Type of Copies
Note: The Copy mode settings determine the options available with other settings on the control panel. Not all of the other options described here are available with every Copy mode setting.
Press a Menu button until you see Copy mode on the LCD screen. Then press the + or - Value buttons to select one of these copy modes:
|
Copy mode
|
Results
|
|
Standard Margins
Copies your original with an 0.55-inch margin at the bottom of the page
|
|
|
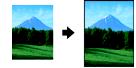
Border Free
Sizes your original as necessary to fit to the edges of your paper*
|
|
|
Small Margins
Copies your original with only an 0.05-inch border around the edges*
|
|
|
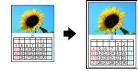
Mirror
Inverts your original horizontally for printing on transfer paper
|
|
|
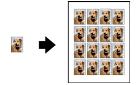
Repeat
Copies an image multiple times on one sheet
(Works best with originals that are business-card-size or smaller)
|
|
|
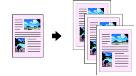
2-up
Copies two originals onto one sheet
|
|
|
Minimize Margins
Copies your original with only an 0.1-inch border around the edges*
|
|
* If you notice reduced print quality at the bottom of your copy, try using the Standard Margins setting.
Copy Quality
Press a Menu button until you see Quality&Paper on the LCD screen. Then press the + or - Value buttons to select a print quality appropriate for your document and the paper you loaded.
|
Quality&Paper setting
|
Use when you've loaded. . .
|
|
Plain Paper-Econ
|
Plain paper or Premium Bright White Paper for quick copying with draft print quality
|
|
Plain Paper-Norm
|
Plain paper or Premium Bright White Paper for text copying with normal print quality
|
|
Plain Paper-Fine
|
Plain paper or Premium Bright White Paper for text and graphics copying with high print quality
|
|
PQIJ Paper-Fine
|
Photo Quality Ink Jet Paper, Cards, or Self-Adhesive sheets for copying with high print quality (also for Plain paper or Premium Bright White Paper for improved image quality)
|
|
PQIJ Paper-Photo
|
Photo Quality Ink Jet Paper, Cards, or Self-Adhesive sheets for copying with photo print quality (also for Plain paper or Premium Bright White Paper for improved image quality)
|
|
Photo Paper
|
Photo Paper, Glossy Photo Paper, Photo Quality Glossy Paper, Glossy Photo Greeting Cards, or All Purpose Glossy Paper
|
|
Premium Glossy
|
Premium Glossy Photo Paper
|
|
Matt Paper HW
|
Matte Paper Heavyweight or Double-Sided Matte Paper
|
Note: Not all of these settings may be available, depending on the current Copy mode setting.
Reduce or Enlarge
Press a Menu button until you see Reduce/Enlarge on the LCD screen. Then press the + or - Value buttons to enlarge or reduce your document to fit on the paper you loaded. Or select Auto Fit Page to have the EPSON Stylus CX3200 automatically determine the necessary reduction or enlargement.
To reduce or enlarge by a precise percentage, press a Menu button until you see Zoom In/Out on the LCD screen. Then press the + or - Value buttons to select a percentage of the scanned image for the resulting print.
Note: If you select Auto Fit Page as the Reduce/Enlarge setting to copy a document with white or very light colored edges, the original size may not be recognized correctly, creating an incorrect size copy. If this occurs, select 100% as the Reduce/Enlarge setting and use the Zoom In/Out setting to adjust the size of your copy.