- Place the document face-down on the glass, in the top, left corner as described in Placing Your Original Document.
- Start your application.
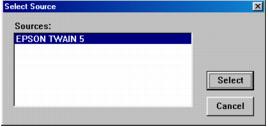
- Windows: Select the scanner source. Open the File menu and choose Select Source, Import, or Acquire.
- Windows: Select the EPSON TWAIN 5 option and click Select or OK.
- Start EPSON TWAIN for scanning. Open the File menu and choose Import or Acquire and if necessary, select TWAIN_32 (Windows) or EPSON TWAIN 5 (Macintosh).
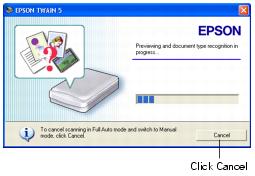
- Click Cancel when you see the following screen.
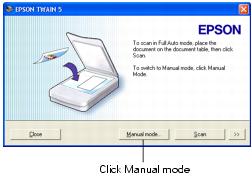
- On the next screen, click the Manual mode button.
- Make sure the Image Type, Destination, and Resolution settings are correct for the type of image you're scanning and the way you'll be printing or viewing it.
- Click the
 Preview button to preview your scanned image.
 - Click the
 Auto Locate button to place a border (or marquee) around your image so only your image is scanned. You can adjust the border as necessary.
 - Click the
 Auto Exposure button to have TWAIN automatically adjust the exposure settings for your image.
 - Make any other changes you want, then click the Scan button. Your image is automatically scanned and optimized.
- If you want to switch back to Full Auto mode, click the Full Auto mode button.
- Click Close to close the EPSON TWAIN 5 window and return to your scanning application screen. Your scanned image appears on the screen so you can modify it, save it, print it, or use it as you like.
Macintosh OS 8.6 to 9.x and OS X: Go to step 5.
![]()
Note: If your computer fails to recognize the EPSON Stylus CX3200, you won't see an EPSON TWAIN 5 option when you try to select a scanner source from your host application. In addition, an error message may appear. If this happens, turn off your computer and the Stylus CX3200, then turn the Stylus CX3200 back on and restart your computer.
![]()
You see the EPSON TWAIN settings dialog box:

Note: For detailed information on TWAIN settings, click the Help button.