Basic Scanning


Placing Your Original Document

  1. Open the scanner lid.
  2. Place your document face-down on the glass, in the corner shown below. Move your document about 0.1 inch from the top and side edge so your entire document is scanned.


  3. Close the scanner lid.
  4. Note: If you place your document against the guides, the edges next to the guides won't be scanned.

    If you need to scan a thick document, such as a book, you can remove the scanner lid to scan. Gently press down the original to keep it flat on the document table. Be sure to replace the scanner lid when you're finished.

Using EPSON Smart Panel

Smart Panel is an easy, step-by-step interface for scanning, copying, printing, and more. You can use it to launch a variety of programs on your computer, as described below, or use it with the EPSON Stylus CX3200 Scan button for automatic scanning and copying, as described in One-Touch Scanning.

For details on using all the Smart Panel features, click the ? button in Smart Panel or see the on-screen Smart Panel User Guide.

Smart Panel features
Description

Scan to Web
Scans an image and uploads it to EPSON's photo-sharing web site.

Photo Print
Scans and prints photos in various sizes and layouts.

Scan for Creativity


Scans a photo into ArcSoftTM PhotoImpressionTM where you can edit, retouch, enhance, and print it with templates, frames, and borders.

Scan to File
Scans an image or document directly to a file on your hard drive.

Copy
Scans and prints an image or document with the power and flexibility of a conventional photocopier.

Scan to OCR
Scans text documents and converts them into editable text files on your computer with great accuracy.

Scan to E-mail
Scans an image or document and attaches it to an e-mail so you can send it right away.

Scan to Application
Scans and image or document and lets you choose which program it launches for handling the scanned file.

Copy to Fax
When you install your own fax software, scans your image or document and faxes it to your chosen destination.

Scanning to a File

You can quickly scan an image or document directly to a file on your hard drive.

Using EPSON Smart Panel (Windows and Mac OS 8.6 to 9.x)

  1. Place the document face-down on the glass, in the top, left corner as described in Placing Your Original Document.
  2. Select the  EPSON Smart Panel icon on your desktop. Or with Windows, click Start > All Programs or Programs > EPSON Smart Panel > EPSON Smart Panel.
  3. You can also press the Scan button on the EPSON Stylus CX3200 control panel to open Smart Panel. (To change the application assigned to the Scan button, see One-Touch Scanning.)

    Note: On a Macintosh, you can also open EPSON Smart Panel by selecting Applications > EPSON > Smart Panel > EPSON Smart Panel.


  4. Click the Scan to File button. Smart Panel starts EPSON TWAIN, which automatically scans your document.


  5. In the following screen, double-click a photo to see an enlarged preview and make sure it scanned properly. To rename the image, click the file name below it and type in a new name.


  6. Click Finish. (Or click Scan More to scan additional images.)


  7. Select a folder and file format, then click Save to save your file to the location you selected. It's ready to open in a compatible image editing program, print, e-mail, or use as you like.
  8. Note: For instructions on scanning with the other Smart Panel options, select Help in the Smart Panel window or open the User Guide in the EPSON Smart Panel program group.

Using EPSON Scan to File in Mac OS X

EPSON Scan to File launches EPSON TWAIN and saves the scanned images to files automatically. It generates sequential file names so you can quickly scan an image with different TWAIN settings and select the one you like the most.

  1. Place the document face-down on the glass, in the top, left corner as described in Placing Your Original Document.
  2. Open your OS X Applications folder, then open the EPSON Scan to File folder.
  3. Double-click the  EPSON Scan to File icon. You see the File Save Settings screen:


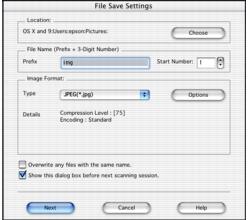
  4. The images you scan are saved to the folder listed in the Location box. To change the folder, click the Choose button and select the folder you want.
  5. The files are named with the prefix img. To change the prefix, enter a different three-character name in the Prefix box.
  6. The files are saved in the JPEG (*.jpg) file format. You can select the TIFF, Multi-TIFF, or PICT format from the Type drop-down menu instead.
  7. Note: For details on the available settings, click the Help button.

  8. Open the File menu and click Select Scanner. You see this window:


  9. Select EPSON TWAIN 5 and click Select. (You only need to perform steps 6 and 7 the first time you run EPSON Scan to File.)
  10. Make sure your image is placed on the document table and the scanner lid is closed.
  11. Click Next on the File Save Settings screen. After a moment, you see this screen:


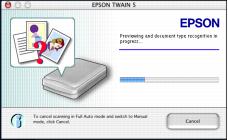
  12. EPSON TWAIN begins scanning your image in Full Auto Mode. Wait for scanning to finish.
  13. To stop the scan and select settings in manual mode, click Cancel. Then click the Manual mode button on the next screen. You see the EPSON TWAIN settings dialog box.

    Note: For detailed information on EPSON TWAIN settings, see Advanced Scanning or click the Help button.

  14. When scanning finishes, EPSON Scan to File saves your file to the location you selected. It's ready to open in a compatible image editing program, print, e-mail, or use as you like.

One-Touch Scanning

You can use your Scan button to automatically scan a photo into an image-editing application, scan a document to convert it into editable text, or scan to e-mail, print, or fax. (Not available with Macintosh OS X.)

The following example explains how to set up the Scan button so you can scan files to e-mail.

  1. Place the document face-down on the glass, in the top, left corner as described in Placing Your Original Document.
  2. Select the  EPSON Smart Panel icon on your desktop. Or with Windows, click Start > All Programs or Programs > EPSON Smart Panel > EPSON Smart Panel.
  3. Note: On a Macintosh, you can also open EPSON Smart Panel by selecting Applications > EPSON > Smart Panel > EPSON Smart Panel.


  4. Select Scan to E-mail in the Scan button start list in the bottom left corner of the Smart Panel window. Then exit Smart Panel.
  5. Press the Scan button on the EPSON Stylus CX3200 control panel.
  6. Smart Panel starts and EPSON TWAIN automatically scans your document.


  7. On the next screen, double-click your document thumbnail to enlarge the preview and make sure it scanned properly. To rename the image, click the file name below it, type in a new name, and click OK. Then click Finish.
  8. On the next screen, select your e-mail program and click the Launch button. Your document is automatically attached to a blank e-mail.


  9. Note: If your e-mail program isn't listed, click the Help button for instructions on adding your e-mail program to the list. For a list of supported programs, see your on-screen Smart Panel User Guide.

  10. Complete your e-mail by entering the address and subject, and adding a message, if you like. Then send your e-mail.
  11. To continue one-touch scanning to e-mail, just press the Scan button and repeat steps 5 through 7. To change the program that opens when you press the Scan button, select a different option in the Scan button start list on the Smart Panel window, as described in step 3.