- Make sure the EPSON Stylus CX3200 is turned on and not printing. The control panel tells you which ink cartridge is low or empty.
- Press a Menu button until you see Change Cartridge, then press the Color Copy button. The ink cartridges move to the replacement position.

- Lift up the scanner.

- Pull up the ink cartridge clamp. (The color cartridge is on the right and the black is on the left.)

- Lift the cartridge out of the EPSON Stylus CX3200 and dispose of it carefully.

- Unwrap the new ink cartridge. Then remove only the yellow tape seal on top.

Caution: You must remove the yellow tape from the top of the cartridge or you will permanently damage it.
Don't touch the green circuit board on the back of the cartridge; you may inhibit normal operation and printing.
- Lower the new cartridge into its holder and rest the tabs on the hooks in the back.

Caution: Don't place the cartridge under the hooks; you may damage the clamp when you close it.
- Press down firmly on the ink cartridge clamp until it snaps in place.

If you need to replace the other ink cartridge, repeat steps 4 through 8 before continuing with step 9.
- Carefully lower the scanner and press it down until it clicks into place. The EPSON Stylus CX3200 begins charging the ink delivery system.
The On light flashes and the EPSON Stylus CX3200 makes noise. Charging takes about 30 seconds. When it's finished, the On light stops flashing and stays on.
Caution: Never turn off the EPSON Stylus CX3200 while the On light is flashing, unless the Stylus CX3200 hasn't moved or made noise for more than 5 minutes.
 icon on the LCD screen to see an approximate indication of the ink level.
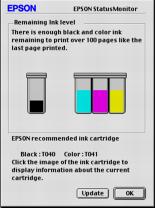
 printer icon in the lower right corner of your screen. If a cartridge is low on ink, you'll see a message in the window that appears on your screen.