Printing With Macintosh OS 8.6 to 9.x
Before you begin, make sure you selected your printer in the Chooser as described on the Start Here sheet.
- From the File menu, select Page Setup. Select the following settings:
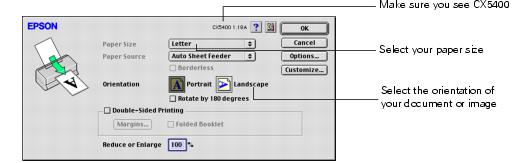
- Click OK to close the Page Setup window.
- From the File menu, select Print. Select the following settings:
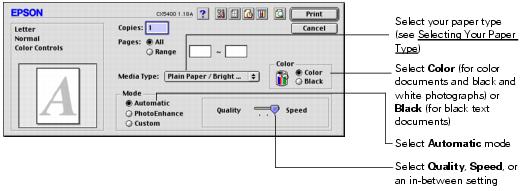
Note: The Quality setting on this screen gives you the best combination of quality and print speed for most prints. For the highest print quality (Photo RPM) on selected papers, click Custom and click the Advanced button. Then see Customizing Print Settings (Mac OS 8.6 to 9.x) for instructions on selecting Photo RPM.
For more information about printer settings, click the ? button.
- You can also do the following:
- Click
 to reduce/enlarge your printed image, print multi-page layouts, or add a watermark.
 - Click
 to control background printing and schedule print jobs.
 - Click
 , then click Preview to preview your printout.
 - Click
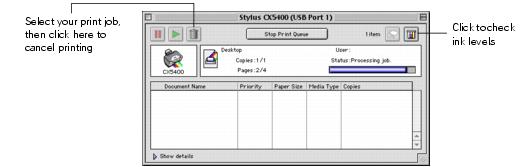
 to check your ink levels.
- Click Print.
- If you turned on background printing, you can select EPSON Monitor IV from the Application menu in the upper right corner of the screen. You see the EPSON Monitor window:
Note: If you're not using background printing and you need to cancel printing, hold down the  key and press the . (period) key.
Customizing Print Settings (Mac OS 8.6 to 9.x)
You can use advanced settings for color matching, printing at a higher resolution, or selecting a variety of special effects and layouts.
- On the printer settings window, click Custom, then click the Custom Settings list to open it.
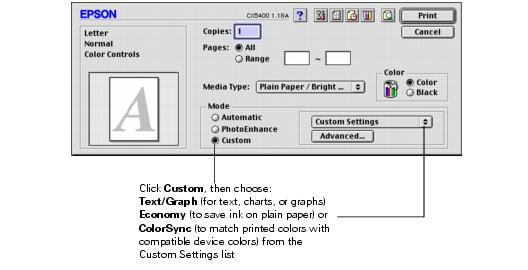
Note: For more information on custom settings, click ?.
- If you're finished selecting custom settings, click Print to print your document.
To select more custom settings, go to step 3.
- To access advanced settings, click Custom, then click Advanced.
- Select these advanced settings as necessary:
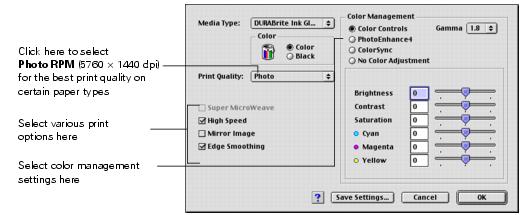
Note: For the highest print quality, select Photo RPM. Please note that printing will take longer in this mode.
For more information on advanced settings, or instructions on saving them as a group so you can reuse them later, click ?.
- Click OK to save your settings, then click Print.
Printing BorderFree Photos (Mac OS 8.6 to 9.x)
You can print your photos with no margins, extending the image all the way to the edges of the page. Although BorderFree printing is a bit slower (especially near the edges), you get beautiful snapshots or enlargements, without trimming.
BorderFree printing supports the following paper types and sizes:
|
EPSON paper name
|
Sizes
|
Menu setting
|
Type or Media Type setting
|
|
Photo Paper or Glossy Photo Paper
|
4 × 6
|
Photo Paper
|
Glossy Photo Paper
|
|
Matte Paper Heavyweight
|
8 × 10
|
Matte Paper HW
|
Matte Paper - Heavyweight
|
|
DURABrite Ink Glossy Photo Paper
|
4 × 6
|
DB Photo Paper
|
DURABrite Ink Glossy Photo Paper
|
Note: For instructions on loading special paper, see Special Papers.
You can print BorderFree photos using the menus and buttons on the Stylus CX or your printer software.
To use the menus and buttons, follow the instructions in Copying Without the Computer and select Border Free as the Copy Mode setting, as described in Changing Copy Settings.
To use your printer software, follow these steps:
- Start your printing application and open your photo file.
- Click File > Page Setup.
- Click the Borderless checkbox, then select your paper size as the Paper Size setting.
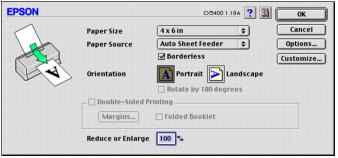
- Select Portrait or Landscape as the Orientation setting.
- Click OK.
- Click File > Print.
- Select your paper type as the Media Type setting.
- Click Print.