|

Reference Guide
|
|
Scanning / Scanning Using Control Panel Functions
Assigning a different application on Windows
You can assign any application, other than EPSON Smart Panel, which supports the Scanner events (for example, Imaging for Windows, as long as it is installed) on Windows to the buttons on the control panel. When you press the buttons on the control panel, EPSON Scan's dialog box opens or scanning starts and the scanned image is automatically sent to the application (which does not need to be opened manually).
Make sure the application supports the Scanner events and then follow the steps.
 |
Note for Macintosh users:
|
 | |
You cannot assign any application other than EPSON Smart Panel to the buttons on the control panel.
|
|
For Windows XP users
 |
Double-click the Scanners and Cameras icon in Control Panel.
|

 |
Right-click this product's icon and select Properties.
|

 |
Select the Events tab.
|

 |
Select a desired button from the Select an event list. Select Start this program and then select the desired application from the list.
|
| |
Note:
|
| | -
If Prompt for which program to run is selected, when the button is pressed, a dialog box appears to prompt you to select an application from the list.
|
|
| | -
Some applications do not support linkage to scanners and digital cameras. Linkage is available only for applications which appear on the list.
|
|
 |
To save your settings, click Apply and then OK.
|
| |
Note:
|
| | |
You need to click Apply whenever you change a button setting.
|
|
If you need to disable the Scanner events, select Take no action in the Properties dialog box.
For Windows Me, 98, and 2000 users
|
Note for Windows 98 and 2000 users:
|
| |
Screen shot for Windows Me is used in this section, so they may differ in appearance from what actually appears on your screen. The instructions are the same.
|
|
|
|
Click Start, point to Settings, and select Control Panel.
|
|
|
Double-click the Scanners and Cameras icon.
|

|
|
For Windows Me users:
Right-click this product's icon and select Properties.
|
For Windows 98 and 2000 users:
Select this product from the installed scanners and cameras list. Click Properties.
|
|
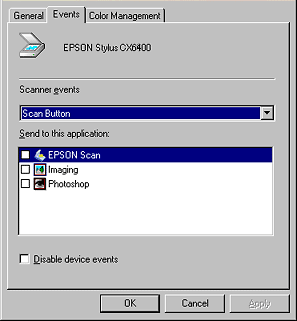
Select the Events tab.
|
|
|
Select a desired button from the Scanner events list and then select the check box of the desired application in the Send to this application list; clear the rest of the check boxes.
|
| |
Note:
|
| | -
If multiple applications are selected, when the button is pressed, a dialog box appears to prompt you to select just one from the list.
|
|
| | -
Some applications do not support linkage to scanners and digital cameras. Linkage is available only with the applications that appear in the Send to this application list.
|
|
 |
To save your settings, click Apply and then OK.
|
| |
Note:
|
| | |
You need to click Apply whenever you change a button setting.
|
|
If you need to disable the Scanner events, select the Disable device events check box in the scanner's Properties dialog box.

[Top]
| Version 1.00E, Copyright © 2001, SEIKO EPSON CORPORATION |