Placing Originals for Scanning
Follow the instructions in this section to position the following types of originals on your Epson Stylus CX7800 for scanning:
Caution:
Do not place heavy objects on the document table glass and do not press the glass with too much force.
Photos and Documents
- Open the document cover and place your original face-down on the glass, in the upper left corner. Move your original about 0.2 inch (5 mm) away from the top and left edges so all of it will be scanned.

- Close the document cover gently so that your original does not move.
Caution:
Never open the document cover beyond where it stops and do not place heavy objects on top of the Epson Stylus CX all-in-one.
Note:
If you are scanning a large or thick document, you can remove the document cover. See Large or Thick Documents for instructions.
To scan your document or photo, see Starting EPSON Scan.
Large or Thick Documents
When you scan a large or thick document, you can lift up the document cover before closing it to give you more room when scanning.
If you need to press the document flat while you copy or scan it, do not press too hard and be careful not to move it.
Caution:
Do not use excessive force on the document cover, and do not twist it diagonally. You may damage the document cover.
Slides and Negatives
You can use the film holder that came with your Epson Stylus CX7800 to scan 35mm slides, or strips of negative and positive film. To get professional results that look and feel like traditional photos, try one of the Epson Special Papers.
Before scanning film or slides, see:
Placing 35mm Slides in the Holder
- Open the document cover and remove the document mat. Pull up on the fastener at the top of the document mat. Then pull out the mat.

- Place the holder's tabs into the two small holes at the left edge of the glass. Make sure the cutouts for 35mm slides are toward the back of the glass to align them with the fluorescent lamp when you close the document cover.

- Place your slides in the film holder in the orientation shown below with the shiny side up.

Note:
Make sure there is no gap between the holder and the document table, otherwise the prints may not be clear.
Placing 35mm Film Strips in the Holder
- Open the document cover and remove the document mat. Pull up on the fastener at the top of the document mat. Then pull out the mat.
- Open the film strip cover.
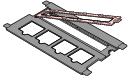
- Slide the strip of film into the holder in the orientation shown below with the shiny side up. (The images should not appear reversed.) Make sure the film slides under the tabs.

- Close the film strip cover. Gently press until it clicks into place.
- Place the holder's tabs into the two small holes at the left edge of the glass. Make sure the film strip is towards the back of the glass to align it with the fluorescent lamp when you close the document cover.

