![]()
Reference Guide
|
|
Index |
|
Help |
|
Safety | |||||
|
|
Contents |
|
Glossary |
|
||||||
|
|
|
|||||||||||||||||||||||||||||||||
Basic Scanning Procedure
Step.1 Turning on the scanner
EPSON Scan provides three modes for you to make any scanning settings: Home Mode, Office Mode, and Professional Mode. This section describes how to scan an image in the Home Mode. The Home Mode lets you scan images using the basic settings. For more details, see Changing a scanning mode.
| Note: |
|
Turn on the scanner by pressing the  Power button. The READY light comes on.

Open the document cover and place a document face down on the document table.

For more details, see the section below.
 | Placing Documents and Photos on the Scanner |
This section shows you how to start EPSON Scan from Photoshop Elements.
| Note for Mac OS X users: |
|
| Note for Mac OS X 10.3 (or later) users: |
|
 | Start Adobe Photoshop Elements. |
Double-click the program icon on your desktop, if it is available, or do one of the following.For Windows® users:
Select
or Start > All Programs or Programs > Adobe Photoshop Elements.
For Macintosh users:
Double-click the Adobe Photoshop Elements folder in Macintosh HD, and then double-click the Photoshop Elements icon.
 | Select Import from the File menu, and then choose your scanner. EPSON Scan starts. |
| Note for Windows Vista and XP users: |
|
 | Specify the Document Type, Image Type, and Destination settings to match the image. |
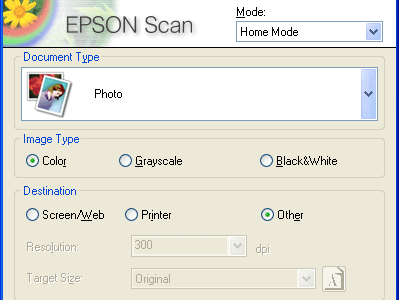
 | Click the Preview button to preview the image. |

 | Use the Target Size setting to specify the output size of the image. |

 | Click Scan. EPSON Scan starts scanning. |
 | The scanned image is sent to Adobe Photoshop Elements. Click Close to close EPSON Scan, if necessary. |
After an image is scanned, be sure to save it using the steps below (using Adobe Photoshop Elements as an example again).
|
| Select Save As from the File menu in Adobe Photoshop Elements. |
|
| Type a file name, select a file format, and then click Save. See the following section for explanation of the file formats. |
The following table lists some common image file formats. Select an appropriate format supported by your image processing application when you save image files.
|
Format (File extension) |
Explanation |
|
BITMAP (*.BMP) |
A standard image file format for Windows. Most Windows applications including word processing applications can read and prepare images in this format. |
|
EPS format (*.EPS) |
A PostScript file format. Most illustration and DTP applications are compatible with EPS. |
|
JPEG (*.JPG) |
A compressed file format. The compression quality can be selected. The JEPG format enables relatively high compression ratio. However, the higher the compression ratio is, the lower the image quality becomes. (Note that the original data cannot be restored.) In addition, the quality deteriorates every time the data is saved. The TIFF format is recommended in cases where modification, retouch and the like are required. |
|
Multi-TIFF (*.TIF) |
A TIFF format where multiple pages are saved to the same file. When you scan documents using the Automatic Document Feeder, they are all stored in the same file. (With other formats, each document is saved in a separate file.) However, to open the Multi-TIFF files, you need an application supporting this format. |
|
PDF (*.PDF) |
A document format that is independent of platforms. To use PDF documents, you need Adobe Acrobat Reader or Acrobat. When you scan documents using the Automatic Document Feeder, multiple pages are saved to a single file. When you save color or grayscale images in PDF, you can select a compression quality. |
|
PICT (*.PCT) |
A standard image file format for Macintosh. Most Macintosh applications including word processing applications can read and prepare images in this format. |
|
PNG format (*.PNG) |
A portable and highly-compressed file format designed for viewing in Web browsing applications, which allows a choice in compression quality. The image quality does not deteriorate when an image file is saved in PNG. |
|
TIFF (*.TIF) |
A file format created for exchanging data among many applications such as graphic and DTP software. When scanning black & white images, you can specify the compression type. |
 Previous |
| Version 1.00E, Copyright © 2003, SEIKO EPSON CORPORATION |